

![]() 愿景:"让编程不再难学,让技术与生活更加有趣"
愿景:"让编程不再难学,让技术与生活更加有趣"
第一章 新版SSM-Springboot2.X-Spring5-Mybatis3专题课程介绍
第1集 新版Springboot2.X-Spring5-Mybatis3专题课程介绍
简介:讲解新版SSM专题课程介绍,课程适合人员和学后水平

课程推出原因
x传统SSM课程:SpringMVC+Spring+Mybatis新版SSM课程:SpringBoot+Spring+Mybatis(零基础讲解到项目实战)SpringBoot2.X当下大部分公司的技术栈,包括微服务等都是基于SpringBoot开发,早在18年我录制了一套SpringBoot2.X零基础到高级教程,里面整合了很多技术中间件,比如 消息队列、分布式缓存等, 观看人次接近100万,如果大家有兴趣,购买本套课程后,另外一个版本的可以免费赠送给你学习!!!我们课程都是有答疑的,所以两年来回复了很多同学的问题,我自己也总结了很多同学遇到的问题在2020年下半年推出了这套全新教程, 并在这套里面都重点强调这些问题,解决了很多坑,所以大家学习这套会顺利很多,也会接触更多知识点。
不要说没有实战!!!! 前面先学怎么用,后续会有项目实战,跟着老师的步骤走,然后再跑

淘汰传统知识点教学,淘汰传统管理系统
- 还在学XXX账单管理系统?? ? 你应该掌握主流互联网项目-电商-在线教育-互联网金融等
- 课程以一个互联网在线教育项目开发,学习SpringBoot2.X-Spring5.X-MyBaits3.X
- 项目效果演示(包括前端+后端+部署上线)
- 学后水平
- 完全掌握SpringBoot-Spring5-Mybatis核心知识(内容太多,大家可以看目录就明白)
- 急速掌握VUE,通往高级全栈工程师!
- 从零开始开发项目,包括数据库设计-后端项目开发-前端项目开发-部署上线
课程技术栈(不要觉得多,全套课程分多个环节,大家按照自己的需求进行学习)
- SpringBoot2.X零基础到高手系列
- Mybatis3.x零基础到高手系列
- Spring5.X零基础到高手系列
- 新版Vue2.X急速入门+ES6语法
- 小滴课堂在线教育系统后端开发
- 小滴课堂在线教育系统前端开发
- 前后端项目部署上线阿里云服务器
适合人员
- 中高级工程师、项目经理更新必备技术栈
- 从传统软件公司过渡到互联网公司的人员
- 全栈工程师
- 想完整开发一套系统包括前端-后端-以及部署上线的同学
学习形式
- 视频讲解 + 文字笔记 + 源码分析 + 交互流程图
- 配套源码 + 笔记 + 答疑
- 只要是我的课程和项目-我会一直维护下去,大家不用担心!!!
- github地址:https://github.com/jackxy/new-ssm
第2集 新版SSM+小滴课堂移动端系统实战+云服务器部署大纲速览
简介:新版SpringBoot-Spring-Mybatis 课程大纲你知道多少
课程知识点概括和学前基础
xxxxxxxxxx(1)SpringBoot2.X+Spring5+Mybaits3.x专题教程学前基础: javaweb+maven(2)全栈综合项目实战开发小滴课堂移动端系统专题教程学前基础:html+js(3) 互联网前后端分离项目,前端-后端部署云服务器专题教程学前基础:linux命令PS:不会上面的基础也没关系,这些基础都有课程,找客服即可
小滴课堂移动端项目实战技术栈
- 后端开发工具和环境:JDK8 + IDEA + Maven3.X
- 后端技术栈:SpringBoot2.X + Spring5 + Mybatis3.X +Mysql +JWT + Guava缓存 + Jmeter5.X压测
- 前端技术栈: VueCli4.3 + Vue2.6 + VueX + Axios + 移动端CUBE-UI框架 + VSCode
- 部署:阿里云CentOS7 + Nginx静态文件服务器 + Nginx部署后端双节点 + 域名配置解析
- 目录大纲
- 课程有配套的源码哈,在每章每集的资料里面,如果自己操作的情况和视频不一样,导入课程代码对比验证基本就可以发现问题了
- 保持谦虚好学、术业有专攻、在校的学生,有些知识掌握也比工作好几年掌握的人厉害
第3集 必备基础-15分钟认识Spring5框架和基本概念
简介:15分钟认识Spring5框架和基本概念
这集为啥什么要学(有spring经验的直接跳过这集)
- 方便照顾没用spring使用经验的同学
- 为springboot课程做准备
什么是注解
- Java注解是附加在代码中的一些元信息,用于一些工具在编译、运行时进行解析和使用,起到说明、配置的功能
- 注解本质上继承 Annotation 接口,我们可以通过反射获取注解的相关信息,从而做些逻辑操作
- springboot里面大量使用了注解,@Controller 、@RestController 、@Service、 @Autowire 等
什么是Spring框架
什么是Spring:轻量级的 DI / IoC 和 AOP 容器的开源框架
bean
有啥好处:
管理创建和组装对象之间的依赖关系, 加了spring注解的类会自动创建一个实例,加到IOC容器里面,然后看哪里需要它,就自动赋值过去
- 使用前:手工创建
xxxxxxxxxxController -> Service -> DaoUserControolerprivate UserService userService = new UserService();- 使用后:Spring创建,自动注入
xxxxxxxxxxController -> Service -> DaoUserControoler@Autowireprivate UserService userService
![]() 愿景:"让编程不再难学,让技术与生活更加有趣"
愿景:"让编程不再难学,让技术与生活更加有趣"
第二章 微服务必备核心-快速入门SpringBoot2.X
第1集 你知道SpringBoot2.X和SpringCloud微服务的关系吗
简介:讲解微服务SpringCloud和SpringBoot的关系
大话微服务
单体应用
开发速度慢
启动时间长
依赖庞大
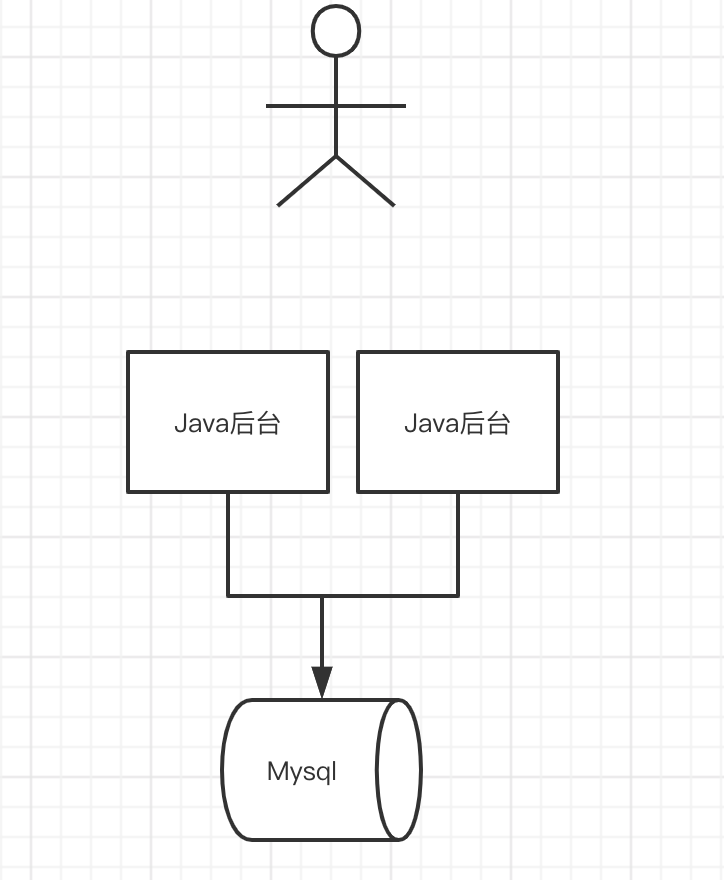
微服务
易开发、理解和维护
独立的部署和启动
问题:
分布式系统-》分布式事务问题
需要管理多个服务-》服务治理
SpringCloud和SpringBoot的关系
- SpringCloud基于SpringBoot
第2集 新版SSM框架-SpringBoot2.X介绍和环境依赖
简介:讲解新版SSM框架之SpringBoot2.X介绍和环境依赖
新版SpringBoot2.X介绍
相关软件环境和作用
JDK1.8+以上
Maven3.5+
编辑器IDEA(旗舰版)
PostMan
翻译神器
第3集 玩转SpringBoot2.X项目创建工具Spring Initializr
简介:使用Spring Initializr创建SpringBoot2.X项目
常见的创建SpringBoot创建方式
本地创建,maven依赖
xxxxxxxxxx<parent><groupId>org.springframework.boot</groupId><artifactId>spring-boot-starter-parent</artifactId><version>2.2.2.RELEASE</version><relativePath/> <!-- lookup parent from repository --></parent><dependencies><dependency><groupId>org.springframework.boot</groupId><artifactId>spring-boot-starter-web</artifactId></dependency><dependency><groupId>org.springframework.boot</groupId><artifactId>spring-boot-starter-test</artifactId><scope>test</scope><exclusions><exclusion><groupId>org.junit.vintage</groupId><artifactId>junit-vintage-engine</artifactId></exclusion></exclusions></dependency></dependencies><build><plugins><plugin><groupId>org.springframework.boot</groupId><artifactId>spring-boot-maven-plugin</artifactId></plugin></plugins></build>
- 在线创建 :https://start.spring.io/
第4集 企业工作或者学习新技术,遇到问题推荐的解决方式
简介:企业工作和学习IT技术,遇到问题常见的解决方式
善于利用搜索引擎
抓住问题核心点,【掌握搜索词提取】
- 百度
- 谷歌
- IT大站,比如CSDN,博客园等
例子:Java自定义异常
学习遇到常见问题和解决办法
资料网站地址失效
- 通过主要入口进行寻找
版本不一致导致失败
- 网站和软件经常更新,大体一致就行,不影响学习
网络导致包下载很慢
- 更好的网络环境,第一次加载都是很慢,需要下载很多包
- 更改Maven仓库地址
按照视频步骤,创建和运行失败
- 导入课程代码运行 -> import project , 从maven项目选择
- 对比课程代码有什么异同和细小遗漏
课程代码导入步骤
IDEA导入课程代码
- 解压课程代码
- 导入IDEA
第5集 新版SpringBoot2.X开发第一个JSON接口
简介:使用新版SpringBoot2.X开发第一个JSON接口
什么是SpringBoot,有什么用
- 一个web开发框架
- Servlet 、SpringMVC
- 简化配置
SpringBoot开发项目常见的交互使用形式
后端接口直接返回页面,现在比较少了
- 常见的传统IT公司比较多,配合模板引擎,由后端页面渲染返回
返回JSON数据,主流场景
- 互联网公司用的比较多,比如微服务接口,前后端分离项目,手机app等,基本都是通过JSON交互
如何使用SpringBoot2.X开发JSON接口
- @RestController注解
- return 一个POJO对象(不能返回字符串)
浏览器如果没安装json格式插件,则返回不会被美化
第6集 前后端分离测试必备工具PostMan接口工具使用
简介:模拟Http接口测试工具PostMan安装和讲解
PostMan工具
- 作用:模拟浏览器请求,拼装参数和格式化json响应结果
- 安装地址:https://www.getpostman.com/
第7集 新版SpringBoot2.X的常用注解你知多少
简介:讲解SpringBoot2.X常用的注解
- @Controller 作用:用于标记这个类是一个控制器,返回页面的时候使用;如果要返回JSON,则需要在接口上使用@ResponseBody才可以
- @RestController 作用:用于标记这个类是一个控制器,返回JSON数据的时候使用,如果使用这个注解,则接口返回数据会被序列化为JSON
- 所以:@RestController = @Controller+@ResponseBody
@RequestMapping 作用:路由映射,用于类上做1级路径;用于某个方法上做子路径
@SpringBootApplication 作用: 用于标记是SringBoot应用,里面包含多个子注解,即
xxxxxxxxxx@SpringBootApplication = @Configuration+@EnableAutoConfiguration+@ComponentScan(下面的目前只需简单理解即可,想深入的同学,后续可以看专门的Spring原理课程深入)@Configuration: 主要标注在某个类上,用于spring扫描注入,一般结合@Bean使用@EnableAutoConfiguration: 启用Spring的自动加载配置,自动载入应用程序所需的所有Bean@ComponentScan:告诉spring扫描包的范围,默认是Applocation类所在的全部子包,可以指定其他包@ComponentScan({"net.xdclass.package1","net.xdclass.package2"})
![]() 愿景:"让编程不再难学,让技术与生活更加有趣"
愿景:"让编程不再难学,让技术与生活更加有趣"
第三章 互联网公司中新版SpringBoot2.X开发规范解读
第1集 新版SpringBoot2.x目录文件结构讲解和静态资源访问
简介:讲解SpringBoot目录文件结构和官方推荐的目录规范、静态资源访问
目录讲解
- src/main/java:存放代码
- src/main/resources
- static: 存放静态文件,比如 css、js、image, (访问方式 http://localhost:8080/js/main.js)
- templates:存放静态页面jsp,html,tpl
- config:存放配置文件,application.properties
- resources:
同个文件的加载顺序,静态资源文件 Spring Boot 默认会挨个从
- META/resources >
- resources >
- static >
- public
里面找是否存在相应的资源,如果有则直接返回,不在默认加载的目录,则找不到
默认配置
- spring.resources.static-locations = classpath:/META-INF/resources/,classpath:/resources/,classpath:/static/,classpath:/public/
基本互联网企业 静态资源文件存储在CDN ,HTML、CSS、图片等
CDN : 内容分发网络
文件服务器: 阿里云OSS
第2集 新版SpringBoot2.x启动类位置常见形式
简介:讲解SpringBoot目录文件结构和官方推荐的目录规范
很多同学遇到的坑,为啥按照课程,启动不了?
注意:应用启动的位置,Application启动类位置
三种形式
当启动类和controller在同一类中时,在该类上添加注解@Controller即可;
当启动类和controller分开时,启动类要放在根目录下,启动类上只需要注解@SpringBootApplication;
当启动类和controller分开时,如果启动类在非根目录下,需要在启动类中增加注解@ComponentScan,并配置需要扫描的包名,如(basePackages = )
@ComponentScan(basePackages ={"net.xdclass.controller","net.xdclass.service"})
工作中用哪种比较多?
- 强烈推荐第二种方式,不然漏配置扫描包,项目庞大,出现问题则难排查
第3集 SpringBoot2.X启动方式讲解和部署
简介:讲解SpringBoot2.X启动方式
IDEA开发中启动
- 本地开发中常用
外置Tomcat中启动
- 接近淘汰
- tomcat版本兼容问题复杂
- 微服务容器化部署复杂
Jar方式打包启动
- 官方推荐,工作中最常用
- 步骤:pom文件新增maven插件
xxxxxxxxxx<build><plugins><plugin><groupId>org.springframework.boot</groupId><artifactId>spring-boot-maven-plugin</artifactId></plugin></plugins></build>如果没有加,则执行jar包 ,报错如下java -jar spring-boot-demo-0.0.1-SNAPSHOT.jarno main manifest attribute, in spring-boot-demo-0.0.1-SNAPSHOT.jar必备打包、启动命令
xxxxxxxxxx构建:mvn install构建跳过测试类 mvn install -Dmaven.test.skip=truetarget目录下有对应的jar包就是打包后项目进到对应的target目录启动 java -jar xxxxx.jar 即可想后台运行,就用守护进程 nohup java -jar xxx.jar &
第4集 打包后的Jar里面的目录结构你知道多少
简介:讲解打包后的springboot里面的目录结构
获取对应的jar包,解压
解压后项目结构
example.jar
 |
 +-META-INF
 |  +-MANIFEST.MF
 +-org
 |  +-springframework
 |     +-boot
 |        +-loader
 |           +-<spring boot loader classes>
 +-BOOT-INF
    +-classes
    |  +-mycompany
    |     +-project
    |        +-YourClasses.class
    +-lib
       +-dependency1.jar
       +-dependency2.jar
![]() 愿景:"让编程不再难学,让技术与生活更加有趣"
愿景:"让编程不再难学,让技术与生活更加有趣"
第四章 淘汰传统XX管理系统! 在线教育项目核心模块学SpringBoot2.X
第1集 小滴课堂在线教育项目原型需求分析
简介: 分析小滴课堂业务功能,通过开发项目掌握SpringBoot2.X
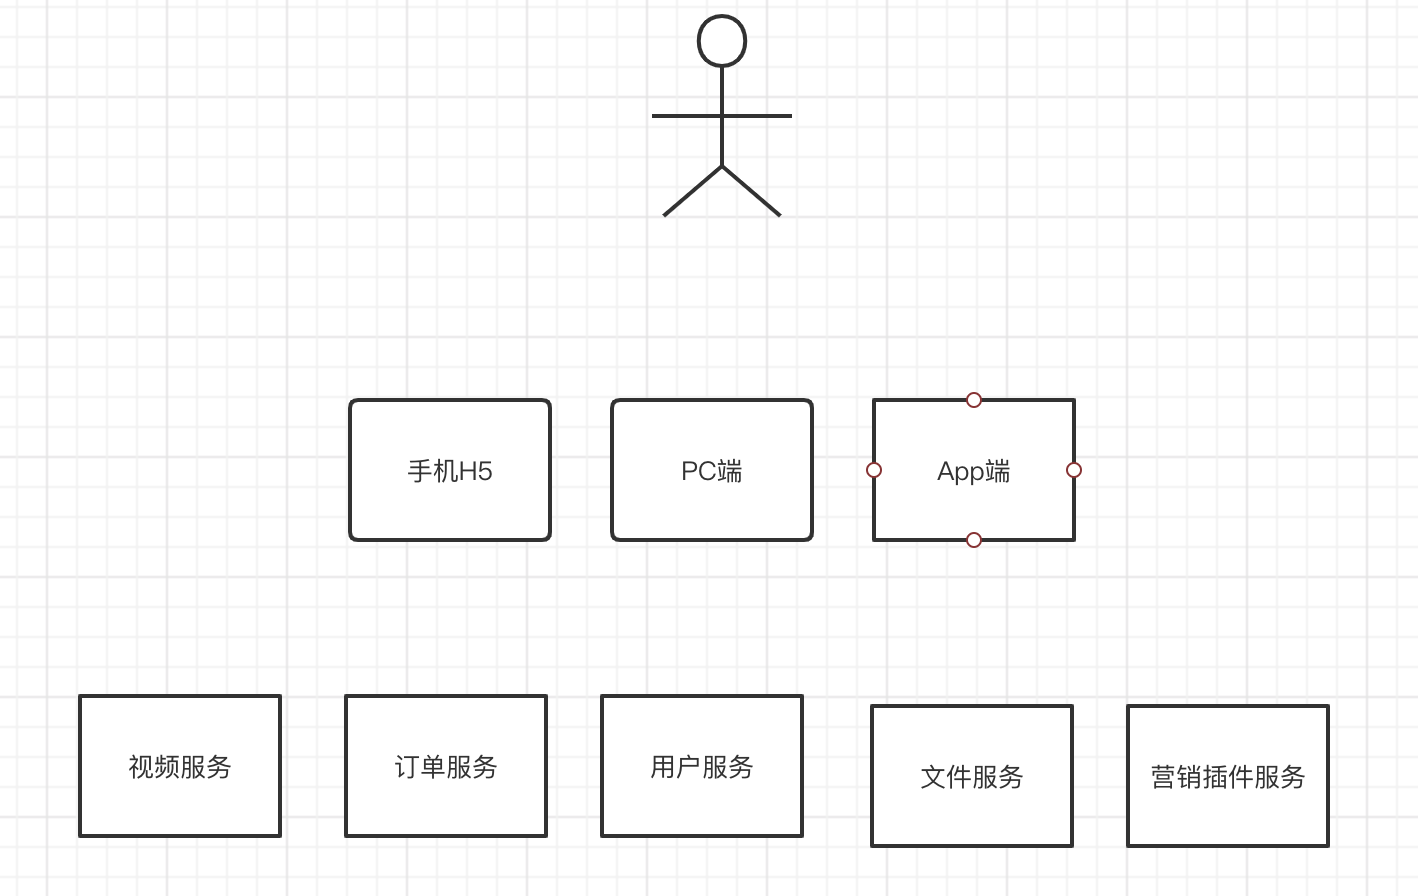
项目简介:在线教育是主流互联网项目,前后端分离,支持高并发访问
后端开发人在公司核心:
- 是否需要掌握前端???? 大部分是不用的
- 专业的人做专业的东西,前端工程师负责页面,后端工程师负责接口
从项目实战角度学习和开发功能
- 不开发全部功能
- 核心:学会springboot在开发项目中常见的使用
小滴课堂 需求模块
用户注册-登录
视频管理模块CRUD
视频列表查询
全局异常处理
日志统计记录
....
数据查询和存储
- 前期是内存数据库存储-HashMap-ArrayList
- 后期使用数据库存储
第2集 SpringBoot2.X在线教育项目架构搭建
简介: 创建对应的项目,划分好对应的包模块
创建项目
配置启动类
建立对应的包,先建立这些包,其他用到再补充
controller
service
dao
domain
utils
初始化数据开发:视频、章、默认用户信息
第3集 SpringBoot2.X开发HTTP接口GET请求实战
简介:讲解springboot接口,http的get请求,各个注解使用
GET请求
- 场景:一般的查询接口就是get请求
- 注解:@GetMapping = @RequestMapping(method = RequestMethod.GET)
一个顶两的注解
@GetMapping = @RequestMapping(method = RequestMethod.GET)
@PostMapping = @RequestMapping(method = RequestMethod.POST)
@PutMapping = @RequestMapping(method = RequestMethod.PUT)
@DeleteMapping = @RequestMapping(method = RequestMethod.DELETE)
功能:视频列表查询例子
第4集 SpringBoot2.X统一接口返回协议-掌握开发规范
简介:讲解springboot自定义返回对象,统一协议
存在的问题:协议未统一,缺少业务状态码
JSONData工具类开发
/**
 * 小滴课堂 接口返回工具类
 */
public class JsonData {

    private int code;

    private Object data;

    private String msg;

    public int getCode() {
        return code;
    }

    public void setCode(int code) {
        this.code = code;
    }

    public Object getData() {
        return data;
    }

    public void setData(Object data) {
        this.data = data;
    }

    public String getMsg() {
        return msg;
    }

    public void setMsg(String msg) {
        this.msg = msg;
    }

    public JsonData(){}

    public JsonData(int code, Object data){
        this.code = code;
        this.data = data;

    }

    public JsonData(int code, Object data, String msg){
        this.code = code;
        this.data =data;
        this.msg = msg;

    }

    public static JsonData buildSuccess(Object data){
        return new JsonData(0,data);
    }

    public static JsonData buildError(String msg){
        return new JsonData(-1,"",msg);
    }


    public static JsonData buildError(String msg,int code){
        return new JsonData(code,"",msg);
    }

}
第5集 SpringBoot2.X开发HTTP接口POST请求实战
简介:讲解springboot接口,http的POST请求
POST请求-form表单
- 场景:表单提交,如果不用细分PUT/DELETE方法,则都可以用POST
- 注解:@PostMapping = @RequestMapping(method = RequestMethod.POST)
- 开发功能:账号密码提交登录接口,form表单形式
第6集 实战RequestBody对象数组提交接口开发
简介:讲解JSON对象提交,批量插入接口开发
POST请求-RequestBody方式
- 场景:json对象映射,数组对象提交接口开发
- 注解:@PostMapping = @RequestMapping(method = RequestMethod.POST)
开发功能:新增视频json对象,章数组提交
第7集 SpringBoot2.X里面定制JSON字段
简介:SpringBoot配置Jackson处理字段
常用框架 阿里 fastjson,谷歌gson等
JavaBean序列化为Json,
- 性能:Jackson > FastJson > Gson > Json-lib 同个结构
- Jackson、FastJson、Gson类库各有优点,各有自己的专长
- 空间换时间,时间换空间
jackson处理相关自动
- 指定字段不返回:@JsonIgnore
- 指定日期格式:@JsonFormat(pattern="yyyy-MM-dd hh:mm:ss",locale="zh",timezone="GMT+8")
- 空字段不返回:@JsonInclude(Include.NON_NULL)
- 指定别名:@JsonProperty
开发功能:视频创建时间返回自定义格式;过滤用户敏感信息
序列化和反序列化操作
      //序列化操作
       ObjectMapper objectMapper = new ObjectMapper();
        String jsonStr = objectMapper.writeValueAsString(list);
        System.out.println(jsonStr);
	  //反序列化操作
        List<Video> temp = objectMapper.readValue(jsonStr,List.class);
![]() 愿景:"让编程不再难学,让技术与生活更加有趣"
愿景:"让编程不再难学,让技术与生活更加有趣"
第五章 IDEA中SpringBoot2.X热部署Dev-tool和常见问题
第1集 什么是热部署,为啥要用这个呢
简介:介绍什么是热部署,使用的好处
什么是热部署
- 应用正在运行的时候升级功能, 不需要重新启动应用
- 对于Java应用程序来说, 热部署就是在运行时更新Java类文件
好处:不需要重新手工启动应用,提高本地开发效率
常见实现热部署的方式
- Jrebel
- Spring Loaded
- spring-boot-devtools
第2集 SpringBoot2.X结合dev-tool 实现IDEA项目热部署
简介:讲解SpringBoot2.x使用dev-tool实现热部署
步骤
- pom文件添加依赖包
 <dependency>
         <groupId>org.springframework.boot</groupId>
         <artifactId>spring-boot-devtools</artifactId>
         <optional>true</optional>
  </dependency>


  <build>
        <plugins>
            <plugin>
                <groupId>org.springframework.boot</groupId>
                <artifactId>spring-boot-maven-plugin</artifactId>
                <configuration>
                    <fork>true</fork><!--必须添加这个配置-->
                </configuration>
            </plugin>
        </plugins>
    </build>
IDEA配置
- idea里面要设置,window和mac一样
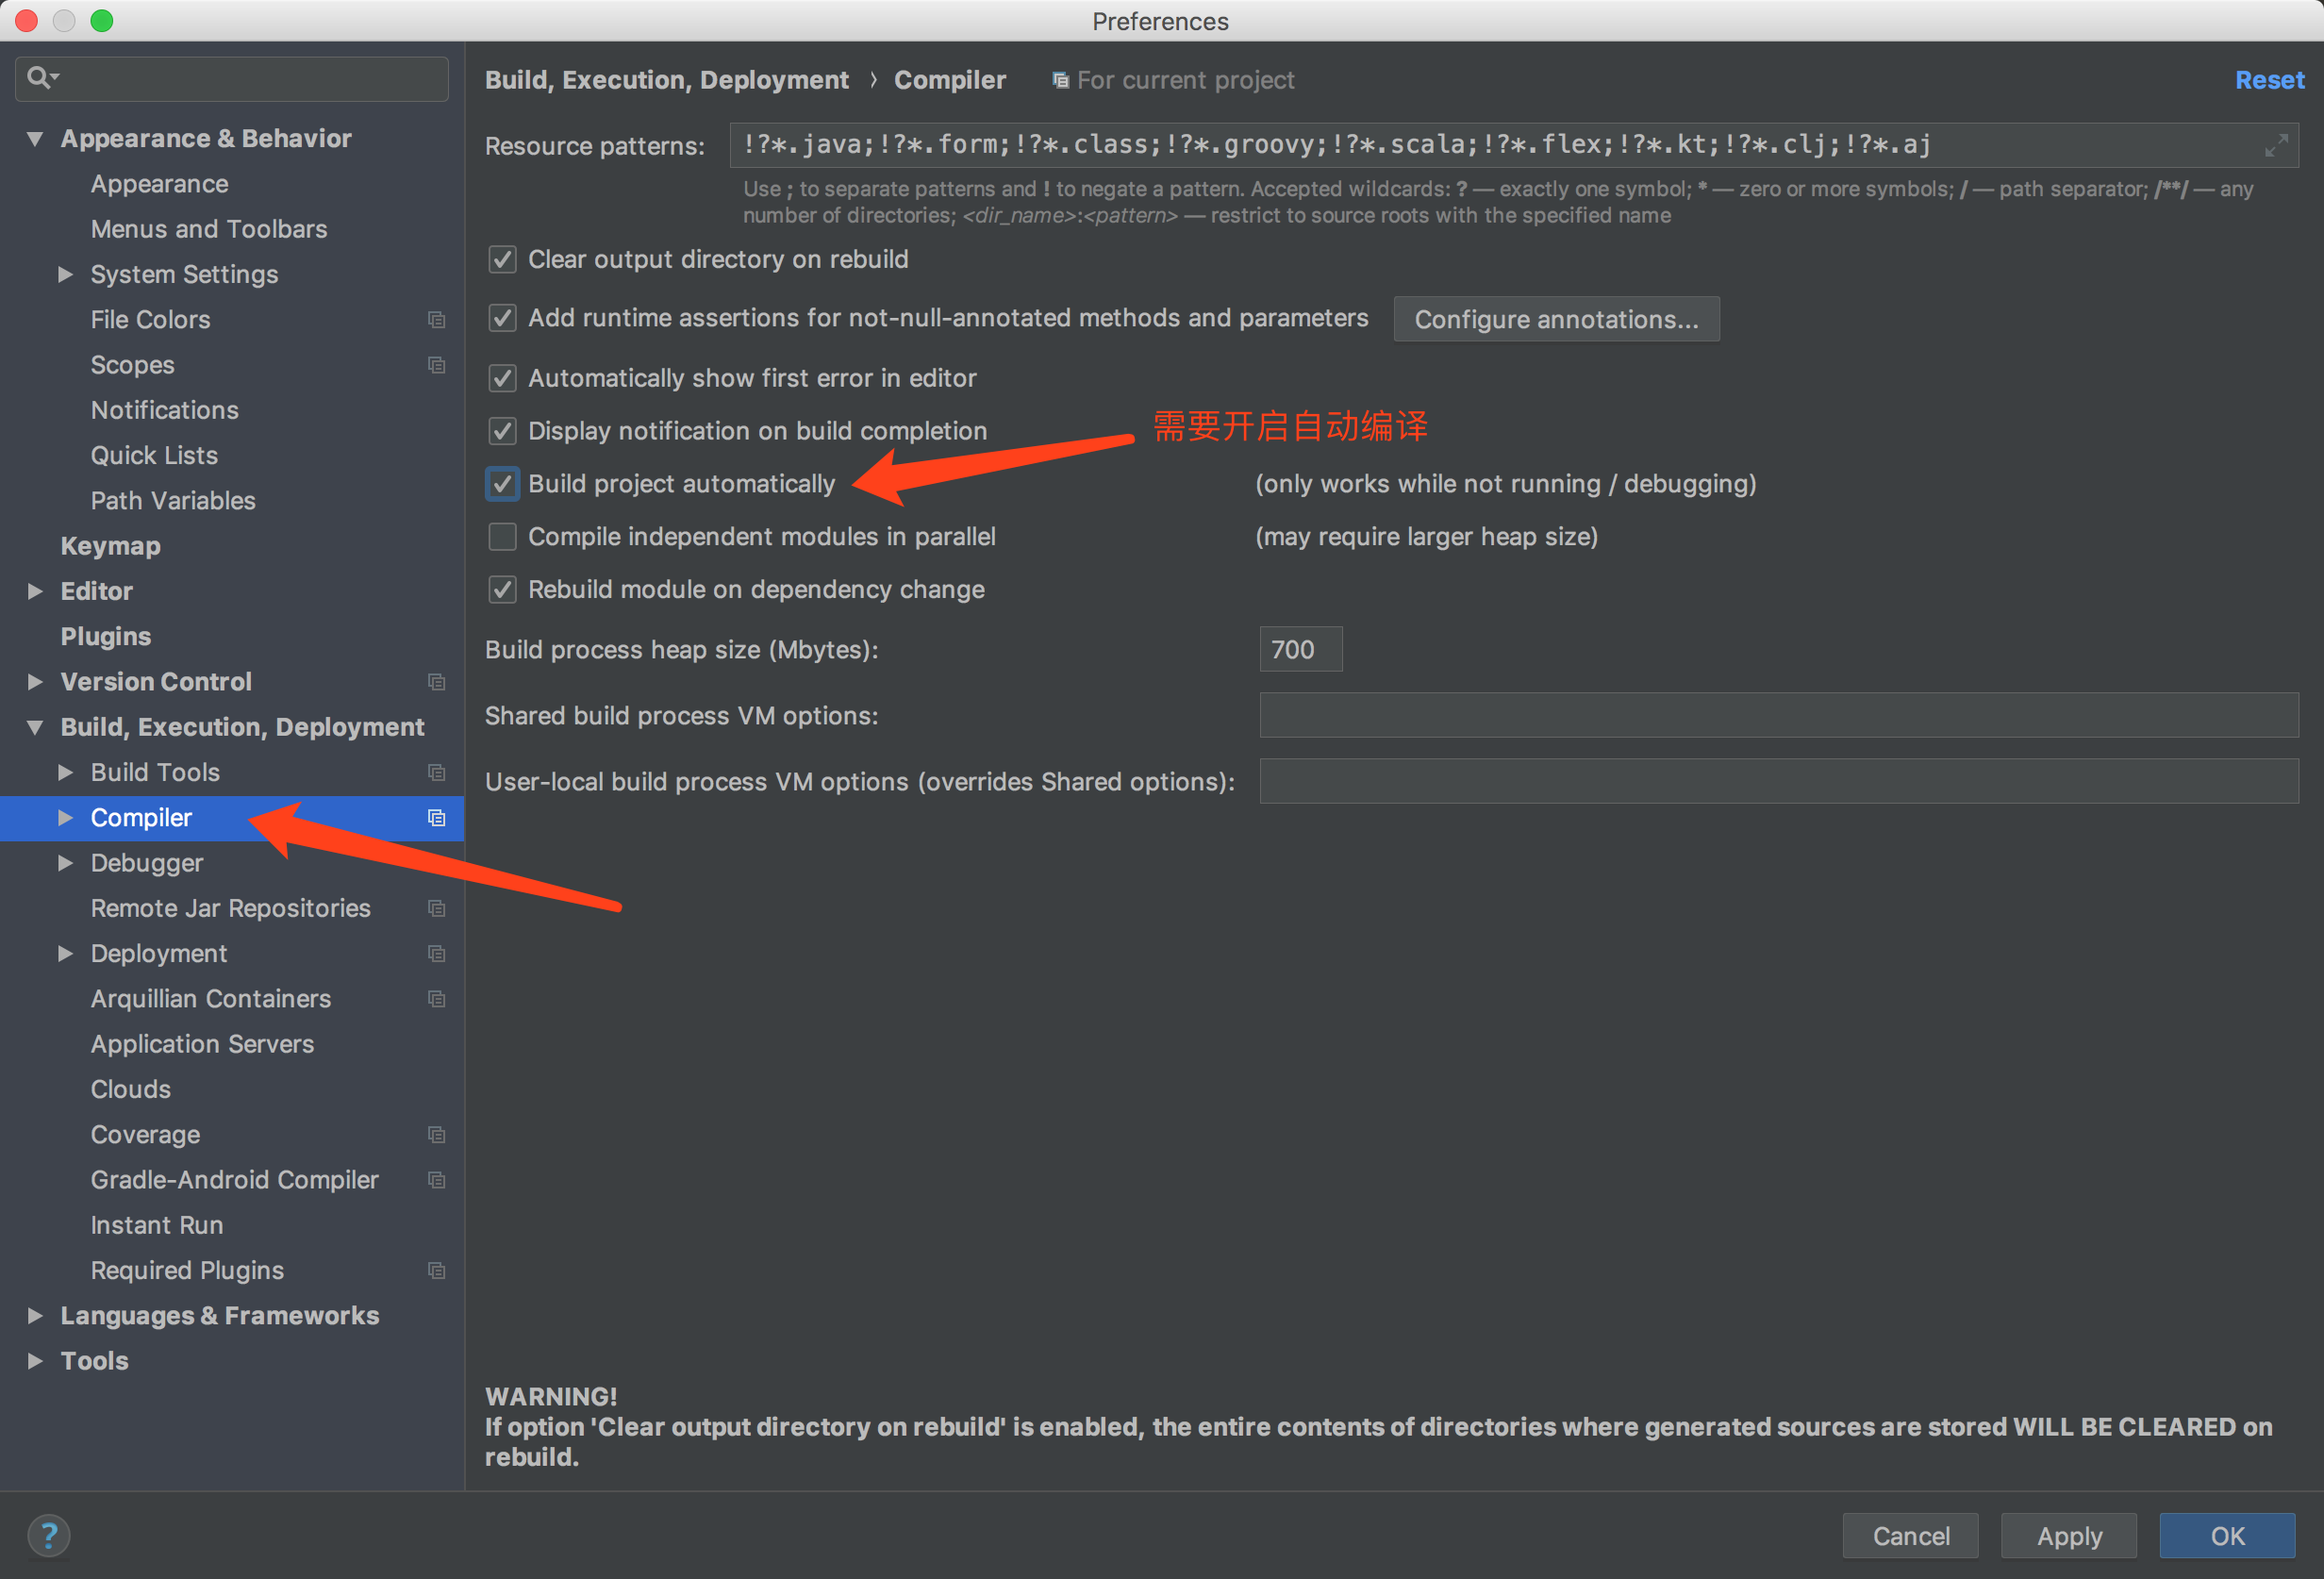
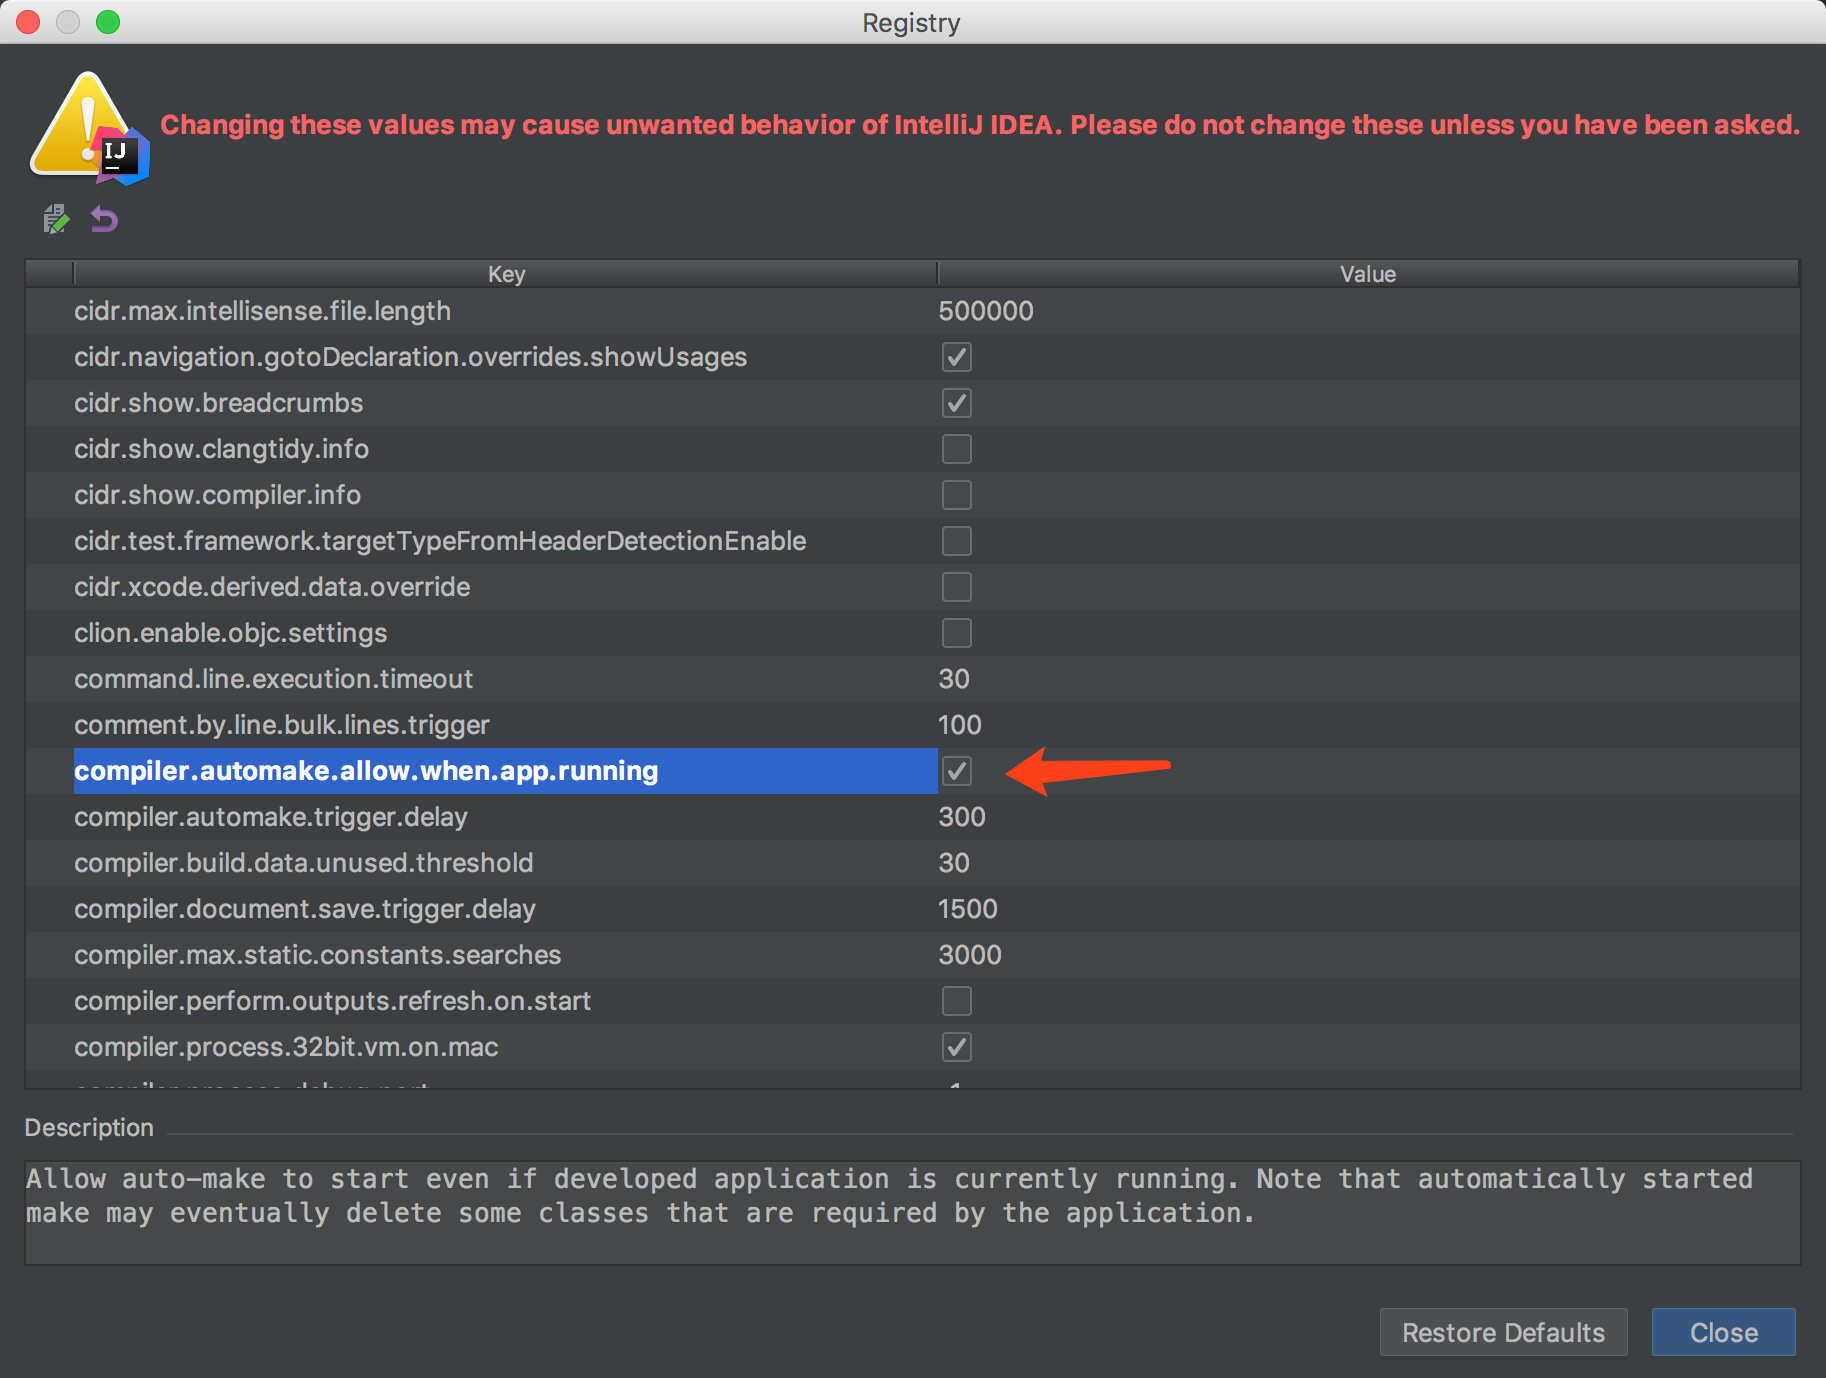
使用快捷键打开,选择Registry
注意默认快捷键:
	window快捷键 Shift+Ctrl+Alt+/
	mac快捷键 Shift+Command+Alt+/

如果自行修改了默认快捷键,则百度搜索相关博文,或者还原快捷键设置
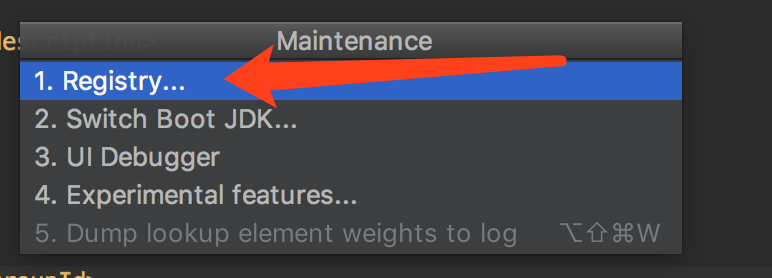
选择compiler.automake.allow.when.app.running ,重启idea就行!!!
![]() 愿景:"让编程不再难学,让技术与生活更加有趣"
愿景:"让编程不再难学,让技术与生活更加有趣"
第六章 最佳实践之SpringBoot.2.X里面的配置文件
第1集 带你看SpringBoot2.x常见配置文件形式
简介:SpringBoot2.x常见的配置文件形式 xml、yml、properties的区别和使用
常见的配置文件格式
xml、properties、json、yaml
Springboot里面常用xx.yml
- YAML(Yet Another Markup Language)
- 写 YAML 要比写 XML 快得多(无需关注标签或引号) 使用空格 Space 缩进表示分层,不同层次之间的缩进可以使用不同的空格数目
- 注意:key后面的冒号,后面一定要跟一个空格,树状结构
server:
  port: 8080  //设置启动端口号为8080

house:
  family:
    name: Doe
    parents:
      - John
      - Jane
    children:
      - Paul
      - Mark
      - Simone
  address:
    number: 34
    street: Main Street
    city: Nowheretown
    zipcode: 12345
Springboot里面常用 xx.properties(推荐)
- Key=Value格式
- 语法简单,不容易出错
server.port=8082

#session失效时间,30m表示30分钟
server.servlet.session.timeout=30m

# Maximum number of connections that the server accepts and processes at any given time.
server.tomcat.max-connections=10000

# Maximum size of the HTTP post content.
server.tomcat.max-http-post-size=2MB
server.tomcat.max-http-form-post-size=2MB


# Maximum amount of worker threads
server.tomcat.max-threads=200
官方文档配置
- https://docs.spring.io/spring-boot/docs/2.3.0.BUILD-SNAPSHOT/reference/htmlsingle/#core-properties
- 如果需要修改,直接复制对应的配置文件加到application.properties里面,一般不需要调整
第2集 新版SpringBoot注解配置文件映射属性和实体类实战
简介:讲解使用@value注解配置文件自动映射到属性和实体类
配置文件加载
方式一
- 1、Controller上面配置 @PropertySource({"classpath:resource.properties"})
- 2、增加属性 @Value("${test.name}") private String name;
方式二:实体类配置文件
1、添加 @Component 注解;
2、使用 @PropertySource 注解指定配置文件位置;
3、使用 @ConfigurationProperties 注解,设置相关属性;
4、必须 通过注入IOC对象Resource 进来 , 才能在类中使用获取的配置文件值。
@Autowired private ServerSettings serverSettings;
例子:
@Configuration
@ConfigurationProperties(prefix="test")
@PropertySource(value="classpath:resource.properties")
public class ServerConstant {

}

常见问题:

1、配置文件注入失败,Could not resolve placeholder
解决:根据springboot启动流程,会有自动扫描包没有扫描到相关注解,
默认Spring框架实现会从声明@ComponentScan所在的类的package进行扫描,来自动注入,
因此启动类最好放在根路径下面,或者指定扫描包范围
spring-boot扫描启动类对应的目录和子目录


2、注入bean的方式,属性名称和配置文件里面的key一一对应,就用加@Value 这个注解
如果不一样,就要加@value("${XXX}")
![]() 愿景:"让编程不再难学,让技术与生活更加有趣"
愿景:"让编程不再难学,让技术与生活更加有趣"
第七章 项目实战中的Springboot2.X单元测试应用
第1集 公司里面软件开发测试流程你知道多少
简介:讲解公司里面软件开发测试
需求分析->设计->开发->测试->上线
测试里面的种类
单元测试
- 完成最小的软件设计单元的验证工作,目标是确保模块被正确的编码
黑盒测试
- 不考虑内部结构,主要测试功能十分满足需求
白盒测试
- 针对代码级别,测试开发工程师一般具备白盒测试能力,针对程序内部的逻辑结构进行代码级别的测试
回归测试
- 对原先提出的缺陷进行二次验证,开发人员修复后进行二次的验证
集成测试
- 测试模块和模块之间的整合,且测试主要的业务功能
系统测试
- 针对整个产品系统进行的测试,验证系统是否满足产品业务需求
第2集 在线教育项目里面怎么用SpringBoot2.x的单元测试
简介:讲解项目里面怎么使用SpringBoot2.x的单元测试
引入相关依赖
<!--springboot程序测试依赖,如果是自动创建项目默认添加-->
 <dependency>
<groupId>org.springframework.boot</groupId>
<artifactId>spring-boot-starter-test</artifactId>
<scope>test</scope>
</dependency>


<dependency>
			<groupId>junit</groupId>
			<artifactId>junit</artifactId>
			<version>4.12</version>
			<scope>test</scope>
</dependency>
配置相关注解
@RunWith(SpringRunner.class)  //底层用junit  SpringJUnit4ClassRunner
@SpringBootTest(classes={XdclassApplication.class})//启动整个springboot工程
public class SpringBootTests { }
常用单元测试的注解
- @before
- @Test
- @After
断言
- 判断程序结果是否符合预期 TestCase.assertXXX
第3集 案例实战单元测试调用Controller-Service层接口
简介:讲解Springboot单元测试Controller-Service层接口
案例实战 Controller层登录方法测试
 	@Autowired
    private UserController userController;

    @Test
    public void loginTest(){

        User user = new User();
        user.setUsername("jack");
        user.setPwd("1234");

        JsonData jsonData  = userController.login(user);

        System.out.println(jsonData.toString());

        TestCase.assertEquals(0,jsonData.getCode());

    }
案例实战 视频列表Service层单元测试
	@Autowired
    private VideoService videoService;


    @Test
    public void testVideoList(){

        List<Video> videoList = videoService.listVideo();

        TestCase.assertTrue(videoList.size()>0);

    }
第4集 MockMvc案例实战调用Controller层API接口
简介:讲解Springboot的MockMvc调用api层接口
如何测试Controller对外提供的接口
增加类注解 @AutoConfigureMockMvc
注入一个MockMvc类
相关API :
- perform执行一个RequestBuilder请求
- andExpect:添加ResultMatcher->MockMvcResultMatchers验证规则
- andReturn:最后返回相应的MvcResult->Response
案例:在线教育VideoController 视频列表接口 单元测试
	@Autowired
    private MockMvc mockMvc;

    @Test
    public void testVideoListApi()throws Exception{

       MvcResult mvcResult =  mockMvc.perform(MockMvcRequestBuilders.get("/api/v1/pub/video/list"))
                .andExpect(MockMvcResultMatchers.status().isOk()).andReturn();

       int status = mvcResult.getResponse().getStatus();

       System.out.println(status);

        //会乱码
        //String result = mvcResult.getResponse().getContentAsString();

        // 使用下面这个,增加 编码 说明,就不会乱码打印
        String result = mvcResult.getResponse().getContentAsString(Charset.forName("utf-8"));

       System.out.println(result);

    }
![]() 愿景:"让编程不再难学,让技术与生活更加有趣"
愿景:"让编程不再难学,让技术与生活更加有趣"
第八章 项目实战中的Springboot2.X全局异常处理
第1集 SpringBoot2.x在线教育项目中里面的全局异常处理
简介:讲解SpringBoot2.X全局异常处理
为什么要配置全局异常?
- 不配全局服务端报错场景 1/0、空指针等
配置好处
- 统一的错误页面或者错误码
- 对用户更友好
Springboot2.X怎么在项目中配置全局异常
类添加注解
- @ControllerAdvice,如果需要返回json数据,则方法需要加@ResponseBody
- @RestControllerAdvice, 默认返回json数据,方法不需要加@ResponseBody
方法添加处理器
- 捕获全局异常,处理所有不可知的异常
- @ExceptionHandler(value=Exception.class)
第2集 SpringBoot2.x自定义全局异常返回页面
简介:使用SpringBoot自定义异常和错误页面跳转实战
- 返回自定义异常界面,需要引入thymeleaf依赖(非必须,如果是简单的html界面则不用)
<dependency>
	   <groupId>org.springframework.boot</groupId>
	   <artifactId>spring-boot-starter-thymeleaf</artifactId>
</dependency>
- resource目录下新建templates,并新建error.html
ModelAndView modelAndView = new ModelAndView();
modelAndView.setViewName("error.html");
modelAndView.addObject("msg", e.getMessage());
return modelAndView;
![]() 愿景:"让编程不再难学,让技术与生活更加有趣"
愿景:"让编程不再难学,让技术与生活更加有趣"
第九章 新版Servlet3.0和SpringBoot2.X过滤器-拦截器实战
第1集 SpringBoot2.X过滤器讲解
简介:SpringBoot2.X过滤器讲解
什么是过滤器
- filter简单理解:人--->检票员(filter)---> 景点
SpringBoot2.X里面的过滤器
ApplicationContextHeaderFilter
OrderedCharacterEncodingFilter
OrderedFormContentFilter
OrderedRequestContextFilter
那么多过滤器,哪个优先级高呢?
Ordered.HIGHEST_PRECEDENCE Ordered.LOWEST_PRECEDENCE
低位值意味着更高的优先级 Higher values are interpreted as lower priority
自定义Filter,避免和默认的Filter优先级一样,不然会冲突
注册Filter配置两种方式
- bean FilterRegistrationBean
- Servlet3.0 webFileter
第2集 抛弃传统方式,使用新版Servlet3.0的注解开发自定义Filter
简介:使用Servlet3.0注解开发自定义的过滤器
使用Servlet3.0的注解进行配置步骤
- 启动类里面增加 @ServletComponentScan,进行扫描
- 新建一个Filter类,implements Filter,并实现对应的接口
- @WebFilter 标记一个类为filter,被spring进行扫描
- urlPatterns:拦截规则,支持正则
- 控制chain.doFilter的方法的调用,来实现是否通过放行
- 不放行,web应用resp.sendRedirect("/index.html") 或者 返回json字符串
场景:权限控制、用户登录状态控制,也可以交给拦截器处理等
在线教育项目案例实战:
- 用户登录过滤器
第3集 前后端分离-自定义Filter 未登录json错误码提示开发
简介:使用Servlet3.0注解开发自定义的过滤器,返回未登录错误码
private void renderJson(HttpServletResponse response,String json){

        response.setCharacterEncoding("UTF-8");
        response.setContentType("application/json");

        try(PrintWriter writer = response.getWriter()){
            writer.print(json);
        }catch (Exception e){
            e.printStackTrace();
        }

}
第4集 回归本质Servlet3.0的注解原生Servlet实战
简介:使用 Servlet3.0的注解自定义原生Servlet
- javaweb的使用doPost和doGet方法使用Servlet3.0替代更轻量级
@WebServlet(name = "userServlet", urlPatterns = "/api/v1/test/customs" )
class UserServlet extends HttpServlet {

    @Override
    protected void doGet(HttpServletRequest req, HttpServletResponse resp) throws ServletException, IOException {

        PrintWriter writer = resp.getWriter();
        writer.write("this is my custom servlet");
        writer.flush();
        writer.close();

    }

    @Override
    protected void doPost(HttpServletRequest req, HttpServletResponse resp) throws ServletException, IOException {
        this.doGet(req,resp);
    }

}
第5集 Servlet3.0+SpringBoot2.X 注解Listener常用监听器
简介:监听器介绍和Servlet3.0的注解自定义原生Listener监听器实战
监听器:应用启动监听器,会话监听器,请求监听器
作用
- ServletContextListener 应用启动监听
- HttpSessionLisener 会话监听
- ServletRequestListener 请求监听
常用的监听器 ServletContextListener、HttpSessionListener、ServletRequestListener)
@WebListener
public class RequestListener implements ServletRequestListener {

    @Override
    public void contextDestroyed(ServletContextEvent sce) {
            System.out.println("======contextDestroyed========");
    }

    @Override
    public void contextInitialized(ServletContextEvent sce) {
            System.out.println("======contextInitialized========");

    }
}
第6集 新版SpringBoot2.X拦截器配置实战
简介: 讲解Spingboot2.x新版本配置拦截器在项目中的使用
拦截器: 和过滤器用途基本类似
SpringBoot2.x使用步骤
SpringBoot2.X 新版本配置拦截器 implements WebMvcConfigurer
自定义拦截器 HandlerInterceptor
- preHandle:调用Controller某个方法之前
- postHandle:Controller之后调用,视图渲染之前,如果控制器Controller出现了异常,则不会执行此方法
- afterCompletion:不管有没有异常,这个afterCompletion都会被调用,用于资源清理
按照注册顺序进行拦截,先注册,先被拦截
拦截器不生效常见问题:
- 是否有加@Configuration
- 拦截路径是否有问题 **  和 *
- 拦截器最后路径一定要 /**  如果是目录的话则是 /*/
在线教育项目案例实战:
- 改造下单 登录 接口
场景:权限控制、用户登录状态控制等
和Filter过滤器的区别
Filter和Interceptor二者都是AOP编程思想的体现,功能基本都可以实现

拦截器功能更强大些,Filter能做的事情它都能做

Filter在只在Servlet前后起作用,而Interceptor够深入到方法前后、异常抛出前后等

filter依赖于Servlet容器即web应用中,而Interceptor不依赖于Servlet容器所以可以运行在多种环境。

在接口调用的生命周期里,Interceptor可以被多次调用,而Filter只能在容器初始化时调用一次。

Filter和Interceptor的执行顺序

过滤前->拦截前->action执行->拦截后->过滤后
补充知识点
如何配置不拦截某些路径?
registry.addInterceptor(new LoginIntercepter()).addPathPatterns("/api/v1/pri/**")
//配置不拦截某些路径,比如静态资源
.excludePathPatterns("/**/*.html","/**/*.js");
![]() 愿景:"让编程不再难学,让技术与生活更加有趣"
愿景:"让编程不再难学,让技术与生活更加有趣"
第十章 新版SpringBoot2.X 整合模板引擎thymeleaf和Fk
第1集 新版SpringBoot2.x的starter和常见模板引擎讲解
简介:介绍常用的SpringBoot2.x模板引擎和官方推荐案例
SpringBoot2.X常用start介绍
starter主要简化依赖用的
- spring-boot-starter-web->里面包含多种依赖
- 查看 pom文件 spring-boot-starter-parent -> spring-boot-dependencies 里面综合的很多依赖包
几个常用的starter

JSP(后端渲染,消耗性能)
Java Server Pages 动态网页技术,由应用服务器中的JSP引擎来编译和执行,再将生成的整个页面返回给客户端
可以写java代码
持表达式语言(el、jstl)
内建函数
JSP->Servlet(占用JVM内存)permSize
javaweb官方推荐
springboot官方不推荐
Freemarker
FreeMarker Template Language(FTL) 文件一般保存为 xxx.ftl
严格依赖MVC模式,不依赖Servlet容器(不占用JVM内存)
内建函数
Thymeleaf (主推)
轻量级的模板引擎(复杂逻辑业务的不推荐,解析DOM或者XML会占用多的内存)
可以直接在浏览器中打开且正确显示模板页面
直接是html结尾,直接编辑xdlcass.net/user/userinfo.html
社会工程学伪装
第2集 SpringBoot2.X整合模板引擎freemarker实战
简介:SpringBoot2.x整合模板引擎freemarker实战
Freemarker相关maven依赖
<!-- 引入freemarker模板引擎的依赖 -->
   <dependency>
        <groupId>org.springframework.boot</groupId>
        <artifactId>spring-boot-starter-freemarker</artifactId>
   </dependency>
Freemarker基础配置
	# 是否开启thymeleaf缓存,本地为false,生产建议为true
	spring.freemarker.cache=false

	spring.freemarker.charset=UTF-8
	spring.freemarker.allow-request-override=false
	spring.freemarker.check-template-location=true

	#类型
	spring.freemarker.content-type=text/html
	spring.freemarker.expose-request-attributes=true
	spring.freemarker.expose-session-attributes=true

	#文件后缀
	spring.freemarker.suffix=.ftl
	#路径
	spring.freemarker.template-loader-path=classpath:/templates/
建立文件夹
1)src/main/resources/templates/fm/user/
2)建立一个index.ftl
3)user文件夹下面建立一个user.html
简单测试代码编写和访问
第3集 SpringBoot2.X整合模板引擎thymeleaf实战
讲解:SpringBoot2.x整合模板引擎thymeleaf实战
官网地址:https://www.thymeleaf.org/doc/articles/thymeleaf3migration.html
thymeleaf相关maven依赖
<dependency>
	   	<groupId>org.springframework.boot</groupId>
	   	<artifactId>spring-boot-starter-thymeleaf</artifactId>
</dependency>
thymeleaf基础配置
	#开发时关闭缓存,不然没法看到实时页面
	spring.thymeleaf.cache=false
	spring.thymeleaf.mode=HTML5
	#前缀
	spring.thymeleaf.prefix=classpath:/templates/
	#编码
	spring.thymeleaf.encoding=UTF-8
	#类型
	spring.thymeleaf.content-type=text/html
	#名称的后缀
	spring.thymeleaf.suffix=.html
建立文件夹
1)src/main/resources/templates/tl/
2)建立一个index.html
简单测试代码编写和访问
- 注意:$表达式只能写在th标签内部
- 快速入门:https://www.thymeleaf.org/doc/articles/standarddialect5minutes.html
![]() 愿景:"让编程不再难学,让技术与生活更加有趣"
愿景:"让编程不再难学,让技术与生活更加有趣"
第十一章 玩转新版SpringBoot2.X整合定时任务和异步任务
第1集 SpringBoot2.X定时任务schedule讲解
简介:讲解什么是定时任务和常见定时任务区别
什么是定时任务,使用场景
- 某个时间定时处理某个任务
- 发邮件、短信等
- 消息提醒
- 订单通知
- 统计报表系统
- ...
常见定时任务
- Java自带的java.util.Timer类配置比较麻烦,时间延后问题
- Quartz框架: 配置更简单,xml或者注解适合分布式或者大型调度作业
- SpringBoot框架自带
SpringBoot使用注解方式开启定时任务
- 启动类里面 @EnableScheduling开启定时任务,自动扫描
- 定时任务业务类 加注解 @Component被容器扫描
- 定时执行的方法加上注解 @Scheduled(fixedRate=2000) 定期执行一次
第2集 SpringBoot2.X多种定时任务配置实战
简介:SpringBoot常用定时任务表达式配置和在线生成器
cron 定时任务表达式 @Scheduled(cron="*/1 * * * * *") 表示每秒
- crontab 工具 https://tool.lu/crontab/
fixedRate: 定时多久执行一次(上一次开始执行时间点后xx秒再次执行;)
fixedDelay: 上一次执行结束时间点后xx秒再次执行
第3集 玩转SpringBoot2.x异步任务EnableAsync实战
简介:讲解什么是异步任务,和使用SpringBoot2.x开发异步任务实战
什么是异步任务和使用场景:适用于处理log、发送邮件、短信……等
- 下单接口->查库存 1000
- 余额校验 1500
- 风控用户1000
启动类里面使用@EnableAsync注解开启功能,自动扫描
定义异步任务类并使用@Component标记组件被容器扫描,异步方法加上@Async
第4集 玩转SpringBoot2.x异步任务Future实战
简介:使用SpringBoot2.x开发异步任务Future获取结果
定义异步任务类需要获取结果
注意点:
- 要把异步任务封装到类里面,不能直接写到Controller
- 增加Future
返回结果 AsyncResult ("task执行完成"); - 如果需要拿到结果 需要判断全部的 task.isDone()
![]() 愿景:"让编程不再难学,让技术与生活更加有趣"
愿景:"让编程不再难学,让技术与生活更加有趣"
第十二章 带你设计在线教育项目核心数据库表
第1集 在线教育项目核心数据库表设计-ER图
简介:设计在线教育的核心库表结构
在线教育站点速览 xdclass.net
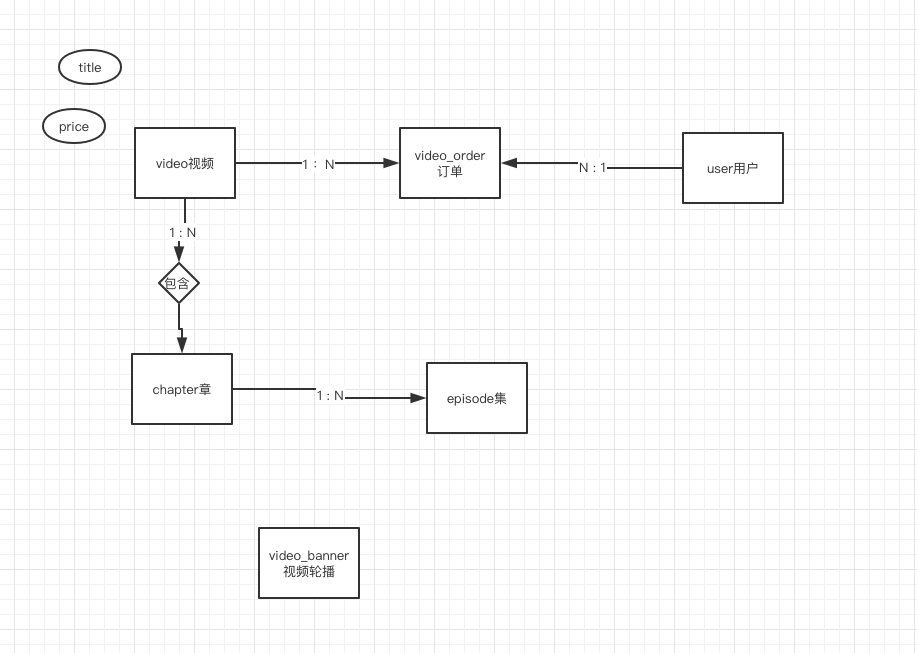
ER图知识回顾:
- 实体对象:矩形
- 属性:椭圆
- 关系:菱形
核心库表
- video
- chapter
- episode
- user
- video_order
- video_banner
第2集 在线教育项目核心数据库表字段设计和测试数据准备
简介:设计在线教育的核心库表结构
设计对应的表字段
Mysql测试数据导入
mysql客户端软件
- 苹果系统:sequel pro
- windows:navicat
没有一成不变的架构,没有通用的设计方案,一定跟业务结合
学习建议:
- 务必会mysql,不会的话看mysql专题课程
- mysql软件自行安装,Mac、window、Linux 搜索博文,或者看mysql专题
- 本地安装是可以直接访问
- 虚拟机或者云服务器安装,测试的话一定要开启mysql远程访问和防火墙开放对应的端口(搜索博文)
导入课程sql, 本地安装Myql务必使用5.7版本
![]() 愿景:"让编程不再难学,让技术与生活更加有趣"
愿景:"让编程不再难学,让技术与生活更加有趣"
第十三章 从Javaweb原生jdbc到快速掌握新版MyBatis3.X
第1集 回顾javaweb通过原生jdbc访问数据库
简介:回顾基础使用原生jdbc访问数据库
注意:本地安装Myql务必使用5.7版本
原生jdbc访问数据库步骤
- 加载JDBC驱动程序
- 创建数据库的连接
- 创建preparedStatement
- 执行SQL语句
- 处理结果集
- 关闭JDBC对象资源
Springboot项目测试原生JDBC连接
加载依赖包
<dependency>
      <groupId>org.springframework.boot</groupId>
      <artifactId>spring-boot-starter-jdbc</artifactId>
</dependency>

<dependency>
      <groupId>mysql</groupId>
      <artifactId>mysql-connector-java</artifactId>
</dependency>
Main函数访问代码实操
 public static void main(String [] args) throws Exception {

        Class.forName("com.mysql.cj.jdbc.Driver");
        //连接
        String url = "jdbc:mysql://127.0.0.1:3306/xdclass?useUnicode=true&characterEncoding=utf-8&useSSL=false";

        String username = "root";
        String password = "xdclass.net";

        //获取连接对象,并连接数据库
       Connection connection = DriverManager.getConnection(url,username,password);


       //获取语句对象
       Statement statement = connection.createStatement();

       ResultSet resultSet =  statement.executeQuery("select * from video");

       while (resultSet.next()){

           System.out.println("视频标题:"+resultSet.getString("title"));

       }
       statement.close();

    }
第2集 原生JDBC访问数据库的缺点和ORM框架介绍
简介:原生jdbc访问数据库缺点和ORM框架介绍
原生jdbc缺点
- 每次要加载驱动,连接信息是硬编码
- sql和java代码耦合一起,改动不易
- 参数设置缺少灵活性
- 处理结果集麻烦,不能自动映射到实体类
- 连接资源不能复用,资源浪费
什么是ORM框架
- 对数据库的表和POJO(Plain Ordinary Java Object)Java对象的做映射的框架
市面上的ORM框架
hibernate (ssh)
- 比较笨重,sql调优麻烦
- 推荐指数:不推荐
JPA - Spring Data JPA
- Java Persistence API, 轻量级,部分中小项目适合
- 推荐指数:次之
mybatis
- 半自动化(半ORM框架),便于写sql,轻量级,在阿里等大厂广泛使用
- 推荐指数:推荐
第3集 新版ORM框架Mybatis3.X基础知识
简介:快速掌握新版Mybaits3.X
什么是 MyBatis ?
- Apahce的一个开源项目
- 一款优秀的持久层框架,它支持自定义 SQL、存储过程以及高级映射
- 免除了几乎所有的 JDBC 代码以及设置参数和获取结果集的工作
- 通过简单的 XML 或注解来配置和映射 Java对象 到 数据库中的记录
- 官方地址:https://mybatis.org/mybatis-3/
新建一个测试的maven项目
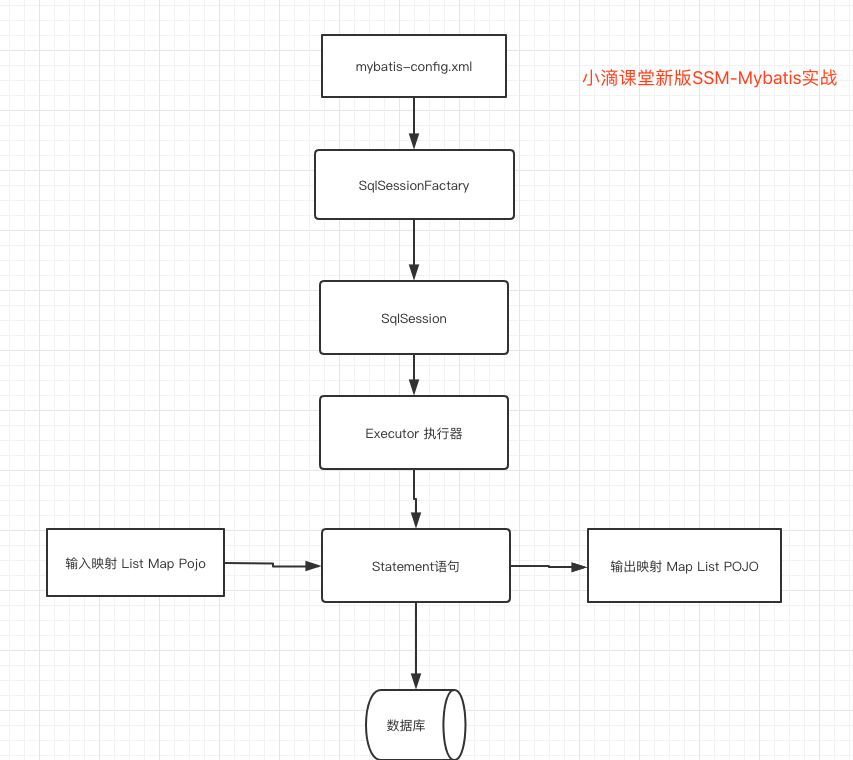
核心流程: https://mybatis.org/mybatis-3/zh/getting-started.html
- 每个基于 MyBatis 的应用都是以一个 SqlSessionFactory 的实例为核心
- SqlSessionFactory 的实例可以通过 SqlSessionFactoryBuilder 获得
- SqlSessionFactoryBuilder 可以从 XML 配置文件或一个预先配置的 Configuration 实例来构建出 SqlSessionFactory 实例
- 工厂设计模式里面 需要获取SqlSession ,里面提供了在数据库执行 SQL 命令所需的所有方法
画流程图
第4集 新版Mybatis3.X快速入门实战《上》
简介:快速掌握新版Mybaits3.X实战,编写 mybatis-confifg.xml和mapper.xml
添加maven依赖
<dependencies>
        <!-- https://mvnrepository.com/artifact/org.mybatis/mybatis -->
        <dependency>
            <groupId>org.mybatis</groupId>
            <artifactId>mybatis</artifactId>
            <version>3.5.4</version>
        </dependency>

        <!-- 使用JDBC链接mysql的驱动-->
        <dependency>
            <groupId>mysql</groupId>
            <artifactId>mysql-connector-java</artifactId>
            <version>8.0.19</version>
        </dependency>

</dependencies>
配置mybatis-config.xml
<?xml version="1.0" encoding="UTF-8" ?> <!DOCTYPE configuration PUBLIC "-//mybatis.org//DTD Config 3.0//EN" "http://mybatis.org/dtd/mybatis-3-config.dtd"> <configuration> <environments default="development"> <environment id="development"> <transactionManager type="JDBC"/> <dataSource type="POOLED"> <property name="driver" value="com.mysql.cj.jdbc.Driver"/> <property name="url" value="jdbc:mysql://127.0.0.1:3306/xdclass?useUnicode=true&characterEncoding=utf-8&useSSL=false"/> <property name="username" value="root"/> <property name="password" value="xdclass.net"/> </dataSource> </environment> </environments> <mappers> <mapper resource="mapper/VideoMapper.xml"/> </mappers> </configuration>配置VideoMapper.xml
<?xml version="1.0" encoding="UTF-8" ?>
<!DOCTYPE mapper
        PUBLIC "-//mybatis.org//DTD Mapper 3.0//EN"
        "http://mybatis.org/dtd/mybatis-3-mapper.dtd">

<mapper namespace="net.xdclass.online_class.dao.VideoMapper">
    <select id="selectById" resultType="net.xdclass.online_class.domain.Video">
    select * from video where id = #{video_id}
  </select>

</mapper>
获取参数中的值
- 注意 :取java对象的某个值,属性名大小写要一致
#{value} : 推荐使用, 是java的名称

${value} : 不推荐使用,存在sql注入风险
第5集 新版Mybatis3.X快速入门实战《下》
简介:快速掌握新版Mybaits3.X实战,SqlSession代码实战
补齐 Video 对象字段
编写代码 获取 SqlSession,以xml方式读取数据库
 public static void main(String [] args) throws IOException {

        String resouce = "config/mybatis-config.xml";

        //读取配置文件
        InputStream inputStream =  Resources.getResourceAsStream(resouce);

        //构建Session工厂
        SqlSessionFactory sqlSessionFactory = new SqlSessionFactoryBuilder().build(inputStream);

        //获取Session
        try(SqlSession sqlSession = sqlSessionFactory.openSession()){

            VideoMapper videoMapper = sqlSession.getMapper(VideoMapper.class);

            Video video = videoMapper.selectById(44);

            //System.out.println(video.toString());


            List<Video> videoList =  videoMapper.selectList();

            System.out.println(videoList.toString());
        }

    }
通过注解读取(如果sql简单,没有过多的表关联,则用注解相对简单)
  /**
     * 查询全部视频列表
     * @return
     */
    @Select("select * from video")
    List<Video> selectList();
![]() 愿景:"让编程不再难学,让技术与生活更加有趣"
愿景:"让编程不再难学,让技术与生活更加有趣"
第十四章 案例实战MyBatis3.X玩转查询和新增操作
第1集 新版Mybatis开发必备调试之控制台打印Sql
简介:讲解Mybatis在控制台打印sql
Mybatis使用流程
创建mybatis-config.xml 全局的配置文件
创建XXXMapper.xml配置文件
创建SqlSessionFactory
用SqlSessionFactory创建SqlSession对象
用SqlSession执行增删改查CRUD
内置的日志工厂提供日志功能, 使用log4j配置打印sql,添加依赖
<dependency>
    <groupId>org.slf4j</groupId>
    <artifactId>slf4j-log4j12</artifactId>
    <version>1.7.30</version>
</dependency>
在应用的classpath中创建名称为
log4j.properties的文件log4j.rootLogger=ERROR, stdout log4j.logger.net.xdclass=DEBUG log4j.appender.stdout=org.apache.log4j.ConsoleAppender log4j.appender.stdout.layout=org.apache.log4j.PatternLayout log4j.appender.stdout.layout.ConversionPattern=%5p [%t] - %m%n
第2集 Mybatis实战参数别名使用之查询视频列表
简介:讲解Mybatis查询视频列表和参数别名的使用
查询视频列表,返回List
- 查询一样,结果使用List接收
常用的查询
默认参数查询
- 单个参数,可以使用别名,也可以使用默认的名称,默认名称的话可以随意
使用参数别名
模糊查询
mysql自带函数使用
<select id="selectByPointAndTitleLike" resultType="net.xdclass.online_class.domain.Video">

select * from video where point=#{point} and title like concat('%', #{title},'%')

</select>
重点:参数记得取别名,方便识别和使用
第3集 Mybatis 配置驼峰字段映射java对象和数据库字段
简介:讲解Mybatis配置驼峰字段到java类
数据库字段是下划线,java属性是驼峰,怎么查询映射上去?
方法一: select cover_img as coverImg from video // 多字段怎么办
Mybatis自带配置( 加在文件顶部)
 <!--下划线自动映射驼峰字段-->
    <settings>
        <setting name="mapUnderscoreToCamelCase" value="true"/>
    </settings>
第4集 Mybatis入参parameterType和取值类型讲解
简介:讲解Mybatis入参 parameterType和取值类型讲解
parameterType 参数类型
可以是基本类型
parameterType="java.lang.Long"
parameterType="java.lang.String"
可以是Java集合List或者Map
parameterType="java.util.Map"
parameterType="java.util.List"
可以是Java自定义对象
parameterType="net.xdclass.online_class.domain.Video"
取参数值,具体某个字段的类型,从java类型映射到数据库类型
例子 #{title, jdbcType=VARCHAR}
注意:
- 多数情况不加是正常使用,但是如果出现报错:无效的列类型,则是缺少jdbcType;
- 只有当字段可为NULL时才需要jdbcType属性
常见的数据库类型和java列席对比
JDBC Type           Java Type

CHAR                String
VARCHAR             String
LONGVARCHAR         String
NUMERIC             java.math.BigDecimal
DECIMAL             java.math.BigDecimal
BIT                 boolean
BOOLEAN             boolean
TINYINT             byte
SMALLINT            short
INTEGER             INTEGER
INTEGER       int
BIGINT              long
REAL                float
FLOAT               double
DOUBLE              double
BINARY              byte[]
VARBINARY           byte[]
LONGVARBINARY       byte[]
DATE                java.sql.Date
TIME                java.sql.Time
TIMESTAMP           java.sql.Timestamp
CLOB                Clob
BLOB                Blob
ARRAY               Array
DISTINCT            mapping of underlying type
STRUCT              Struct
REF                 Ref
DATALINK            java.net.URL
第5集 Mybatis实战插入语法之视频新增和自增主键
简介:讲解Mybatis插入语法的使用和如何获得自增主键
新增一条视频记录
 <insert id="add" parameterType="net.xdclass.online_class.domain.Video">

        INSERT INTO `video` ( `title`, `summary`, `cover_img`, `price`, `create_time`, `point`)
        VALUES
      (#{title,jdbcType=VARCHAR},#{summary,jdbcType=VARCHAR},#{coverImg,jdbcType=VARCHAR},#{price,jdbcType=INTEGER},
       #{createTime,jdbcType=TIMESTAMP},#{point,jdbcType=DOUBLE});

</insert>
如何获得插入的自增主键
<insert id="add" parameterType="net.xdclass.online_class.domain.Video" useGeneratedKeys="true" keyProperty="id" keyColumn="id" >
代码
      //新增一条记录
            Video video =  new Video();
            video.setTitle("小滴课堂面试专题900道");
            video.setCoverImg("xdclass.net/aaa.png");
            video.setPoint(9.4);
            video.setCreateTime(new Date());
            video.setPrice(9900);
            video.setSummary("这个是面试专题概要");

            int rows = videoMapper.add(video);

            System.out.println(rows);

            System.out.println(video.toString());
第6集 Mybatis实战foreach批量插入语法之视频批量插入
简介:讲解Mybatis foreach批量插入语法的使用
批量插入多条视频记录
foreach: 用于循环拼接的内置标签,常用于 批量新增、in查询等常见
包含以下属性:
  collection:必填,值为要迭代循环的集合类型,情况有多种
    入参是List类型的时候,collection属性值为list
    入参是Map类型的时候,collection 属性值为map的key值

    item:每一个元素进行迭代时的别名
    index:索引的属性名,在集合数组情况下值为当前索引值,当迭代对象是map时,这个值是map的key
    open:整个循环内容的开头字符串
    close:整个循环内容的结尾字符串
    separator: 每次循环的分隔符
例子
<!--批量插入-->
<insert id="addBatch" parameterType="net.xdclass.online_class.domain.Video" useGeneratedKeys="true" keyProperty="id" keyColumn="id" >

INSERT INTO `video` ( `title`, `summary`, `cover_img`, `price`, `create_time`, `point`)
VALUES

<foreach collection="list" item="video" separator=",">

(#{video.title,jdbcType=VARCHAR},#{video.summary,jdbcType=VARCHAR},#{video.coverImg,jdbcType=VARCHAR},
#{video.price,jdbcType=INTEGER},
#{video.createTime,jdbcType=TIMESTAMP},#{video.point,jdbcType=DOUBLE})

</foreach>
如果批量插入要获取自增id, 可以按照单条记录获得自增id的方式
![]() 愿景:"让编程不再难学,让技术与生活更加有趣"
愿景:"让编程不再难学,让技术与生活更加有趣"
第十五章 案例实战MyBatis3.X玩转更新和删除
第1集 MyBatis3.X实战更新语法之视频更新操作
简介:讲解Mybatis视频更新操作
update 语法更新视频对象
    <update id="updateVideo" parameterType="net.xdclass.online_class.domain.Video">

        UPDATE video

        set
          title = #{title,jdbcType=VARCHAR},

          summary = #{summary,jdbcType=VARCHAR},

          cover_img = #{coverImg,jdbcType=VARCHAR},

          price = #{price,jdbcType=INTEGER},

          c_id = #{cId,jdbcType=INTEGER},

         point = #{point,jdbcType=INTEGER},

         learn_base = #{learnBase,jdbcType=VARCHAR},

         learn_result = #{learnResult,jdbcType=VARCHAR},

         total_episode = #{totalEpisode,jdbcType=INTEGER},

         update_time = now()

         WHERE

         id = #{id}

    </update>
存在其他不想被更新的字段却置为null或者默认值了
第2集 MyBatis3.X实战 更新语法之选择性更新标签使用
简介:讲解Mybatis 动态字段更新 if test 标签使用
可以选择性更新非空字段
if test标签介绍
if 标签可以通过判断传入的值来确定查询条件,test 指定一个OGNL表达式
常见写法
//当前字段符合条件才更新这个字段的值
<if test='title != null and id == 87 '> title = #{title}, </if>

<if test="title!=null"> title = #{title}, </if>
代码(里面包含一个惨痛教训,一定要看pojo类里面的是基本数据类型,还是包装数据类型)
<update id="updateVideoSelective" parameterType="net.xdclass.online_class.domain.Video">

        update video

        <trim prefix="set" suffixOverrides=",">

            <if test="title != null "> title = #{title,jdbcType=VARCHAR},</if>

            <if test="summary != null "> summary = #{summary,jdbcType=VARCHAR},</if>

            <if test="coverImg != null "> cover_img = #{coverImg,jdbcType=VARCHAR},</if>

            <if test="price != 0 "> price = #{price,jdbcType=INTEGER},</if>

            <if test="createTime !=null "> create_time = #{createTime,jdbcType=TIMESTAMP},</if>

            <!-- 特别注意: 一定要看pojo类里面的是基本数据类型,还是包装数据类型-->
            <if test="point != null "> point = #{point,jdbcType=DOUBLE},</if>

        </trim>

        where
        id = #{id}

    </update>
第3集 MyBatis3.X实战之删除语法和转义字符使用
简介:讲解Mybatis删除语法操作
delete删除语法
- 需求:删除某个时间段之后 且金额大于 10元的数据
<delete id="deleteByCreateTimeAndPrice" parameterType="java.util.Map">

        delete from video where create_time <![CDATA[ > ]]> #{createTime} and price <![CDATA[ >= ]]> #{price}

</delete>
为什么要转义字符:
- 由于MyBatis的sql写在XML里面, 有些sql的语法符号和xml里面的冲突
大于等于 <![CDATA[ >= ]]>

小于等于 <![CDATA[ <= ]]>
![]() 愿景:"让编程不再难学,让技术与生活更加有趣"
愿景:"让编程不再难学,让技术与生活更加有趣"
第十六章 新版MyBatis3.X玩转常见配置
第1集 MyBatis3.X 配置文件mybatis-config.xml常见属性
简介:讲解Mybatis的mybatis-config.xml常见配置
核心配置文件(dom节点顺序要求,不然报错)
- 记住常用的,不常用的简单介绍,
configuration(配置)
    properties(属性)
    settings(设置)
    typeAliases(类型别名)
    typeHandlers(类型处理器)
    objectFactory(对象工厂)
    plugins(插件,少用)
    environments(环境配置,不配多环境,基本在Spring里面配置)
    environment(环境变量)
      transactionManager(事务管理器)
      dataSource(数据源)
  databaseIdProvider(数据库厂商标识)
  mappers(映射器)
第2集 MyBatis3.X 查询typeAlias别名的使用
简介:讲解Mybatis的查询类别名typeAlias的使用
typeAlias
- 类型别名,给类取个别名,可以不用输入类的全限定名
<!--<select id="selectById" parameterType="java.lang.Integer" resultType="net.xdclass.online_class.domain.Video">-->
    <select id="selectById" parameterType="java.lang.Integer" resultType="Video">
        select * from video where id = #{video_id,jdbcType=INTEGER}

    </select>
如果有很多类,是否需要一个个配置?
- 不用一个个配置,使用包扫描即可
<typeAliases>

        <!--<typeAlias type="net.xdclass.online_class.domain.Video" alias="Video"/>-->
        <package name="net.xdclass.online_class.domain"/>

</typeAliases>
本身就内置很多别名,比如Integer、String、List、Map 等
第3集 高性能sql之MyBatis3.X的Sql片段使用
简介:讲解Mybatis的sql片段的使用
你是否常用select * 去查询数据库
- 小项目没问题,高并发项目不推荐这样使用,查询性能低,应该选择需要的字段
什么是sql片段
根据业务需要,自定制要查询的字段,并可以复用
    <sql id="base_video_field">
        id,title,summary,cover_img
    </sql>

     <select id="selectById" parameterType="java.lang.Integer" resultType="Video">

        select <include refid="base_video_field"/>  from video where id = #       {video_id,jdbcType=INTEGER}

    </select>


    <select id="selectListByXML" resultType="Video">

        select <include refid="base_video_field"/>  from video

    </select>
![]() 愿景:"让编程不再难学,让技术与生活更加有趣"
愿景:"让编程不再难学,让技术与生活更加有趣"
第十七章 进阶MyBatis3.X复杂Sql查询
第1集 MyBatis3.X的resultMap 你知道多少
简介:讲解Mybatis的resultMap讲解
Mybatis的SQL语句返回结果有两种
resultType
- 查询出的字段在相应的pojo中必须有和它相同的字段对应,或者基本数据类型
- 适合简单查询
resultMap
- 需要自定义字段,或者多表查询,一对多等关系,比resultType更强大
- 适合复杂查询
<resultMap id="VideoResultMap" type="Video">

        <!--
        id 指定查询列的唯一标示
        column 数据库字段的名称
        property pojo类的名称
        -->
        <id column="id" property="id" jdbcType="INTEGER" />

        <result column="video_tile" property="title"  jdbcType="VARCHAR" />
        <result column="summary" property="summary"  jdbcType="VARCHAR" />
        <result column="cover_img"  property="coverImg"  jdbcType="VARCHAR" />

</resultMap>
<select id="selectBaseFieldByIdWithResultMap" resultMap="VideoResultMap">
select id , title as video_tile, summary, cover_img from video where id = #{video_id}
</select>
第2集 ResultMap复杂对象一对一查询结果映射之association
简介:讲解Mybatis 复杂对象映射配置ResultMap的association
- association: 映射到POJO的某个复杂类型属性,比如订单order对象里面包含 user对象
  <resultMap id="VideoOrderResultMap" type="VideoOrder">
        <id column="id" property="id"/>

        <result column="user_id" property="userId"/>
        <result column="out_trade_no" property="outTradeNo"/>
        <result column="create_time" property="createTime"/>
        <result column="state" property="state"/>
        <result column="total_fee" property="totalFee"/>
        <result column="video_id" property="videoId"/>
        <result column="video_title" property="videoTitle"/>
        <result column="video_img" property="videoImg"/>


        <!--
         association 配置属性一对一
         property 对应videoOrder里面的user属性名
         javaType 这个属性的类型
         -->
        <association property="user" javaType="User">
            <id property="id"  column="user_id"/>
            <result property="name" column="name"/>
            <result property="headImg" column="head_img"/>
            <result property="createTime" column="create_time"/>
            <result property="phone" column="phone"/>
        </association>

    </resultMap>

    <!--一对一管理查询订单, 订单内部包含用户属性-->
    <select id="queryVideoOrderList" resultMap="VideoOrderResultMap">

        select

         o.id id,
         o.user_id ,
         o.out_trade_no,
         o.create_time,
         o.state,
         o.total_fee,
         o.video_id,
         o.video_title,
         o.video_img,
         u.name,
         u.head_img,
         u.create_time,
         u.phone
         from video_order o left join user u on o.user_id = u.id

    </select>
代码
// resultmap association关联查询
VideoOrderMapper videoOrderMapper = sqlSession.getMapper(VideoOrderMapper.class);
List<VideoOrder> videoOrderList = videoOrderMapper.queryVideoOrderList();

System.out.println(videoOrderList.toString());
第3集 ResultMap复杂对象一对多查询结果映射之collection
简介:讲解Mybatis 复杂对象一对多映射配置ResultMap的collection
- collection: 一对多查询结果查询映射,比如user有多个订单
<resultMap id="UserOrderResultMap" type="User">

        <id property="id"  column="id"/>
        <result property="name" column="name"/>
        <result property="headImg" column="head_img"/>
        <result property="createTime" column="create_time"/>
        <result property="phone" column="phone"/>

        <!--
        property 填写pojo类中集合类属性的名称
        ofType 集合里面的pojo对象
        -->
        <collection property="videoOrderList" ofType="VideoOrder">

            <!--配置主键,管理order的唯一标识-->
            <id column="order_id" property="id"/>
            <result column="user_id" property="userId"/>
            <result column="out_trade_no" property="outTradeNo"/>
            <result column="create_time" property="createTime"/>
            <result column="state" property="state"/>
            <result column="total_fee" property="totalFee"/>
            <result column="video_id" property="videoId"/>
            <result column="video_title" property="videoTitle"/>
            <result column="video_img" property="videoImg"/>
        </collection>
    </resultMap>

    <select id="queryUserOrder" resultMap="UserOrderResultMap">
        select
        u.id,
        u.name,
        u.head_img,
        u.create_time,
        u.phone,
        o.id order_id,
        o.out_trade_no,
        o.user_id,
        o.create_time,
        o.state,
        o.total_fee,
        o.video_id,
        o.video_title,
        o.video_img
        from user u left join video_order o on u.id = o.user_id

    </select>
代码
 // resultmap association关联查询
VideoOrderMapper videoOrderMapper = sqlSession.getMapper(VideoOrderMapper.class);

//resultmap collection测试

List<User> userList = videoOrderMapper.queryUserOrder();

System.out.println(userList.toString());
第4集 Mybatis3.X ResultMap复杂对象查询总结
简介:总结ResultMap的复杂对象查询
- association 映射的是一个pojo类,处理一对一的关联关系。
- collection 映射的一个集合列表,处理的是一对多的关联关系。
- 模板
<!-- column不做限制,可以为任意表的字段,而property须为type 定义的pojo属性-->
<resultMap id="唯一的标识" type="映射的pojo对象">
  <id column="表的主键字段,或查询语句中的别名字段" jdbcType="字段类型" property="映射pojo对象的主键属性" />
  <result column="表的一个字段" jdbcType="字段类型" property="映射到pojo对象的一个属性"/>

  <association property="pojo的一个对象属性" javaType="pojo关联的pojo对象">
    <id column="关联pojo对象对应表的主键字段" jdbcType="字段类型" property="关联pojo对象的属性"/>
    <result  column="表的字段" jdbcType="字段类型" property="关联pojo对象的属性"/>
  </association>

  <!-- 集合中的property 需要为oftype定义的pojo对象的属性-->
  <collection property="pojo的集合属性名称" ofType="集合中单个的pojo对象类型">
    <id column="集合中pojo对象对应在表的主键字段" jdbcType="字段类型" property="集合中pojo对象的主键属性" />
    <result column="任意表的字段" jdbcType="字段类型" property="集合中的pojo对象的属性" />
  </collection>
</resultMap>
![]() 愿景:"让编程不再难学,让技术与生活更加有趣"
愿景:"让编程不再难学,让技术与生活更加有趣"
第十八章 面试章-MyBatis3.X高手系列-玩转多级缓存和懒加载
第1集 Mybatis3.X 一级缓存讲解和案例实战
简介:讲解Mybatis一级缓存介绍和验证
什么是缓存
- 程序经常要调用的对象存在内存中,方便其使用时可以快速调用,不必去数据库或者其他持久化设备中查询,主要就是提高性能
Mybatis一级缓存
- 简介:一级缓存的作用域是SQLSession,同一个SqlSession中执行相同的SQL查询(相同的SQL和参数),第一次会去查询数据库并写在缓存中,第二次会直接从缓存中取
- 基于PerpetualCache 的 HashMap本地缓存
- 默认开启一级缓存
失效策略:当执行SQL时候两次查询中间发生了增删改的操作,即insert、update、delete等操作commit后会清空该SQLSession缓存; 比如sqlsession关闭,或者清空等
第2集 你知道Mybatis3.X 二级缓存怎么使用《上》
简介:讲解Mybatis二级缓存和配置实操
Mybatis二级缓存
- 简介:二级缓存是namespace级别的,多个SqlSession去操作同一个namespace下的Mapper的sql语句,多个SqlSession可以共用二级缓存,如果两个mapper的namespace相同,(即使是两个mapper,那么这两个mapper中执行sql查询到的数据也将存在相同的二级缓存区域中,但是最后是每个Mapper单独的名称空间)
- 基于PerpetualCache 的 HashMap本地缓存,可自定义存储源,如 Ehcache/Redis等
- 默认是没有开启二级缓存
- 操作流程:第一次调用某个namespace下的SQL去查询信息,查询到的信息会存放该mapper对应的二级缓存区域。 第二次调用同个namespace下的mapper映射文件中,相同的sql去查询信息,会去对应的二级缓存内取结果
失效策略:执行同个namespace下的mapepr映射文件中增删改sql,并执行了commit操作,会清空该二级缓存
注意:实现二级缓存的时候,MyBatis建议返回的POJO是可序列化的, 也就是建议实现Serializable接口
缓存淘汰策略:会使用默认的 LRU 算法来收回(最近最少使用的)
如何开启某个二级缓存 mapper.xml里面配置
<!--开启mapper的namespace下的二级缓存-->
    <!--
        eviction:代表的是缓存回收策略,常见下面两种。
        (1) LRU,最近最少使用的,一处最长时间不用的对象
        (2) FIFO,先进先出,按对象进入缓存的顺序来移除他们

        flushInterval:刷新间隔时间,单位为毫秒,这里配置的是100秒刷新,如果不配置它,当SQL被执行的时候才会去刷新缓存。

        size:引用数目,代表缓存最多可以存储多少个对象,设置过大会导致内存溢出

        readOnly:只读,缓存数据只能读取而不能修改,默认值是false
    -->
<cache eviction="LRU" flushInterval="100000" readOnly="true" size="1024"/>
全局配置: <settings> <!--这个配置使全局的映射器(二级缓存)启用或禁用缓存,全局总开关,这里关闭,mapper中开启了也没用--> <setting name="cacheEnabled" value="true" /> </settings>
第3集 你知道Mybatis3.X 二级缓存怎么使用《下》
简介:讲解Mybatis二级缓存和配置实操
配置实操
如果需要控制全局mapper里面某个方法不使用缓存,可以配置 useCache="false"
<select id="selectById" parameterType="java.lang.Integer" resultType="Video" useCache="false">

select <include refid="base_video_field"/>  from video where id = #{video_id,jdbcType=INTEGER}

</select>
一级缓存和二级缓存使用顺序
- 优先查询二级缓存-》查询一级缓存-》数据库
第4集 你知道Mybatis3.X 懒加载吗-看这个就懂了?
简介:讲解Mybatis3.x的懒加载
- 什么是懒加载: 按需加载,先从单表查询,需要时再从关联表去关联查询,能大大提高数据库性能,并不是所有场景下使用懒加载都能提高效率
- Mybatis懒加载: resultMap里面的association、collection有延迟加载功能
<!--全局参数设置-->
<settings>
    <!--延迟加载总开关-->
    <setting name="lazyLoadingEnabled" value="true"/>
    <!--将aggressiveLazyLoading设置为false表示按需加载,默认为true-->
    <setting name="aggressiveLazyLoading" value="false"/>
</settings>
<resultMap id="VideoOrderResultMapLazy" type="VideoOrder">
        <id column="id" property="id"/>

        <result column="user_id" property="userId"/>
        <result column="out_trade_no" property="outTradeNo"/>
        <result column="create_time" property="createTime"/>
        <result column="state" property="state"/>
        <result column="total_fee" property="totalFee"/>
        <result column="video_id" property="videoId"/>
        <result column="video_title" property="videoTitle"/>
        <result column="video_img" property="videoImg"/>

<!--
select: 指定延迟加载需要执行的statement id
column: 和select查询关联的字段
-->
        <association property="user" javaType="User" column="user_id" select="findUserByUserId"/>


</resultMap>

    <!--一对一管理查询订单, 订单内部包含用户属性  懒加载-->
<select id="queryVideoOrderListLazy" resultMap="VideoOrderResultMapLazy">

        select
         o.id id,
         o.user_id ,
         o.out_trade_no,
         o.create_time,
         o.state,
         o.total_fee,
         o.video_id,
         o.video_title,
         o.video_img
         from video_order o

</select>


<select id="findUserByUserId" resultType="User">

       select  * from user where id=#{id}

</select>
- dubug模式测试懒加载不准确,可以直接run
// resultmap association关联查询(测试懒加载)
VideoOrderMapper videoOrderMapper = sqlSession.getMapper(VideoOrderMapper.class);
List<VideoOrder> videoOrderList = videoOrderMapper.queryVideoOrderListLazy();
System.out.println(videoOrderList.size());

//课程里面演示是6条订单记录,但是只查询3次用户信息,是因为部分用户信息走了一级缓存sqlsession
for(VideoOrder videoOrder : videoOrderList){

    System.out.println(videoOrder.getVideoTitle());
    System.out.println(videoOrder.getUser().getName());
}
![]() 愿景:"让编程不再难学,让技术与生活更加有趣"
愿景:"让编程不再难学,让技术与生活更加有趣"
第十九章 MyBatis3.X高手系列之整合Mysql数据库事务
第1集 新版MyBatis3.x 的事务管理形式
简介:讲解Mybatis的事务管理形式
使用JDBC的事务管理
- 使用 java.sql.Connection对象完成对事务的提交(commit())、回滚(rollback())、关闭(close())
使用MANAGED的事务管理
- MyBatis自身不会去实现事务管理,而让程序的容器如(Spring, JBOSS)来实现对事务的管理
<environment id="development">
<!-- mybatis使用jdbc事务管理方式 -->
<transactionManager type="JDBC"/>
<dataSource type="POOLED">
<property name="driver" value="com.mysql.cj.jdbc.Driver"/>
<property name="url" value="jdbc:mysql://127.0.0.1:3306/xdclass?useUnicode=true&characterEncoding=utf-8&useSSL=false"/>
<property name="username" value="root"/>
<property name="password" value="xdclass.net"/>
</dataSource>
</environment>
事务工厂TransactionFactory 的两个实现类
- JdbcTransactionFactory->JdbcTransaction
- ManagedTransactionFactory->ManagedTransaction
- 注意:如果不是web程序,然后使用的事务管理形式是MANAGED, 那么将没有事务管理功能
第2集 面试题-Mysql的Innodb和MyISAM引擎的区别
简介:讲解mysql常见的两种存储引擎的区别
区别项 Innodb myisam 事务 支持 不支持 锁粒度 行锁,适合高并发 表锁,不适合高并发 是否默认 默认 非默认 支持外键 支持外键 不支持 适合场景 读写均衡,写大于读场景,需要事务 读多写少场景,不需要事务 全文索引 可以通过插件实现, 更多使用ElasticSearch 支持全文索引 重点:MyISAM不支持事务,如果需要事务则改为innodb引擎 更改数据库的表里面的引擎
第3集 新版MyBatis3.x 的事务控制 - 走读源码和案例
简介:讲解mybatis事务控制实战
为什么原先没进行commit操作,也可以插入成功?
- 因为原先是myisam引擎,没有事务,直接插入成功
检查数据库的 引擎 ,改为innodb
- 多个表video/chapter/episode/user/video_order
- video_banner
案例实战
事务管理记得改为这个mybatis-config.xml
<transactionManager type="JDBC"/>
事务管理形式 MANAGED,设置非自动提交,然后注释 commit, 依旧可以保存成功
不用重点关注,公司开发项目的事务控制基本是交给Spring,或者使用分布式事务
![]() 愿景:"让编程不再难学,让技术与生活更加有趣"
愿景:"让编程不再难学,让技术与生活更加有趣"
第二十章 新版SSM之Spring Framework5.X快速入门
第1集 快速认知-新版Spring Framework5.X
简介:讲解什么是spring框架,使用的好处
什么是Spring:轻量级的 DI / IoC 和 AOP 容器的开源框架
有啥好处:
管理创建和组装对象之间的依赖关系 使用前:手工创建
Controller -> Service -> Dao

UserControoler
private UserService userService = new UserService();
使用后:Spring创建,自动注入
面向切面编程(AOP)可以解耦核心业务和边缘业务的关系
场景:用户调用下单购买视频接口,需要判断登录,拦截器是AOP思想的一种实现
使用前:代码写逻辑,每次下单都调用方法判断,多个方法需要判断登录则都需要 登录方法判断
使用后:根据一定的方法或者路径规则进行判断是否要调用,降低代码耦合度
包含java大型项目里面常见解决方案 web层、业务层、数据访问层等
极其便利的整合其他主流技术栈,比如redis、mq、mybatis、jpa
社区庞大和活跃,在微服务、大数据、云计算都有对应的组件
接下来的课程为什么要学?(springboot帮我们简化了很多配置)
- 使用springboot2.x后,大家很少接触到各种细化的bean配置,但是底层实现流程和原理是必须掌握的,面试+工作都是必备
第2集 IDEA+Maven+Spring5.X项目创建
简介:使用 IDEA + Maven + Spring5创建项目
创建项目
- maven
添加依赖
        <!-- https://mvnrepository.com/artifact/org.springframework/spring-context -->
        <dependency>
            <groupId>org.springframework</groupId>
            <artifactId>spring-context</artifactId>
            <version>5.2.5.RELEASE</version>
        </dependency>
        <!-- https://mvnrepository.com/artifact/org.springframework/spring-core -->
        <dependency>
            <groupId>org.springframework</groupId>
            <artifactId>spring-core</artifactId>
            <version>5.2.5.RELEASE</version>
        </dependency>
        <!-- https://mvnrepository.com/artifact/org.springframework/spring-beans -->
        <dependency>
            <groupId>org.springframework</groupId>
            <artifactId>spring-beans</artifactId>
            <version>5.2.5.RELEASE</version>
        </dependency>
添加配置文件applicationContext.xml
添加bean配置
<?xml version="1.0" encoding="UTF-8"?>
<beans xmlns="http://www.springframework.org/schema/beans"
       xmlns:xsi="http://www.w3.org/2001/XMLSchema-instance"
       xsi:schemaLocation="http://www.springframework.org/schema/beans
        https://www.springframework.org/schema/beans/spring-beans.xsd">


    <bean name="video" class="net.xdclass.sp.domain.Video" scope="prototype">
            <property name="name" value="tom"/>
            <property name="id" value="23"/>
    </bean>

</beans>
获取bean
第3集 ApplicationContext.xml配置文件讲解和Helloworld例子解读
简介:讲解Spring5.x的applicationContext.xml配置文件和例子回顾
bean标签 id属性:指定Bean的名称,在Bean被别的类依赖时使用
name属性:用于指定Bean的别名,如果没有id,也可以用name
class属性:用于指定Bean的来源,要创建的Bean的class类,需要全限定名
- 很多配置,比如aop、beans生命周期等,我们边用边讲
第4集 新版SpringFramework5.X核心之 IOC 容器讲解
简介:讲解spring的IOC设计思想
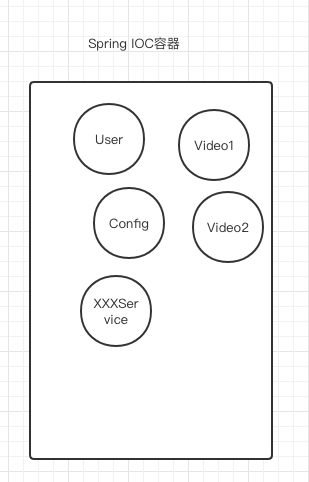
什么是IOC Inverse of Control(控制反转)是一种设计思想 将原本在程序中手动创建对象的流程,交由Spring框架来管理 核心:把创建对象的控制权反转给Spring框架,对象的生命周期由Spring统一管理
把spring ioc 当成一个容器,里面存储管理的对象称为Bean,类实例
案例实操 配置文件里面定义一个bean,通过代码去获取
 <bean  name="video" class="net.xdclass.sp.domain.Video">

        <property name="id" value="9"/>
        <property name="title" value="Spring 5.X课程" />

</bean>

ApplicationContext applicationContext = new ClassPathXmlApplicationContext("applicationContext.xml");

Video  video = (Video)applicationContext.getBean("video");

System.out.println(video.getTitle());
第5集 新版SpringFramework5.X核心之 DI依赖注入讲解
简介:讲解spring的依赖注入讲解
什么是DI Dependency Injection ,依赖注入
IOC容器在运行期间,动态地将对象某种依赖关系注入到对象之中,比如视频订单对象,依赖用视频对象
案例实操
   <bean id="video" class="net.xdclass.sp.domain.Video">

        <property name="id" value="9"/>
        <property name="title" value="Spring 5.X课程" />

    </bean>

    <bean id="videoOrder" class="net.xdclass.sp.domain.VideoOrder" >
        <property name="id" value="8" />
        <property name="outTradeNo" value="23432fnfwedwefqwef2"/>
        <property name="video" ref="video"/>
    </bean>
ApplicationContext context = new ClassPathXmlApplicationContext("applicationContext.xml"); Video video = (Video)context.getBean("video"); System.out.println(video.getTitle()); VideoOrder videoOrder = (VideoOrder) context.getBean("videoOrder"); System.out.println(videoOrder.getOutTradeNo()); System.out.println(videoOrder.getVideo().getTitle());
![]() 愿景:"让编程不再难学,让技术与生活更加有趣"
愿景:"让编程不再难学,让技术与生活更加有趣"
第二十一章 玩转Spring5.X bean 的作用域和注入
第1集 新版Spring5.x的bean的scope作用域讲解
简介:讲解spring的bean 属性scope作用域
scope属性
- singleton:单例, 默认值,调用getBean方法返回是同一个对象,实例会被缓存起来,效率比较高 当一个bean被标识为singleton时候,spring的IOC容器中只会存在一个该bean
<!--<bean id="video" class="net.xdclass.sp.domain.Video" scope="singleton"> -->
<bean id="video" class="net.xdclass.sp.domain.Video" scope="prototype">

        <property name="id" value="9"/>
        <property name="title" value="Spring 5.X课程" />

</bean>
prototype: 多例,调用getBean方法创建不同的对象,会频繁的创建和销毁对象造成很大的开销
其他少用 (作用域 只在 WebApplicationContext)
- request :每个Http请求都会创建一个新的bean
- session: 每个Http Session请求都会创建一个新的bean
- global session(基本不用)
 private static  void testScope(ApplicationContext context){
        Video  video1 = (Video)context.getBean("video");

        Video  video2 = (Video)context.getBean("video");

        //靠匹配内存地址,== 是匹配内存地址
        System.out.println( video1 == video2 );

  }
第2集 实战Spring5.X常见的注入方式
简介:讲解spring的常见的注入方式
- 使用set方法注入
<bean id="video" class="net.xdclass.sp.domain.Video" scope="singleton">

        <property name="id" value="9"/>
        <property name="title" value="Spring 5.X课程" />

</bean>
- 使用带参的构造函数注入
    <bean id="video" class="net.xdclass.sp.domain.Video" >

        <constructor-arg name="title" value="面试专题课程第一季"></constructor-arg>

    </bean>
- POJO类型注入(property 没有使用value属性,而是使用了ref属性)
  <bean id="video" class="net.xdclass.sp.domain.Video" >

        <constructor-arg name="title" value="面试专题课程第一季"></constructor-arg>

    </bean>


    <bean id="videoOrder" class="net.xdclass.sp.domain.VideoOrder" >
        <property name="id" value="8" />
        <property name="outTradeNo" value="23432fnfwedwefqwef2"/>
        <property name="video" ref="video"/>
    </bean>
- 注意: 类的构造函数重写的时候,一定要保留空构造函数!!!
第3集 实战Spring5.X List-Map类型的注入
简介:讲解spring的常见的注入方式-List-Map
- 复杂类型注入,添加两个属性
<bean id="video" class="net.xdclass.sp.domain.Video" >

        <!--list类型注入-->
        <property name="chapterList">
            <list>
                <value>第一章SpringBoot</value>
                <value>第二章Mybatis</value>
                <value>第三章Spring</value>
            </list>
        </property>

        <property name="videoMap">
            <map>
                <entry key="1" value="SpringCloud课程"></entry>
                <entry key="2" value="面试课程"></entry>
                <entry key="3" value="javaweb课程"></entry>
            </map>
        </property>
</bean>


public class Video {

    private int id;

    private String title;


    private List<String> chapterList;


    private Map<Integer,String> videoMap;

//省略set get方法
}
第4集 玩转spring ioc容器Bean之间的依赖和继承
简介:讲解spring里面bean的依赖和继承
- bean继承:两个类之间大多数的属性都相同,避免重复配置,通过bean标签的parent属性重用已有的Bean元素的配置信息 继承指的是配置信息的复用,和Java类的继承没有关系
<bean id="video" class="net.xdclass.sp.domain.Video" scope="singleton">

        <property name="id" value="9"/>
        <property name="title" value="Spring 5.X课程" />

</bean>


<bean id="video2" class="net.xdclass.sp.domain.Video2" scope="singleton" parent="video">

        <property name="summary" value="这个是summary"></property>

</bean>
- 属性依赖: 如果类A是作为类B的属性, 想要类A比类B先实例化,设置两个Bean的依赖关系
<bean id="video" class="net.xdclass.sp.domain.Video" scope="singleton">

        <property name="id" value="9"/>
        <property name="title" value="Spring 5.X课程" />

</bean>

<!--设置两个bean的关系,video要先于videoOrder实例化-->

<bean id="videoOrder" class="net.xdclass.sp.domain.VideoOrder" depends-on="video">
        <property name="id" value="8" />
        <property name="outTradeNo" value="23432fnfwedwefqwef2"/>
        <property name="video" ref="video"/>
</bean>
![]() 愿景:"让编程不再难学,让技术与生活更加有趣"
愿景:"让编程不再难学,让技术与生活更加有趣"
第二十二章 玩转Spring5.X bean 的生命周期和二次处理
第1集 玩转spring ioc容器Bean的生命周期的init和destroy方法
简介:讲解spring里面bean的生命周期里面的init和destroy方法
<bean id="video" class="net.xdclass.sp.domain.Video" scope="singleton" init-method="init" destroy-method="destroy">

        <property name="id" value="9"/>
        <property name="title" value="Spring 5.X课程" />

</bean>


public static void main(String [] args){

  ApplicationContext context = new ClassPathXmlApplicationContext("applicationContext.xml");


  ((ClassPathXmlApplicationContext) context).registerShutdownHook();

 }
第2集 bean的二次加工-Spring5.x后置处理器 BeanPostProcessor
简介:讲解Spring的BeanPostProcessor使用
什么是BeanPostProcessor
- 是Spring IOC容器给我们提供的一个扩展接口
- 在调用初始化方法前后对 Bean 进行额外加工,ApplicationContext 会自动扫描实现了BeanPostProcessor的 bean,并注册这些 bean 为后置处理器
- 是Bean的统一前置后置处理而不是基于某一个bean
执行顺序
Spring IOC容器实例化Bean
调用BeanPostProcessor的postProcessBeforeInitialization方法
调用bean实例的初始化方法
调用BeanPostProcessor的postProcessAfterInitialization方法
注意:接口重写的两个方法不能返回null,如果返回null那么在后续初始化方法将报空指针异常或者通过getBean()方法获取不到bean实例对象
public class CustomBeanPostProcessor implements BeanPostProcessor,Ordered {

    public Object postProcessBeforeInitialization(Object bean, String beanName) throws BeansException {

        System.out.println("CustomBeanPostProcessor1 postProcessBeforeInitialization beanName="+beanName);

        return bean;
    }

    public Object postProcessAfterInitialization(Object bean, String beanName) throws BeansException {
        System.out.println("CustomBeanPostProcessor1 postProcessAfterInitialization beanName="+beanName);
        return bean;
    }


    public int getOrder() {
        return 1;
    }
}
可以注册多个BeanPostProcessor顺序
- 在Spring机制中可以指定后置处理器调用顺序,通过BeanPostProcessor接口实现类实现Ordered接口getOrder方法,该方法返回整数,默认值为 0优先级最高,值越大优先级越低
第3集 Spring5.X bean自动装配Autowire 属性
简介:讲解Spring的Bean的自动装配属性autowire
属性注入
- 前面学过属性注入,set方法、构造函数等,属于手工注入
- 有没办法实现自动装配注入?
Spring自动注入
使用
元素的 autowire 属性为一个 bean 定义指定自动装配模式 autowire设置值
no:没开启
byName: 根据bean的id名称,注入到对应的属性里面
byType:根据bean需要注入的类型,注入到对应的属性里面
- 如果按照类型注入,存在2个以上bean的话会抛异常
- expected single matching bean but found 2
constructor: 通过构造函数注入,需要这个类型的构造函数
<!--<bean id="videoOrder" class="net.xdclass.sp.domain.VideoOrder" autowire="byName">-->
<!--<bean id="videoOrder" class="net.xdclass.sp.domain.VideoOrder" autowire="byType">-->
    <bean id="videoOrder" class="net.xdclass.sp.domain.VideoOrder" autowire="constructor">

        <property name="id" value="8" />
        <property name="outTradeNo" value="23432fnfwedwefqwef2"/>
    </bean>
![]() 愿景:"让编程不再难学,让技术与生活更加有趣"
愿景:"让编程不再难学,让技术与生活更加有趣"
第二十三章 高级知识点-玩转Spring5.X 面向切面编程 AOP
第1集 什么是AOP面向切面编程
简介:讲解什么是AOP面向切面编程
- 假话:方便开发者,提高开发效率,为了广大程序员谋福利
- 真话:就是“懒” -> 懒人智慧才是厉害的

什么是AOP
- Aspect Oriented Program 面向切面编程
- 在不改变原有逻辑上增加额外的功能,比如解决系统层面的问题,或者增加新的功能
场景
- 权限控制
- 缓存
- 日志处理
- 事务控制
AOP思想把功能分两个部分,分离系统中的各种关注点
核心关注点
- 业务的主要功能
横切关注点
- 非核心、额外增加的功能
好处
- 减少代码侵入,解耦
- 可以统一处理横切逻辑
- 方便添加和删除横切逻辑
第2集 掌握AOP面向切面编程核心概念
简介:讲解AOP面向切面编程相关核心概念
- 横切、通知、连接点、切入点、切面???

横切关注点
- 对哪些方法进行拦截,拦截后怎么处理,这些就叫横切关注点
- 比如 权限认证、日志、事物
通知 Advice
- 在特定的切入点上执行的增强处理,有5种通知,后面讲解
- 做啥? 比如你需要记录日志,控制事务 ,提前编写好通用的模块,需要的地方直接调用
连接点 JointPoint
- 要用通知的地方,业务流程在运行过程中需要插入切面的具体位置,
- 一般是方法的调用前后,全部方法都可以是连接点
- 只是概念,没啥特殊
切入点 Pointcut
- 不能全部方法都是连接点,通过特定的规则来筛选连接点, 就是Pointcut,选中那几个你想要的方法
- 在程序中主要体现为书写切入点表达式(通过通配、正则表达式)过滤出特定的一组 JointPoint连接点
- 过滤出相应的 Advice 将要发生的joinpoint地方
切面 Aspect
- 通常是一个类,里面定义 切入点+通知 , 定义在什么地方; 什么时间点、做什么事情
- 通知 advice指明了时间和做的事情(前置、后置等)
- 切入点 pointcut 指定在什么地方干这个事情
- web接口设计中,web层->网关层->服务层->数据层,每一层之间也是一个切面,对象和对象,方法和方法之间都是一个个切面
目标 target
- 目标类,真正的业务逻辑,可以在目标类不知情的条件下,增加新的功能到目标类的链路上
织入 Weaving
- 把切面(某个类)应用到目标函数的过程称为织入
AOP代理
- AOP框架创建的对象,代理就是目标对象的加强
- Spring中的AOP代理可以使JDK动态代理,也可以是CGLIB代理

第3集 AOP里面的通知Advice类型讲解
简介:讲解AOP里面Advice通知的讲解
@Before前置通知
- 在执行目标方法之前运行
@After后置通知
- 在目标方法运行结束之后
@AfterReturning返回通知
- 在目标方法正常返回值后运行
@AfterThrowing异常通知
- 在目标方法出现异常后运行
@Around环绕通知
- 在目标方法完成前、后做增强处理 ,环绕通知是最重要的通知类型 ,像事务,日志等都是环绕通知,注意编程中核心是一个ProceedingJoinPoint,需要手动执行 joinPoint.procced()
第4集 举个通俗的栗子-AOP面向切面编程
简介:举个栗子理解AOP面向切面编程
常见例子
用户下单
- 核心关注点:创建订单
- 横切关注点:记录日志、控制事务
用户观看付费视频
- 核心关注点:获取播放地址
- 横切关注点:记录日志、权限认证
接口业务流程例子
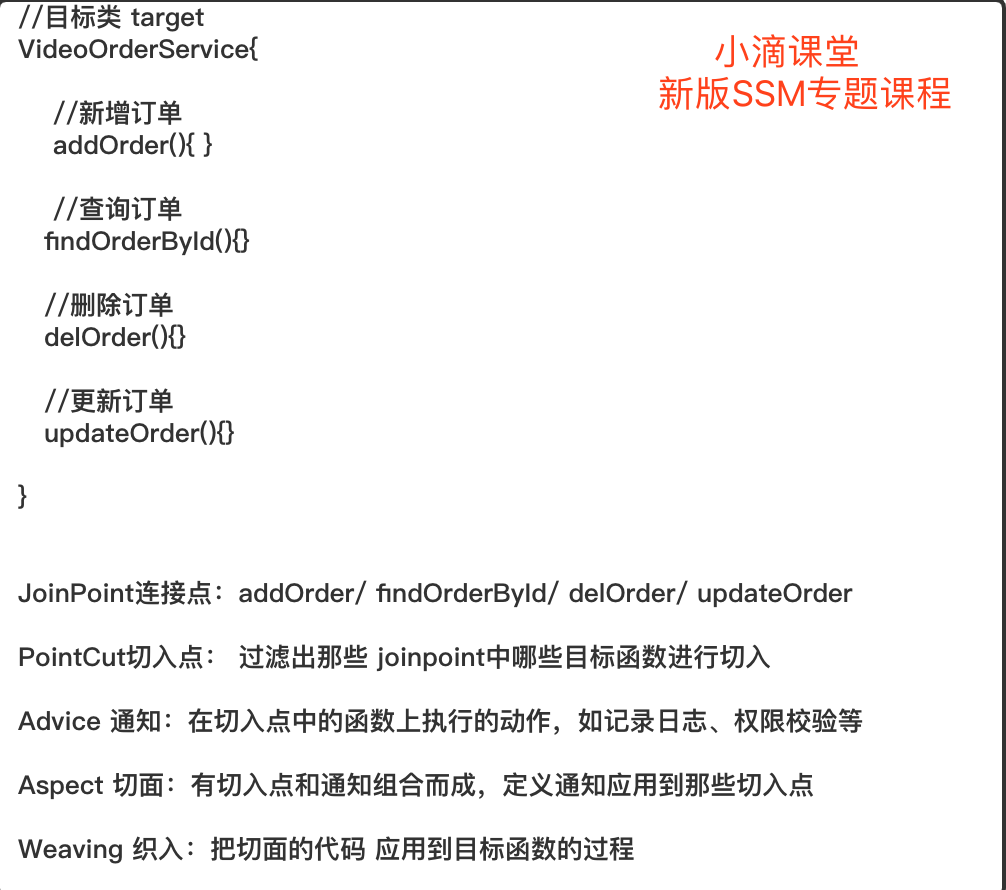
//目标类 VideoOrderService; 里面每个方法都是连接点,;切入点是CUD类型的方法,R读取的不作为切入点
//CRDU全称:增加(Create)、读取查询(Retrieve)、更新(Update)和删除(Delete)

VideoOrderService{
    //新增订单
    addOrder(){ }
    //查询订单
   findOrderById(){}
   //删除订单
   delOrder(){}
   //更新订单
   updateOrder(){}
}


//权限切面类 = 切入点+通知
PermissionAspects{

  //切入点  定义了什么地方
    @Pointcut("execution(public int net.xdclass.sp.service.VideoOrderService.*(..))")
  public void pointCut(){}


  //before 通知 表示在目标方法执行前切入, 并指定在哪个方法前切入
  //什么时候,做什么事情
  @Before("pointCut()")
  public void permissionCheck(){

    System.out.println("在 xxx 之前执行权限校验");
  }
  ....
}

//日志切面类 = 切入点+通知
LogAspect{

  //切入点  定义了什么地方
    @Pointcut("execution(public int net.xdclass.sp.service.VideoOrderService.*(..))")
  public void pointCut(){}


  //after 通知 表示在目标方法执行后切入, 并指定在哪个方法前切入
  //什么时候,做什么事情
  @After("pointCut()")
  public void logStart(){

    System.out.println("在 xxx 之后记录日志");
  }
  ....
}
第5集 Spring5.X AOP切入点表达式讲解
简介:讲解Spring5.X的AOP切入点表达式
切入点表示式
- 除了返回类型、方法名和参数外,其它项都是可选的 (修饰符基本都是省略不写)
        访问修饰符          返回值类型(必填)     包和类                    方法(必填)
execution(modifiers-pattern? ret-type-pattern declaring-type-pattern?name-pattern(param-pattern)  throws-pattern?)
- @Pointcut("execution(public int net.xdclass.sp.service.VideoOrderService.*(..))")
常见匹配语法
*:匹配任何数量字符 单个;
..:匹配任何数量字符,可以多个,在类型模式中匹配任何数量子包;在方法参数模式中匹配任何数量参数
() 匹配一个不接受任何参数的方法
(..) 匹配一个接受任意数量参数的方法
(*) 匹配了一个接受一个任何类型的参数的方法
(*,Integer) 匹配了一个接受两个参数的方法,其中第一个参数是任意类型,第二个参数必须是Integer类型
常见例子
任意公共方法
execution(public * *(..))
任何一个名字以“save”开始的方法
execution(* save*(..))
VideoService接口定义的任意方法(识别)
execution(* net.xdclass.service.VideoService.*(..))
在service包中定义的任意方法(识别)
execution(* net.xdclass.service.*.*(..))
匹配 service 包,子孙包下所有类的所有方法(识别)
execution(* net.xdclass.service..*.*(..))
![]() 愿景:"让编程不再难学,让技术与生活更加有趣"
愿景:"让编程不再难学,让技术与生活更加有趣"
第二十四章 Spring AOP里面的代理知识你知道多少
第1集 你知道动态代理和静态代理吗
简介:讲解静态代理和动态代理
什么是代理
- 为某一个对象创建一个代理对象,程序不直接用原本的对象,而是由创建的代理对象来控制对原对象,通过代理类这中间一层,能有效控制对委托类对象的直接访问,也可以很好地隐藏和保护委托类对象,同时也为实施不同控制策略预留了空间
- A ->B-> C
什么是静态代理
- 由程序创建或特定工具自动生成源代码,在程序运行前,代理类的.class文件就已经存在
什么是动态代理
在程序运行时,运用反射机制动态创建而成,无需手动编写代码
- JDK动态代理
- CGLIB动态代理
第2集 代理模式实战之静态代理讲解
简介:讲解静态代理优缺点和实操
什么是静态代理
- 由程序创建或特定工具自动生成源代码,在程序运行前,代理类的.class文件就已经存在
- 通过将目标类与代理类实现同一个接口,让代理类持有真实类对象,然后在代理类方法中调用真实类方法,在调用真实类方法的前后添加我们所需要的功能扩展代码来达到增强的目的
- A -> B -> C
优点
- 代理使客户端不需要知道实现类是什么,怎么做的,而客户端只需知道代理即可
- 方便增加功能,拓展业务逻辑
缺点
- 代理类中出现大量冗余的代码,非常不利于扩展和维护
- 如果接口增加一个方法,除了所有实现类需要实现这个方法外,所有代理类也需要实现此方法。增加了代码维护的复杂度
public class StaticProxyPayServiceImpl implements PayService {

    private PayService payService;

    public  StaticProxyPayServiceImpl(PayService payService){
        this.payService = payService;
    }

    public String callback(String outTradeNo) {

        System.out.println("StaticProxyPayServiceImpl callback begin");

        String result = payService.callback(outTradeNo);

        System.out.println("StaticProxyPayServiceImpl callback end");

        return result;
    }

    public int save(int userId, int productId) {

        System.out.println("StaticProxyPayServiceImpl save begin");

        int id = payService.save(userId, productId);

        System.out.println("StaticProxyPayServiceImpl save end");

        return id;
    }
}
第3集 AOP的实现策略之JDK动态代理
简介:讲解AOP常见的实现的策略JDK动态代理
什么是动态代理
- 在程序运行时,运用反射机制动态创建而成,无需手动编写代码
- JDK动态代理与静态代理一样,目标类需要实现一个代理接口,再通过代理对象调用目标方法
实操:
定义一个java.lang.reflect.InvocationHandler接口的实现类,重写invoke方法

//Object proxy:被代理的对象
//Method method:要调用的方法
//Object[] args:方法调用时所需要参数
public interface InvocationHandler {
    public Object invoke(Object proxy, Method method, Object[] args) throws Throwable;
}
public class JdkProxy implements InvocationHandler {

    //目标类
    private Object targetObject;

    //获取代理对象
    public Object newProxyInstance(Object targetObject){
        this. targetObject = targetObject;

        //绑定关系,也就是和具体的哪个实现类关联
        return  Proxy.newProxyInstance(targetObject.getClass().getClassLoader(),
                targetObject.getClass().getInterfaces(),this);
    }


    public Object invoke(Object proxy, Method method, Object[] args) {


        Object result = null;

        try{
            System.out.println("通过JDK动态代理调用 "+method.getName() +", 打印日志 begin");

            result = method.invoke(targetObject,args);

            System.out.println("通过JDK动态代理调用 "+method.getName() +", 打印日志 end");

        }catch (Exception e){

            e.printStackTrace();
        }

        return result;


    }
}
第4集 AOP的实现策略之CGLib动态代理
简介:讲解AOP常见的实现的策略JDK动态代理
什么是动态代理
- 在程序运行时,运用反射机制动态创建而成,无需手动编写代码
- CgLib动态代理的原理是对指定的业务类生成一个子类,并覆盖其中的业务方法来实现代理
public class CglibProxy  implements MethodInterceptor {

    //目标类
    private Object targetObject;

    //绑定关系
    public Object newProxyInstance(Object targetObject){
        this.targetObject = targetObject;

        Enhancer enhancer = new Enhancer();
        //设置代理类的父类(目标类)
        enhancer.setSuperclass(this.targetObject.getClass());

        //设置回调函数
        enhancer.setCallback(this);

        //创建子类(代理对象)
        return enhancer.create();
    }

    public Object intercept(Object o, Method method, Object[] args, MethodProxy methodProxy) throws Throwable {

        Object result = null;

        try{

            System.out.println("通过CGLIB动态代理调用 "+method.getName() +", 打印日志 begin");

            result = methodProxy.invokeSuper(o,args);

            System.out.println("通过CGLIB动态代理调用 "+method.getName() +", 打印日志 begin");

        }catch (Exception e){
            e.printStackTrace();
        }


        return result;
    }


}
第5集 CGLib动态代理和JDK动态代理总结
简介:总结CGlib和JDk动态代理
- 动态代理与静态代理相比较,最大的好处是接口中声明的所有方法都被转移到调用处理器一个集中的方法中处理,解耦和易维护
两种动态代理的区别:
- JDK动态代理:要求目标对象实现一个接口,但是有时候目标对象只是一个单独的对象,并没有实现任何的接口,这个时候就可以用CGLib动态代理
- CGLib动态代理,它是在内存中构建一个子类对象从而实现对目标对象功能的扩展
- JDK动态代理是自带的,CGlib需要引入第三方包
- CGLib动态代理基于继承来实现代理,所以无法对final类、private方法和static方法实现代理
Spring AOP中的代理使用的默认策略:
- 如果目标对象实现了接口,则默认采用JDK动态代理
- 如果目标对象没有实现接口,则采用CgLib进行动态代理
- 如果目标对象实现了接扣,程序里面依旧可以指定使用CGlib动态代理
![]() 愿景:"让编程不再难学,让技术与生活更加有趣"
愿景:"让编程不再难学,让技术与生活更加有趣"
第二十五章 面向切面编程 Spring AOP 实战 配置
第1集 基于Spring的AOP快速实现通用日志打印《上》
简介:实战SpringAOP配置日志打印基础准备
需求分析:针对Videoservice接口实现日志打印
三个核心包
spring-aop:AOP核心功能,例如代理工厂
aspectjweaver:简单理解,支持切入点表达式
aspectjrt:简单理解,支持aop相关注解
定义service接口和实现类
定义横切关注点
引入相关包
<dependency>
     <groupId>org.aspectj</groupId>
     <artifactId>aspectjweaver</artifactId>
     <version>1.6.11</version>
</dependency>
maven仓库改为阿里云
<repositories>

        <repository>
            <id>maven-ali</id>
            <url>http://maven.aliyun.com/nexus/content/groups/public/</url>
            <releases>
                <enabled>true</enabled>
            </releases>
            <snapshots>
                <enabled>true</enabled>
                <updatePolicy>always</updatePolicy>
                <checksumPolicy>fail</checksumPolicy>
            </snapshots>

        </repository>
 </repositories>
第2集 基于Spring的AOP快速实现通用日志打印《下》
简介:实战SpringAOP配置日志打印,配置切面和织入
添加schema
http://www.springframework.org/schema/aop
http://www.springframework.org/schema/aop/spring-aop-4.2.xsd"
xmlns:aop="http://www.springframework.org/schema/aop"
配置bean和aop
<bean id="timeHandler" class="net.xdclass.sp.aop.TimeHandler"/> <bean id="videoService" class="net.xdclass.sp.service.VideoServiceImpl"/> <!--aop配置--> <aop:config> <!--横切关注点--> <aop:aspect id="timeAspect" ref="timeHandler"> <!--定义切入点表达式--> <!--<aop:pointcut id="allMethodLogPointCut" expression="execution(* net.xdclass.sp.service.VideoService.sav*(..))"/>--> <aop:pointcut id="allMethodLogPointCut" expression="execution(* net.xdclass.sp.service.VideoService.*(..))"/> <!--配置前置通知和后置通知--> <aop:before method="printBefore" pointcut-ref="allMethodLogPointCut"/> <aop:after method="printAfter" pointcut-ref="allMethodLogPointCut"/> </aop:aspect> <!--横切关注点--> <!--<aop:aspect id="timeAspect" ref="timeHandler">--> <!--<!–定义切入点表达式–>--> <!--<!–<aop:pointcut id="allMethodLogPointCut" expression="execution(* net.xdclass.sp.service.VideoService.sav*(..))"/>–>--> <!--<aop:pointcut id="allMethodLogPointCut" expression="execution(* net.xdclass.sp.service.VideoService.*(..))"/>--> <!--<!–配置前置通知和后置通知–>--> <!--<aop:before method="printBefore" pointcut-ref="allMethodLogPointCut"/>--> <!--<aop:after method="printAfter" pointcut-ref="allMethodLogPointCut"/>--> <!--</aop:aspect>--> </aop:config>
![]() 愿景:"让编程不再难学,让技术与生活更加有趣"
愿景:"让编程不再难学,让技术与生活更加有趣"
第二十六章 玩转Spring5.X Xml配置转换到注解配置
第1集 论Spring使用方式之XML和注解的优缺点
简介:讲解Spring使用xml和注解的优缺点
spring的使用方式有两种 xml配置和注解
- 有些公司只用其中一种,也有公司xml 配置与注解配置一起使用
注解的优势:配置简单,维护方便
xml的优势:单修改xml时不用改源码,不用重新编译和部署
- 结论: 看团队开发规范进行选择,没有强调一定用哪个 更多的是xml+注解配合使用,比如spring整合mybatis
第2集 实战Spring5.X的注解配置项目
简介:讲解spring的使用注解配置项目
- 开启注解配置和包扫描
public static void main(String[] args) {


     AnnotationConfigApplicationContext context = new AnnotationConfigApplicationContext();

        //扫描指定的包,包括子包
        context.scan("net.xdclass");


        //里面完成初始化操作,核心方法
        context.refresh();


        VideoService videoService = (VideoService) context.getBean("videoService");
        videoService.findById(2);


        Video video = (Video) context.getBean("video");
        video.init();
    }
第3集 实战Spring5.X的常用注解和xml对比《上》
简介:讲解spring的xml和注解对比《上》
常用注解
bean定义
- xml方式:
- 注解方式:@Component 通用组件 细分: @Controller (用于web层) @Service (用于service层) @Repository (用于dao仓库层)
- xml方式:
bean取名
- xml方式:通过id或者name
- 注解方式:@Component("XXXX")
bean注入
- xml方式:通过
- 注解方式:类型注入@Autowired 名称注入@Qualifier
- xml方式:通过
第4集 实战Spring5.X的常用注解和xml对比《下》
简介:讲解spring的xml和注解对比《上》
bean生命周期
- xml方式:init-method、destroy-method
- 注解方式:@PostConstruct初始化、@PreDestroy销毁
bean作用范围
- xml方式:scope属性
- 注解方式:@scope注解
![]() 愿景:"让编程不再难学,让技术与生活更加有趣"
愿景:"让编程不再难学,让技术与生活更加有趣"
第二十七章 玩转Spring5.X Xml配置转换到注解配置进阶
第1集 spring的@Configuration和@Bean注解定义第三方bean
简介:讲解@Configuration和@Bean注解的使用
- @Configuration标注在类上,相当于把该类作为spring的xml配置文件中的
,作用为:配置spring容器(应用上下文)
- @bean注解:用于告诉方法产生一个Bean对象,然后这个Bean对象交给Spring管理,Spring将会将这个Bean对象放在自己的IOC容器中
- 注意点:SpringIOC容器管理一个或者多个bean,这些bean都需要在@Configuration注解下进行创建
@Configuration
public class AppConfig {

    //使用@bean注解,表明这个bean交个spring 进行管理
    // 如果没有指定名称,默认采用 方法名 + 第一个字母小写 作为bean的名称
    @Bean(name = "videoOrderName",initMethod = "init",destroyMethod = "destroy")
    @Scope
    public VideoOrder videoOrder(){
        return new VideoOrder();
    }

}
第2集 Spring的自动映射配置文件PropertySource注解讲解
简介:讲解@PropertySource注解的使用
@PropertySource,指定加载配置文件
- 配置文件映射到实体类
使用@Value映射到具体的java属性
@Configuration
@PropertySource(value = {"classpath:config.properties"})
public class CustomConfig {

    @Value("${server.host}")
    private String host;

    @Value("${server.port}")
    private int port;

    public String getHost() {
        return host;
    }

    public void setHost(String host) {
        this.host = host;
    }

    public int getPort() {
        return port;
    }

    public void setPort(int port) {
        this.port = port;
    }
}
![]() **愿景:"让编程不再难学,让技术与生活更加有趣"
**愿景:"让编程不再难学,让技术与生活更加有趣"
第二十八章 案例实战之基于Spring注解配置AOP面向切面编程
第1集 Spring AOP注解基础准备
简介:讲解Spring AOP注解的基础准备
- 声明切面类 @Aspect(切面): 通常是一个类,里面可以定义切入点和通知
- 配置切入点和通知
@Component
//告诉spring,这个一个切面类,里面可以定义切入点和通知
@Aspect
public class LogAdvice {


    //切入点表达式
    @Pointcut("execution(* net.xdclass.sp.service.VideoServiceImpl.*(..))")
    public void aspect(){

    }

    //前置通知
    @Before("aspect()")
    public void beforeLog(JoinPoint joinPoint){
        System.out.println("LogAdvice  beforeLog");
    }


    //后置通知
    @After("aspect()")
    public void afterLog(JoinPoint joinPoint){
        System.out.println("LogAdvice  afterLog");
    }

}
第2集 开启Spring AOP注解配置和扫描
简介:开启Spring AOP注解和扫描
- 开启SpringAOP注解配置
@Configuration
@ComponentScan("net.xdclass")
@EnableAspectJAutoProxy  //开启了spring对aspect的支持
public class AnnotationAppConfig {

}
public static void main(String[] args) {

AnnotationConfigApplicationContext context = new AnnotationConfigApplicationContext(AnnotationAppConfig.class);

        VideoService videoService = (VideoService) context.getBean("videoService");

        videoService.findById(2);

}
- 效果测试
@Component
//告诉spring,这个一个切面类,里面可以定义切入点和通知
@Aspect
public class LogAdvice {

    //切入点表达式,也可以直接在通知上编写切入点表达式
    @Pointcut("execution(* net.xdclass.sp.service.VideoServiceImpl.*(..))")
    public void aspect(){

    }

    //前置通知
    //@Before("aspect()")

    @Before("execution(* net.xdclass.sp.service.VideoServiceImpl.*(..))")
    public void beforeLog(JoinPoint joinPoint){
        System.out.println("LogAdvice  beforeLog");
    }


    //后置通知
    @After("aspect()")
    public void afterLog(JoinPoint joinPoint){
        System.out.println("LogAdvice  afterLog");
    }

}
第3集 AOP案例实战之环绕通知统计接口耗时
简介:通过AOP的环绕通知统计方法调用耗时
- 配置环绕通知:打印方法请求耗时时间
- 环绕通知获取目标方法和参数
 /**
     * 环绕通知
     * @param joinPoint
     */
    @Around("aspect()")
    public void around(JoinPoint joinPoint){

      Object target = joinPoint.getTarget().getClass().getName();
        System.out.println("调用者="+target);

        //目标方法签名
        System.out.println("调用方法="+joinPoint.getSignature());

        //通过joinPoint获取参数
        Object [] args = joinPoint.getArgs();
        System.out.println("参数="+args[0]);


        long start = System.currentTimeMillis();
        System.out.println("环绕通知 环绕前=========");

        //执行连接点的方法
        try {
            ((ProceedingJoinPoint)joinPoint).proceed();
        } catch (Throwable throwable) {
            throwable.printStackTrace();
        }

        long end = System.currentTimeMillis();
        System.out.println("环绕通知 环绕后=========");

        System.out.println("调用方法总耗时 time = " + (end - start) +" ms");
    }
- 测试效果
![]() 愿景:"让编程不再难学,让技术与生活更加有趣"
愿景:"让编程不再难学,让技术与生活更加有趣"
第二十九章 新版SSM整合-打通Mysql数据库控制事务(包含面试题)
第1集 Spring 常见的事务管理-面试常考点
简介:讲解Spring常见的事务管理
事务:多个操作,要么同时成功,要么失败后一起回滚
具备ACID四种特性
- Atomic(原子性)
- Consistency(一致性)
- Isolation(隔离性)
- Durability(持久性)
你知道常见的Spring事务管理方式吗
- 编程式事务管理:
* 代码中调用beginTransaction()、commit()、rollback()等事务管理相关的方法,通过TransactionTempalte手动管理事务(用的少)
- 声明式事务管理:
* 通过AOP实现,可配置文件方式或者注解方式实现事务的管理控制(用的多)
你知道声明式事务管理本质吗:
本质是对方法前后进行拦截,底层是建立在 AOP 的基础之上
在目标方法开始之前创建或者加入一个事务,在执行完目标方法之后根据执行情况提交或者回滚事务
第2集 Spring事务的传播属性和隔离级别
简介:讲解Spring事务的传播属性和隔离级别
事物传播行为介绍:
如果在开始当前事务之前,一个事务上下文已经存在,此时有若干选项可以指定一个事务性方法的执行行为
- @Transactional(propagation=Propagation.REQUIRED) 如果有事务, 那么加入事务, 没有的话新建一个(默认情况下)
- @Transactional(propagation=Propagation.NOT_SUPPORTED) 不为这个方法开启事务
- @Transactional(propagation=Propagation.REQUIRES_NEW) 不管是否存在事务,都创建一个新的事务,原来的挂起,新的执行完毕,继续执行老的事务
- @Transactional(propagation=Propagation.MANDATORY) 必须在一个已有的事务中执行,否则抛出异常
- @Transactional(propagation=Propagation.NEVER) 必须在一个没有的事务中执行,否则抛出异常(与Propagation.MANDATORY相反)
- @Transactional(propagation=Propagation.SUPPORTS) 如果其他bean调用这个方法,在其他bean中声明事务,那就用事务.如果其他bean没有声明事务,那就不用事务.
- @Transactional(propagation=Propagation.NESTED) 如果当前存在事务,则创建一个事务作为当前事务的嵌套事务来运行; 如果当前没有事务,则该取值等价于Propagation.REQUIRED。
事务隔离级别: 是指若干个并发的事务之间的隔离程度
- @Transactional(isolation = Isolation.READ_UNCOMMITTED) 读取未提交数据(会出现脏读, 不可重复读) 基本不使用
- @Transactional(isolation = Isolation.READ_COMMITTED) 读取已提交数据(会出现不可重复读和幻读)
- @Transactional(isolation = Isolation.REPEATABLE_READ) 可重复读(会出现幻读)
- @Transactional(isolation = Isolation.SERIALIZABLE) 串行化
- MYSQL: 默认为REPEATABLE_READ级别
第3集 新版SpringBoot-Spring-Mybatsi事务控制讲解
简介:新版SSM @Transactional 事务控制讲解
快速创建SpringBoot+Spring+Mybatsi项目
连接打通数据库
spring.datasource.driver-class-name =com.mysql.cj.jdbc.Driver
spring.datasource.url=jdbc:mysql://127.0.0.1:3306/online_xdclass?useUnicode=true&characterEncoding=utf-8&useSSL=false
spring.datasource.username=root
spring.datasource.password=xdclass.net
#使用阿里巴巴druid数据源,默认使用自带的
#spring.datasource.type =com.alibaba.druid.pool.DruidDataSource
#开启控制台打印sql
mybatis.configuration.log-impl=org.apache.ibatis.logging.stdout.StdOutImpl
多表操作,通过@Transactional控制事务
- 启动类加注解 @EnableTransactionManagement
- 业务类 加 @Transactional
第4集 新版SpringBoot-Spring-Mybatsi课程总结和后续内容预告
简介:新版SSM课程总结和后续内容预告
新版SSM课程总结
- SpringBoot
- Mybatis
- Spring
- 综合项目实战规划
- 后端 SpringBoot + Spring5 + Mybatis + Maven +IDEA +MySql + JWT + Guava + Jmeter5.X
- 前端 Vue + Vuex + Axios + CubeUI
- 阿里云ECS CentOS7 + Nginx + 域名绑定
![]() 愿景:"让编程不再难学,让技术与生活更加有趣"
愿景:"让编程不再难学,让技术与生活更加有趣"
手机端-小滴课堂在线教育系统效果演示和技术准备
第1集 小滴课堂在线教育项目效果演示
简介:演示手机端小滴课堂在线教育项目
模块
- 注册
- 登录
- 轮播图
- 视频列表
- 视频详情
- 下单购买
- 我的订单
- 个人中心
项目技术栈
- 后端 SpringBoot + Spring +Mybatis +JWT +Mysql +Gauva +Jmeter5.X + IDEA
- 前端 Vue +VueCLi + Axios +Vuex + CubeUI + VSCODE
- 部署 阿里云CentOS7 + Nginx + 域名解析
第2集 轻量级-小滴课堂核心数据库表字段设计和测试数据准备
简介:设计轻量版-在线教育的核心库表结构
设计对应的表字段(统一使用Innodb引擎,mysql5.7版本)
- video_banner
- video
- chapter
- episode
- video_order
- user
Mysql测试数据导入
mysql客户端软件
- 苹果系统:sequel pro
- windows:navicat
学习建议:
- 务必会mysql,不会的话看mysql专题课程
- mysql软件自行安装,Mac、window、Linux 搜索博文,或者看mysql专题
- 本地安装是可以直接访问
- 虚拟机或者云服务器安装,测试的话一定要开启mysql远程访问和防火墙开放对应的端口(搜索博文)
- 没有一成不变的架构,没有通用的设计方案,一定跟业务结合
导入课程sql, 本地安装Myql务必使用5.7版本
第3集 新版SSM-SpringBoot2.X 后端项目框架搭建
简介:新版SSM- Springboot2.X+Spring5.x + Mybatis3.X项目创建和依赖准备
在线创建
添加依赖
springboot核心包
    <dependency>
      <groupId>org.springframework.boot</groupId>
      <artifactId>spring-boot-starter-web</artifactId>
    </dependency>
    <dependency>
      <groupId>org.springframework.boot</groupId>
      <artifactId>spring-boot-starter-test</artifactId>
      <scope>test</scope>
      <exclusions>
        <exclusion>
          <groupId>org.junit.vintage</groupId>
          <artifactId>junit-vintage-engine</artifactId>
        </exclusion>
      </exclusions>
    </dependency>
mybaits依赖
<dependency>
      <groupId>org.mybatis.spring.boot</groupId>
      <artifactId>mybatis-spring-boot-starter</artifactId>
      <version>2.1.2</version>
</dependency>
mysql驱动 (注意需要去掉runtime,否则报错)
<dependency>
      <groupId>mysql</groupId>
      <artifactId>mysql-connector-java</artifactId>
</dependency>
通用工具包
<dependency>
      <groupId>org.apache.commons</groupId>
      <artifactId>commons-lang3</artifactId>
      <version>3.9</version>
</dependency>
跨域身份验证解决方案 Json web token包
<!-- JWT相关 -->
<dependency>
      <groupId>io.jsonwebtoken</groupId>
      <artifactId>jjwt</artifactId>
      <version>0.7.0</version>
</dependency>
高性能缓存组件
<!--guava依赖包-->
<dependency>
      <groupId>com.google.guava</groupId>
      <artifactId>guava</artifactId>
      <version>19.0</version>
</dependency>
第4集 小滴课堂综合实战-项目相关包和实体类创建
简介:创建相关的包和项目用的实体类
项目基本包结构
domain实体类创建完成
controller-service-dao
utils-config-interceptor
![]() 愿景:"让编程不再难学,让技术与生活更加有趣"
愿景:"让编程不再难学,让技术与生活更加有趣"
小滴课堂项目实战之打通Myabtis连接Mysql开发视频列表
第1集 小滴课堂实战之Mybaits打通Mysql数据库
简介:配置Mybatis连接Mysql数据库
添加数据库配置
server.port=8081

#==============================数据库相关配置========================================
spring.datasource.driver-class-name =com.mysql.cj.jdbc.Driver
spring.datasource.url=jdbc:mysql://127.0.0.1:3306/online_xdclass?useUnicode=true&characterEncoding=utf-8&useSSL=false
spring.datasource.username=root
spring.datasource.password=xdclass.net
#使用阿里巴巴druid数据源,默认使用自带的
#spring.datasource.type =com.alibaba.druid.pool.DruidDataSource
#开启控制台打印sql
mybatis.configuration.log-impl=org.apache.ibatis.logging.stdout.StdOutImpl

# mybatis 下划线转驼峰配置,两者都可以
#mybatis.configuration.mapUnderscoreToCamelCase=true
mybatis.configuration.map-underscore-to-camel-case=true
#配置扫描
mybatis.mapper-locations=classpath:mapper/*.xml
#配置xml的结果别名
mybatis.type-aliases-package=net.xdclass.online_xdclass.domain
创建Video相关类
创建VideoMapper.xml
<?xml version="1.0" encoding="UTF-8" ?>
<!DOCTYPE mapper PUBLIC "-//mybatis.org//DTD Mapper 3.0//EN" "http://mybatis.org/dtd/mybatis-3-mapper.dtd" >
<mapper namespace="net.xdclass.online_xdclass.mapper.VideoMapper">

</mapper>
配置扫描mapper路径
@SpringBootApplication
@MapperScan("net.xdclass.online_xdclass.mapper")
public class OnlineXdclassApplication {

  public static void main(String[] args) {
    SpringApplication.run(OnlineXdclassApplication.class, args);
  }

}
第2集 小滴课堂实战之视频列表接口开发+API权限路径规划
简介:开发视频列表JSON接口
postman调试接口
- 浏览器如果要支持json格化,需要安装谷歌插件,但是网络问题直接安装不了,推荐使用插件
开发视频列表接口
开发jsondata工具类
规划api权限路径
- /api/v1/pub/AA/BB 这个是不需要登录
- /api/v1/pri/AA/BB 这个是需要登录
第3集 小滴课堂实战之dev-tool 实现IDEA项目热部署
简介:使用dev-tool实现热部署
步骤
- pom文件添加依赖包
 <dependency>
         <groupId>org.springframework.boot</groupId>
         <artifactId>spring-boot-devtools</artifactId>
         <optional>true</optional>
  </dependency>


  <build>
        <plugins>
            <plugin>
                <groupId>org.springframework.boot</groupId>
                <artifactId>spring-boot-maven-plugin</artifactId>
                <configuration>
                    <fork>true</fork><!--必须添加这个配置-->
                </configuration>
            </plugin>
        </plugins>
    </build>
IDEA配置
- idea里面要设置,window和mac一样

使用快捷键打开,选择Registry
注意默认快捷键:
  window快捷键 Shift+Ctrl+Alt+/
  mac快捷键 Shift+Command+Alt+/

如果自行修改了默认快捷键,则百度搜索相关博文,或者还原快捷键设置

选择compiler.automake.allow.when.app.running ,重启idea就行!!!

第4集 小滴课堂实战之首页banner轮播图和视频详情接口开发
简介:首页banner轮播图接口开发
开发轮播列表接口
<select id="listVideoBanner" resultType="VideoBanner">

        select  * from video_banner order by weight asc

</select>
视频详情接口开发《上》
第5集 小滴课堂实战之视频详情接口开发-三表关联查询映射
简介:视频详情接口,多表关联开发
修改Video-Chapter POJO类, 增加属性(不使用DTO)
定义ResultMap
调试接口数据
<resultMap id="VideoDetailResultMap" type="Video">

        <id column="id" jdbcType="INTEGER" property="id"/>

        <result column="title" jdbcType="VARCHAR" property="title"/>
        <result column="summary" jdbcType="VARCHAR" property="summary"/>
        <result column="cover_img" jdbcType="VARCHAR" property="coverImg"/>
        <result column="price" jdbcType="INTEGER" property="price"/>
        <result column="point" jdbcType="DOUBLE" property="point"/>
        <result column="create_time" jdbcType="TIMESTAMP" property="createTime"/>


        <collection property="chapterList" ofType="Chapter">
            <id column="chapter_id" jdbcType="INTEGER" property="id"/>
            <result column="chapter_title" jdbcType="VARCHAR" property="title"/>
            <result column="ordered" jdbcType="INTEGER" property="ordered"/>
            <result column="chapter_create_time" jdbcType="TIMESTAMP" property="createTime"/>

            <collection property="episodeList" ofType="Episode">
                <id column="episode_id" jdbcType="INTEGER" property="id"/>
                <result column="num" jdbcType="INTEGER" property="num"/>
                <result column="episode_title" jdbcType="VARCHAR" property="title"/>
                <result column="episode_ordered" jdbcType="INTEGER" property="ordered"/>
                <result column="play_url" jdbcType="VARCHAR" property="playUrl"/>
                <result column="free" jdbcType="INTEGER" property="free"/>
                <result column="episode_create_time" jdbcType="TIMESTAMP" property="createTime"/>
            </collection>

        </collection>

</resultMap>


<select id="findDetailById" resultMap="VideoDetailResultMap">

        select
        v.id, v.title,v.summary,v.cover_img,v.price,v.point,v.create_time,
        c.id as chapter_id, c.title as chapter_title, c.ordered,c.create_time as chapter_create_time,
        e.id as episode_id,e.num, e.title as episode_title,e.ordered as episode_ordered,e.play_url,e.free,e.create_time as episode_create_time

        from video v

        left join chapter c on v.id=c.video_id

        left join episode e on c.id= e.chapter_id

        where v.id = #{video_id}
        order by c.ordered,e.num asc


</select>
第6集 小滴课堂实战之自定义异常开发和配置
简介:开发自定义异常和配置
自定义异常 继承 RuntimeException
/**
 * 小滴课堂
 * 自定义异常类
 */
public class XDException extends RuntimeException{

    private Integer code;

    private String msg;

    public XDException(Integer code, String msg){
        this.code = code;
        this.msg = msg;
    }

    public Integer getCode() {
        return code;
    }

    public void setCode(Integer code) {
        this.code = code;
    }

    public String getMsg() {
        return msg;
    }

    public void setMsg(String msg) {
        this.msg = msg;
    }
}
开发异常处理器ExceptionHandle
/**
 * 异常处理类
 */
@ControllerAdvice
public class CustomExceptionHandler {

    private final static Logger logger = LoggerFactory.getLogger(CustomExceptionHandler.class);

    @ExceptionHandler(value = Exception.class)
    @ResponseBody
    public JsonData handle(Exception e){

        logger.error("[ 系统异常 ]{}",e);

        if( e instanceof XDException ){

            XDException xdException = (XDException) e;

            return JsonData.buildError(xdException.getCode(),xdException.getMsg());

        }else {

            return JsonData.buildError("全局异常,未知错误");

        }


    }

}
![]() 愿景:"让编程不再难学,让技术与生活更加有趣"
愿景:"让编程不再难学,让技术与生活更加有趣"
小滴课堂项目实战之用户注册登录模块和JWT登录解决方案
第1集 小滴课堂实战之用户注册功能开发和MD5加密工具类封装
简介:用户注册功能接口开发
注册接口开发
//增加唯一索引
CREATE TABLE `user` (
  `id` int(11) unsigned NOT NULL AUTO_INCREMENT,
  `name` varchar(128) DEFAULT NULL COMMENT '昵称',
  `pwd` varchar(124) DEFAULT NULL COMMENT '密码',
  `head_img` varchar(524) DEFAULT NULL COMMENT '头像',
  `phone` varchar(64) DEFAULT '' COMMENT '手机号',
  `create_time` datetime DEFAULT NULL COMMENT '创建时间',
  PRIMARY KEY (`id`),
  UNIQUE KEY `phone` (`phone`)
) ENGINE=InnoDB AUTO_INCREMENT=8 DEFAULT CHARSET=utf8;
MD5加密工具类封装(不用死记,不常用的方法,直接拷贝使用就行,基本是写一次,其他项目直接拷贝)
public static String MD5(String data)  {
        try {
            java.security.MessageDigest md = MessageDigest.getInstance("MD5");
            byte[] array = md.digest(data.getBytes("UTF-8"));
            StringBuilder sb = new StringBuilder();
            for (byte item : array) {
                sb.append(Integer.toHexString((item & 0xFF) | 0x100).substring(1, 3));
            }

            return sb.toString().toUpperCase();
        } catch (Exception exception) {
        }
        return null;

}
随机头像生成
private static final String [] headImg = {
            "https://xd-video-pc-img.oss-cn-beijing.aliyuncs.com/xdclass_pro/default/head_img/12.jpeg",
            "https://xd-video-pc-img.oss-cn-beijing.aliyuncs.com/xdclass_pro/default/head_img/11.jpeg",
            "https://xd-video-pc-img.oss-cn-beijing.aliyuncs.com/xdclass_pro/default/head_img/13.jpeg",
            "https://xd-video-pc-img.oss-cn-beijing.aliyuncs.com/xdclass_pro/default/head_img/14.jpeg",
            "https://xd-video-pc-img.oss-cn-beijing.aliyuncs.com/xdclass_pro/default/head_img/15.jpeg"
    };
第2集 常见的互联网项目中 单机和分布式应用的登录校验解决方案
简介:讲解单机和分布式应用下登录校验,session共享,分布式缓存使用
单机tomcat应用登录检验
- sesssion保存在浏览器和应用服务器会话之间
- 用户登录成功,服务端会保存一个session,当然客户端有一个sessionId
- 客户端会把sessionId保存在cookie中,每次请求都会携带这个sessionId
分布式应用中session共享
真实的应用不可能单节点部署,所以就有个多节点登录session共享的问题需要解决
tomcat支持session共享,但是有广播风暴;用户量大的时候,占用资源就严重,不推荐
使用redis存储token:
- 服务端使用UUID生成随机64位或者128位token,放入redis中,然后返回给客户端并存储在cookie中
- 用户每次访问都携带此token,服务端去redis中校验是否有此用户即可
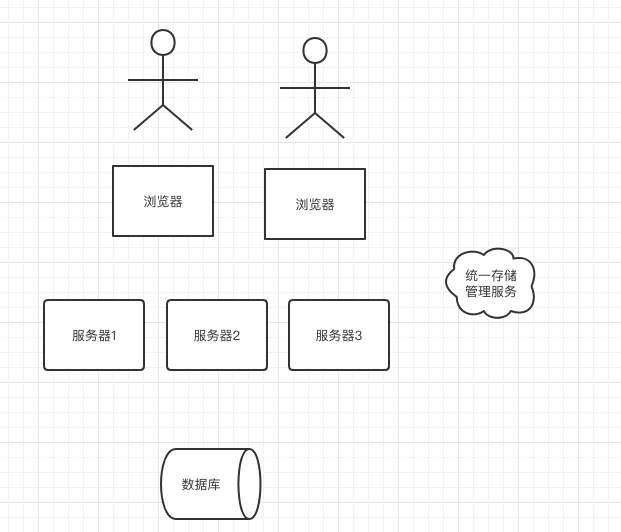
第3集 分布式应用下登录检验解决方案 JWT讲解
简介:分布式应用的登录检验解决方案 JWT讲解 json wen token
什么是JWT
- JWT 是一个开放标准,它定义了一种用于简洁,自包含的用于通信双方之间以 JSON 对象的形式安全传递信息的方法。 可以使用 HMAC 算法或者是 RSA 的公钥密钥对进行签名
- 简单来说: 就是通过一定规范来生成token,然后可以通过解密算法逆向解密token,这样就可以获取用户信息
      {
                id:888,
                name:'小D',
                expire:10000
            }

            funtion 加密(object, appsecret){
                xxxx
                return base64( token);
            }

            function 解密(token ,appsecret){

                xxxx
                //成功返回true,失败返回false
            }
优点
- 生产的token可以包含基本信息,比如id、用户昵称、头像等信息,避免再次查库
- 存储在客户端,不占用服务端的内存资源
缺点
- token是经过base64编码,所以可以解码,因此token加密前的对象不应该包含敏感信息,如用户权限,密码等
- 如果没有服务端存储,则不能做登录失效处理,除非服务端改秘钥
JWT格式组成 头部、负载、签名
header+payload+signature
- 头部:主要是描述签名算法
- 负载:主要描述是加密对象的信息,如用户的id等,也可以加些规范里面的东西,如iss签发者,exp 过期时间,sub 面向的用户
- 签名:主要是把前面两部分进行加密,防止别人拿到token进行base解密后篡改token
关于jwt客户端存储
- 可以存储在cookie,localstorage和sessionStorage里面
第4集 登录校验Json Web Token实战之封装通用方法
讲解:引入相关依赖并开发JWT工具类, 开发生产token和校验token的办法
加入相关依赖
    <!-- JWT相关 -->
    <dependency>
      <groupId>io.jsonwebtoken</groupId>
      <artifactId>jjwt</artifactId>
      <version>0.7.0</version>
    </dependency>
封装生产token方法
  /**
     * 根据用户信息,生成令牌
     * @param user
     * @return
     */
    public static String geneJsonWebToken(User user){

        String token = Jwts.builder().setSubject(SUBJECT)
                .claim("head_img",user.getHeadImg())
                .claim("id",user.getId())
                .claim("name",user.getName())
                .setIssuedAt(new Date())
                .setExpiration(new Date(System.currentTimeMillis() + EXPIRE))
                .signWith(SignatureAlgorithm.HS256,SECRET).compact();

        token = TOKEN_PREFIX + token;


        return token;
    }
封装校验token方法
   /**
     * 校验token的方法
     * @param token
     * @return
     */
    public static Claims checkJWT(String token){

        try{

            final  Claims claims = Jwts.parser().setSigningKey(SECRET)
                    .parseClaimsJws(token.replace(TOKEN_PREFIX,"")).getBody();

            return claims;

        }catch (Exception e){
            return null;
        }

    }
第5集 小滴课堂实战之登录模块开发整合Json Web Token
简介:开发登录模块功能,并整合JSON Web Token
开发登录功能
修改domain 为model层
- 增加entity、request包
- 记得改application.properties配置文件扫描路径!!!!
整合JWT工具类
![]() 愿景:"让编程不再难学,让技术与生活更加有趣"
愿景:"让编程不再难学,让技术与生活更加有趣"
小滴课堂项目实战之登录拦截器开发和订单模块开发
第1集 小滴课堂实战之用户登录校验拦截器开发
简介:开发对应的登录拦截器
开发loginInterceptor
登录校验成功放行
  /**
     * 进入到controller之前的方法
     * @param request
     * @param response
     * @param handler
     * @return
     * @throws Exception
     */
@Override
public boolean preHandle(HttpServletRequest request, HttpServletResponse response, Object handler) throws Exception {

        try {

            String accesToken = request.getHeader("token");
            if (accesToken == null) {
                accesToken = request.getParameter("token");
            }

            if (StringUtils.isNotBlank(accesToken)) {
                Claims claims = JWTUtils.checkJWT(accesToken);
                if (claims == null) {
                    //告诉登录过期,重新登录
                    sendJsonMessage(response, JsonData.buildError("登录过期,重新登录"));
                    return false;
                }

                Integer id = (Integer) claims.get("id");
                String name = (String) claims.get("name");

                request.setAttribute("user_id", id);
                request.setAttribute("name", name);

                return true;

            }

        }catch (Exception e){}

        sendJsonMessage(response, JsonData.buildError("登录过期,重新登录"));

        return false;
    }
登录不成功返回json数据
 /**
     * 响应json数据给前端
     * @param response
     * @param obj
     */
public static void sendJsonMessage(HttpServletResponse response, Object obj){

        try{
            ObjectMapper objectMapper = new ObjectMapper();
            response.setContentType("application/json; charset=utf-8");
            PrintWriter writer = response.getWriter();
            writer.print(objectMapper.writeValueAsString(obj));
            writer.close();
            response.flushBuffer();
        }catch (Exception e){
            e.printStackTrace();
        }


    }
第2集 小滴课堂实战之loginInterceptor注册和放行路径
简介:loginInterceptor 拦截器注册和路径校验配置
- 继承 WebMvcConfigurer
- 配置拦截路径和放行路径
/**
 * 拦截器配置
 *
 * 不用权限可以访问url    /api/v1/pub/
 * 要登录可以访问url    /api/v1/pri/
 */

@Configuration
public class InterceptorConfig implements WebMvcConfigurer {


    @Bean
    LoginInterceptor loginInterceptor(){
        return new LoginInterceptor();
    }


    @Override
    public void addInterceptors(InterceptorRegistry registry) {

        //拦截全部
        registry.addInterceptor(loginInterceptor()).addPathPatterns("/api/v1/pri/*/*/**")
                //不拦截哪些路径   斜杠一定要加
                .excludePathPatterns("/api/v1/pri/user/login","/api/v1/pri/user/register");

        WebMvcConfigurer.super.addInterceptors(registry);

    }
}
第3集 小滴课堂实战之个人信息查询接口开发
简介:根据token查询个人信息接口开发
- 直接解密token,获取个人信息
- 通过token解密查询数据库获取个人信息
第4集 小滴课堂实战之VideoOrder下单模块开发
简介:开发用户下单购买视频接口
- VideoOrder模块 下单接口开发
第5集 小滴课堂实战之播放记录表设计和模块开发
简介:播放记录表设计和功能模块开发
play_record表设计
CREATE TABLE `play_record` (
  `id` int(11) unsigned NOT NULL AUTO_INCREMENT,
  `user_id` int(11) DEFAULT NULL,
  `video_id` int(11) DEFAULT NULL,
  `current_num` int(11) DEFAULT NULL COMMENT '当前播放第几集',
  `episode_id` int(11) DEFAULT NULL COMMENT '当前播放第几集视频id',
  `create_time` datetime DEFAULT NULL,
  PRIMARY KEY (`id`)
) ENGINE=InnoDB AUTO_INCREMENT=1 DEFAULT CHARSET=utf8mb4;
整合用户下单接口
第6集 小滴课堂实战之订单和播放记录事务控制
简介:播放记录表和下单整合,开启事务控制
开启事务控制
- 启动类 @EnableTransactionManagement
- 业务类,或者业务方法 @Transactional
- 默认事务的隔离级别和传播属性
第7集 小滴课堂实战之订单列表接口开发
简介:订单列表接口开发
- 开发我的订单列表接口
   /**
     * 订单列表
     * @param request
     * @return
     */
    @GetMapping("list")
    public JsonData listOrder(HttpServletRequest request){
        Integer userId = (Integer) request.getAttribute("user_id");

        List<VideoOrder> videoOrderList = videoOrderService.listOrderByUserId(userId);

        return JsonData.buildSuccess(videoOrderList);

    }


    <select id="listOrderByUserId" resultType="VideoOrder">

        select * from video_order where user_id=#{user_id} order by create_time desc

    </select>
![]() 愿景:"让编程不再难学,让技术与生活更加有趣"
愿景:"让编程不再难学,让技术与生活更加有趣"
性能优化实战之协议优化和引入Guava缓存
第1集 小滴课堂实战之接口协议调整和日期格式
简介:调整api接口协议和日期格式
- 统一输出协议,驼峰转下划线
- 格式化日期
第2集 高并发项目必备利器之分布式缓存和本地缓存
简介: 讲解分布式缓存和本地缓存知识
什么是缓存
- 程序经常要调用的对象存在内存中,方便其使用时可以快速调用,不必去数据库或者其他持久化设备中查询,主要就是提高性能
- DNS缓存、前端缓存、代理服务器缓存Nginx、应用程序缓存(本地缓存、分布式缓存)、数据库缓存
分布式缓存
与应用分离的缓存组件或服务,与本地应用隔离一个独立的应用,多个应用可直接的共享缓存
常见的分布式缓存 Redis、Memcached等
本地缓存
- 和业务程序一起的缓存,例如myabtis的一级或者二级缓存,本地缓存自然是最快的,但是不能在多个节点共享
- 常见的本地缓存:ssm基础课程myabtis 一级缓存、mybatis二级缓存;框架本身的缓存; redis本地单机服务;ehchche;guava cache、Caffeine等
选择本地缓存和分布式缓存
- 和业务数据结合去选择
- 高并发项目里面一般都是有本地缓存和分布式缓存共同存在的
第3集 谷歌开源缓存框架Guava Cache讲解和封装缓存组件
简介: 讲解谷歌开源框架Guava Cache,封装API
Guava Cache
- github地址:https://github.com/google/guava/wiki/CachesExplained
- 全内存的本地缓存实现
- 高性能且功能丰富
- 线程安全,操作简单 (底层实现机制类似ConcurrentMap)
添加依赖
    <!--guava依赖包-->
    <dependency>
      <groupId>com.google.guava</groupId>
      <artifactId>guava</artifactId>
      <version>19.0</version>
    </dependency>
封装api
 private Cache<String,Object> tenMinuteCache = CacheBuilder.newBuilder()

            //设置缓存初始大小,应该合理设置,后续会扩容
            .initialCapacity(10)
            //最大值
            .maximumSize(100)
            //并发数设置
            .concurrencyLevel(5)

            //缓存过期时间,写入后10分钟过期
            .expireAfterWrite(600,TimeUnit.SECONDS)

            //统计缓存命中率
            .recordStats()

            .build();


    public Cache<String, Object> getTenMinuteCache() {
        return tenMinuteCache;
    }

    public void setTenMinuteCache(Cache<String, Object> tenMinuteCache) {
        this.tenMinuteCache = tenMinuteCache;
    }
第4集 小滴课堂实战之轮播图接口引入本地缓存
简介: 轮播图接口引入本地缓存
- 轮播图接口加入缓存
         try{

            Object cacheObj =  baseCache.getTenMinuteCache().get(CacheKeyManager.INDEX_BANNER_KEY, ()->{

                List<VideoBanner> bannerList =  videoMapper.listVideoBanner();

                System.out.println("从数据库里面找轮播图列表");

                return bannerList;

            });

            if(cacheObj instanceof List){
                List<VideoBanner> bannerList = (List<VideoBanner>)cacheObj;
                return bannerList;
            }

        }catch (Exception e){
            e.printStackTrace();
        }
        return null;
第5集 小滴课堂实战之视频列表引入本地缓存
简介: 视频列表引入本地缓存
播放列表加入本地缓存
@Override
    public List<Video> listVideo() {


        try{

          Object cacheObj =  baseCache.getTenMinuteCache().get(CacheKeyManager.INDEX_VIDEL_LIST,()->{

                List<Video> videoList = videoMapper.listVideo();

                return videoList;

            });

          if(cacheObj instanceof List){
              List<Video> videoList = (List<Video>)cacheObj;
              return videoList;
          }

        }catch (Exception e){
            e.printStackTrace();
        }

        //可以返回兜底数据,业务系统降级-》SpringCloud专题课程
        return null;
    }
第6集 小滴课堂实战之视频详情引入本地缓存
简介: 视频详情引入本地缓存
视频详情加入本地缓存
    @Override
    public Video findDetailById(int videoId) {

        String videoCacheKey = String.format(CacheKeyManager.VIDEO_DETAIL,videoId);

        try{

         Object cacheObject = baseCache.getOneHourCache().get( videoCacheKey, ()->{

                // 需要使用mybaits关联复杂查询
                Video video = videoMapper.findDetailById(videoId);

                return video;

            });

         if(cacheObject instanceof Video){

             Video video = (Video)cacheObject;
             return video;
         }

        }catch (Exception e){
            e.printStackTrace();
        }

        return null;
    }
![]() 愿景:"让编程不再难学,让技术与生活更加有趣"
愿景:"让编程不再难学,让技术与生活更加有趣"
压力测试工具Jmeter5.X快速入门实战
第1集、接口压测和常用压力测试工具对比
简介:目前用的常用测试工具对比
LoadRunner
- 性能稳定,压测结果及细粒度大,可以自定义脚本进行压测,但是太过于重大,功能比较繁多
Apache AB(单接口压测最方便)
- 模拟多线程并发请求,ab命令对发出负载的计算机要求很低,既不会占用很多CPU,也不会占用太多的内存,但却会给目标服务器造成巨大的负载, 简单DDOS攻击等
Webbench
- webbench首先fork出多个子进程,每个子进程都循环做web访问测试。子进程把访问的结果通过pipe告诉父进程,父进程做最终的统计结果。
- Jmeter
- 开源免费,功能强大,在互联网公司普遍使用
- 压测不同的协议和应用 1) Web - HTTP, HTTPS (Java, NodeJS, PHP, ASP.NET, …) 2) SOAP / REST Webservices 3) FTP 4) Database via JDBC 5) LDAP 轻量目录访问协议 6) Message-oriented middleware (MOM) via JMS 7) Mail - SMTP(S), POP3(S) and IMAP(S) 8) TCP等等
- 使用场景及优点 1)功能测试 2)压力测试 3)分布式压力测试 4)纯java开发 5)上手容易,高性能 4)提供测试数据分析 5)各种报表数据图形展示
第2集 压测工具本地快速安装Jmeter5.x
简介:GUI图形界面的安装 Jmeter5.x
需要安装JDK8 以上
- 建议安装JDK环境,虽然JRE也可以,但是压测https需要JDK里面的 keytool工具
第3集 Jmeter5.x目录文件讲解和汉化操作
简介:讲解jmeter解压文件里面的各个目录,文件等
目录
bin:核心可执行文件,包含配置
        jmeter.bat: windows启动文件(window系统一定要配置显示文件拓展名)
        jmeter: mac或者linux启动文件
        jmeter-server:mac或者Liunx分布式压测使用的启动文件
        jmeter-server.bat:window分布式压测使用的启动文件
        jmeter.properties: 核心配置文件
extras:插件拓展的包

lib:核心的依赖包
Jmeter语言版本中英文切换
- 控制台修改 menu -> options -> choose language
配置文件修改
- bin目录 -> jmeter.properties
- 默认 #language=en
- 改为 language=zh_CN
第4集 Jmeter5.X基础功能组件介绍线程组和Sampler
简介:讲解Jmeter里面GUI菜单栏主要组件
添加->threads->线程组(控制总体并发)
线程数:虚拟用户数。一个虚拟用户占用一个进程或线程

准备时长(Ramp-Up Period(in seconds)):全部线程启动的时长,比如100个线程,20秒,则表示20秒内 100个线程都要启动完成,每秒启动5个线程

循环次数:每个线程发送的次数,假如值为5,100个线程,则会发送500次请求,可以勾选永远循环
线程组->添加-> Sampler(采样器) -> Http (一个线程组下面可以增加几个Sampler)
名称:采样器名称
注释:对这个采样器的描述
web服务器:
  默认协议是http
  默认端口是80
  服务器名称或IP :请求的目标服务器名称或IP地址

路径:服务器URL
查看测试结果
线程组->添加->监听器->察看结果树
第5集 Jmeter5.x实战之压测结果聚合报告分析
简介:讲解压测结果的聚合报告
新增聚合报告:线程组->添加->监听器->聚合报告(Aggregate Report)
lable: sampler的名称
Samples: 一共发出去多少请求,例如10个用户,循环10次,则是 100
Average: 平均响应时间
Median: 中位数,也就是 50% 用户的响应时间


90% Line : 90% 用户的响应不会超过该时间 (90% of the samples took no more than this time.     The remaining samples at least as long as this)
95% Line : 95% 用户的响应不会超过该时间
99% Line : 99% 用户的响应不会超过该时间
min : 最小响应时间
max : 最大响应时间


Error%:错误的请求的数量/请求的总数
Throughput: 吞吐量——默认情况下表示每秒完成的请求数(Request per Second) 可类比为qps、tps
KB/Sec: 每秒接收数据量
![]() 愿景:"让编程不再难学,让技术与生活更加有趣"
愿景:"让编程不再难学,让技术与生活更加有趣"
实战接口压力测试,明白优化前后的QPS并发差距和跨域配置
第1集 开启Guava缓存压测热点数据接口
简介: 启用缓存 压测热点数据接接口
视频轮播图接口 Throughput: 14000

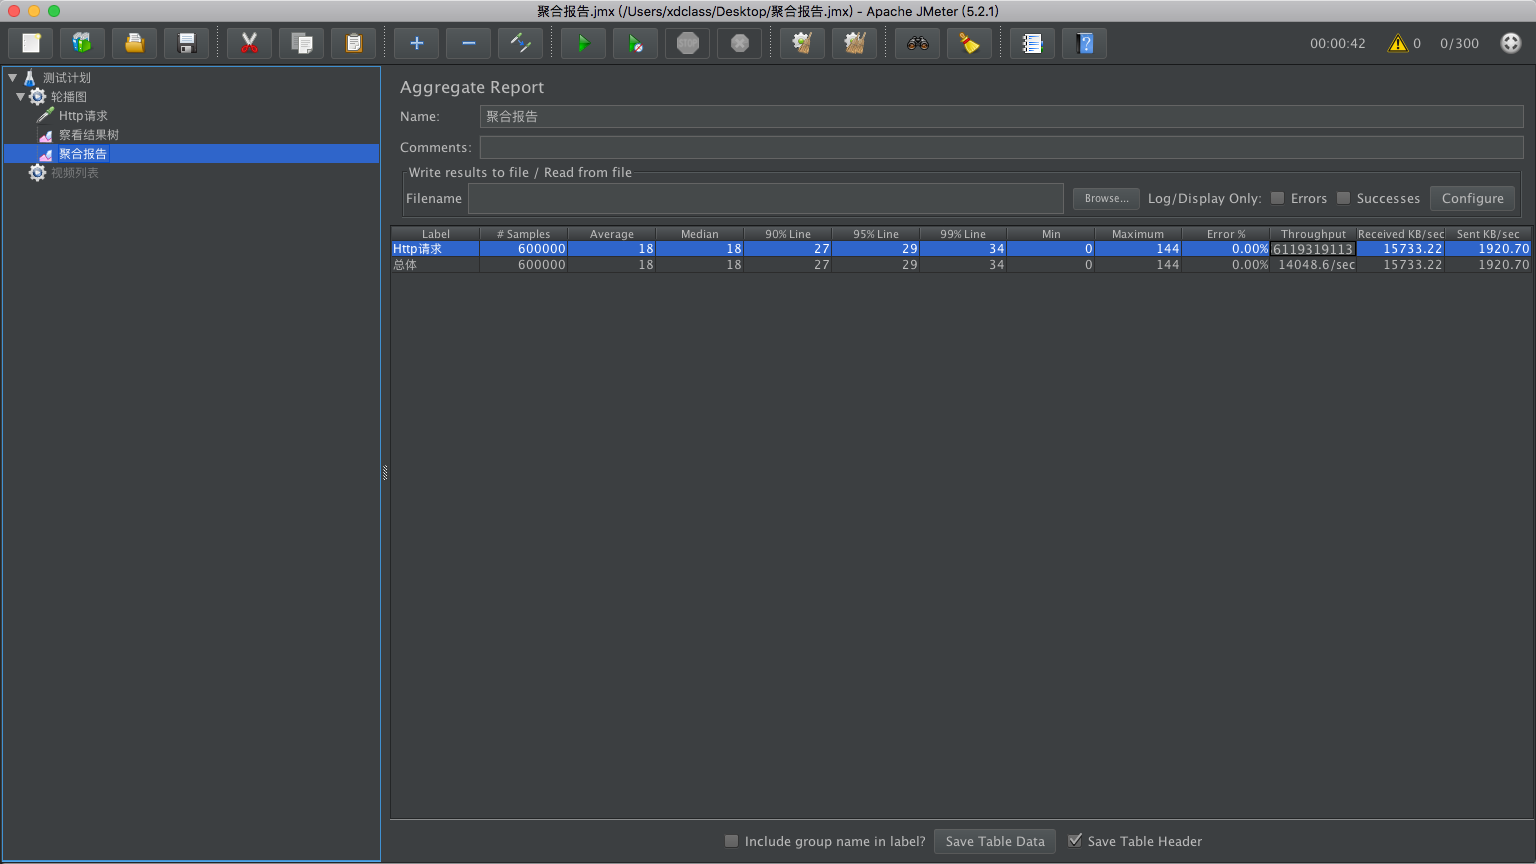
- 注意:接口的性能影响因素很多:机器的配置如CPU、内存、当前负载情况等,还有网络带宽因素影响,只能尽量减少影响因素
第2集 取消Guava缓存压测热点数据接口和前后对比
简介: 不启用缓存 压测热点数据接口
视频轮播图接口 Throughput : 2700
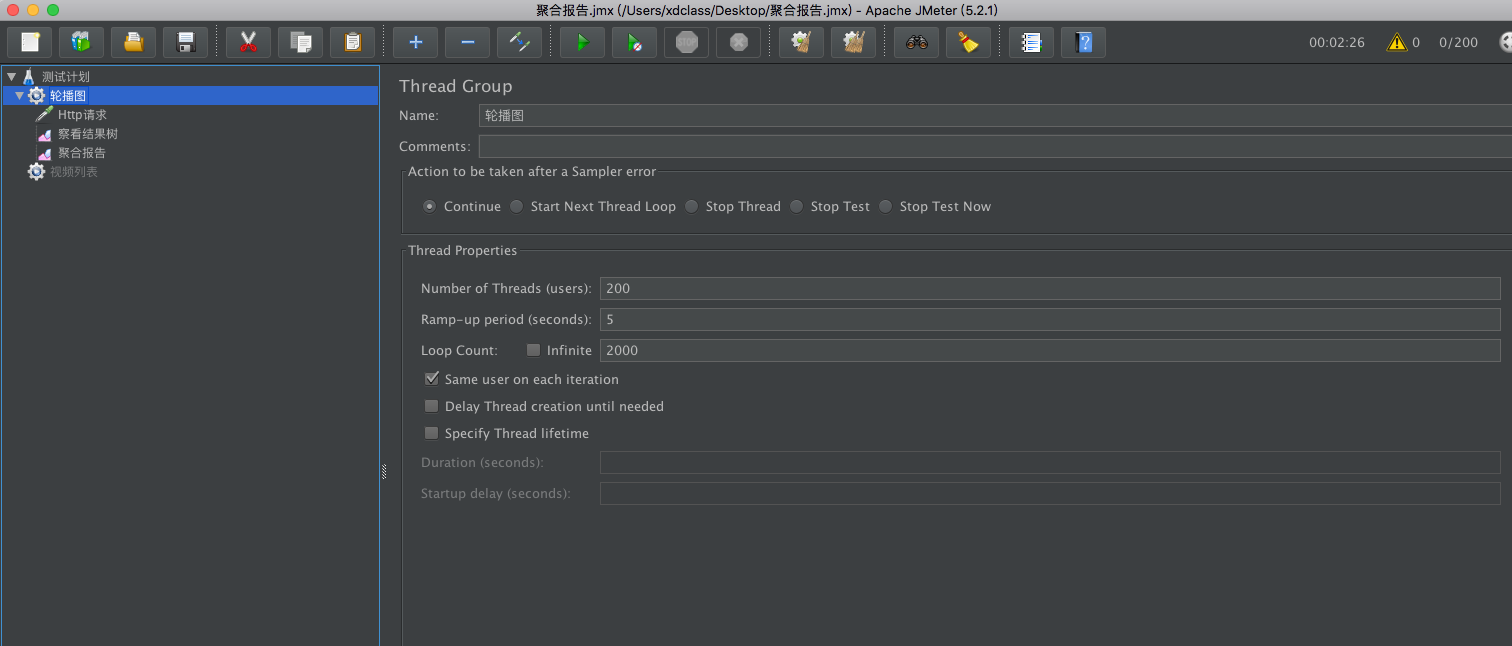
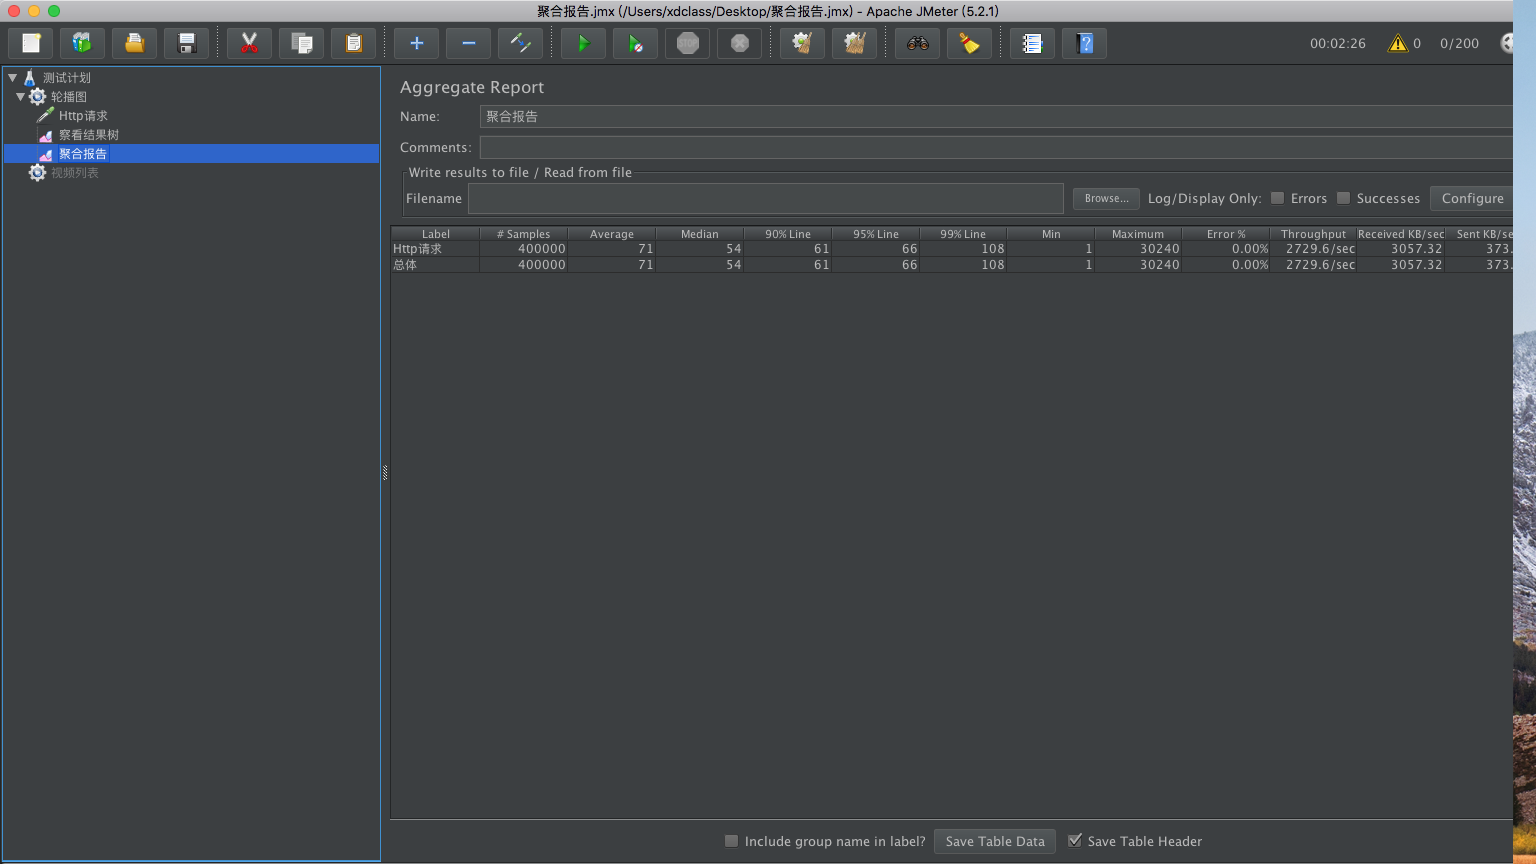
第3集 SpringBoot2.X开启跨域配置
简介: 什么是浏览器跨域和springboot怎么解决
跨域:浏览器同源策略 1995年,同源政策由 Netscape 公司引入浏览器。目前,所有浏览器都实行这个政策。 最初,它的含义是指,A网页设置的 Cookie,B网页不能打开,除非这两个网页"同源"。所谓"同源"指的是"三个相同"
协议相同  http https
域名相同  www.xdclass.net
端口相同  80  81

一句话:浏览器从一个域名的网页去请求另一个域名的资源时,域名、端口、协议任一不同,都是跨域

浏览器控制台跨域提示:
No 'Access-Control-Allow-Origin' header is present on the requested resource. Origin 'null' is therefore not allowed access.
- 解决方法
     1)JSONP
     2)Http响应头配置允许跨域
             nginx层配置 https://www.cnblogs.com/hawk-whu/p/6725699.html
     3)程序代码中处理 SpringBoot 通过拦截器配置

      //表示接受任意域名的请求,也可以指定域名
     response.setHeader("Access-Control-Allow-Origin", request.getHeader("origin"));

     //该字段可选,是个布尔值,表示是否可以携带cookie
     response.setHeader("Access-Control-Allow-Credentials", "true");

     response.setHeader("Access-Control-Allow-Methods", "GET, HEAD, POST, PUT, PATCH, DELETE, OPTIONS");

     response.setHeader("Access-Control-Allow-Headers", "*");
- options请求,这个需要注意
- 注意点: 假如接口报错,则跨域配置可能不生效(报错建议断点调试,排除异常错误)
![]() 愿景:"让编程不再难学,让技术与生活更加有趣"
愿景:"让编程不再难学,让技术与生活更加有趣"
全栈工程师必备VSCODE编辑器和开发环境搭建
第1集 前端主流编辑器VSCode安装
简介:前端编辑器vscode安装
前端编辑器
- vscode:免费开源的现代化轻量级代码编辑器,支持大部分主流的开发语言的语法高亮、智能代码补全、自定义热键、代码对比 Diff、GIT 等特性,支持插件扩展,软件跨平台支持 Win、Mac 以及 Linux
- 其他:sublime、hbuilder、webstorm
vscode安装地址:https://code.visualstudio.com/Download
设置为中文语言环境,这里需要使用快捷键来实现 win:【Ctrl+Shift+P】 mac:【Command+Shift+P】
在弹出的搜索框中输入【configure language】,然后选择搜索出来的【Configure Display Language】
Window系统 参考文档 https://jingyan.baidu.com/article/7e44095377c9d12fc1e2ef5b.html
第2集 互联网公司前端开发环境搭建之Node和Npm介绍
简介:搭建node环境和npm安装
- 什么是NodeJS: Node.js 就是运行在服务端的 JavaScript
什么是npm: nodejs的包管理工具,可以下载使用公共仓库的包,类似maven 包安装分为本地安装(local)、全局安装(global)两种
npm install express          # 本地安装express
npm install express -g       # 全局安装express
npm list -g                 #查看所有全局安装的模块
Node安装包:http://nodejs.cn/download/
- 新版的nodejs已经集成了npm,所以npm也一并安装好
- 苹果系统Mac安装node和npm: brew install nodejs brew install npm
- Window安装node和npm 下载后一步步安装就行 参考文档:https://www.jianshu.com/p/03a76b2e7e00
- 验证是否成功
node -v
npm -v
第3集 切换npm镜像源为淘宝npm镜像
简介:修改npm镜像源为国内
- 类似maven,从国外下载包很慢,所以就有人改成国内的maven仓库就会快很多,或者搭建自己本地的私服
- 国内直接使用 npm 的官方镜像是非常慢的,推荐使用淘宝 NPM 镜像。
淘宝 NPM 镜像是一个完整 npmjs.org 镜像,可以用此代替官方版本。
使用淘宝定制的 cnpm 命令行工具代替默认的 npm:(需要管理员权限)
npm install -g cnpm --registry=https://registry.npm.taobao.org
这样就可以使用 cnpm 命令来安装模块了:
cnpm install [name]
更多信息可以查阅:https://developer.aliyun.com/mirror/NPM
第4集 新版Vue + 脚手架Vue-Cli 4.3 安装
简介:本地搭建Vue 、CLI、Cube-UI相关框架
什么是VUE 一套用于构建用户界面的渐进式框架。与其它大型框架不同的是,Vue 被设计为可以自底向上逐层应用。Vue 的核心库只关注视图层,不仅易于上手,还便于与第三方库或既有项目整合. 文档:https://cn.vuejs.org/
安装新版Vue (直接使用 cli)
npm install vue (可以不用)
什么是VUE-CLI Vue 提供了一个官方的 CLI,为单页面应用 (SPA) 快速搭建繁杂的脚手架
安装 新版vue-cli
cnpm install -g @vue/cli

cnpm install -g @vue/cli-init
使用vue-cli创建项目(测试项目,验证vue环境)
vue create my-project
第5级 VsCode导入小滴课堂前端项目
简介:使用VSCODE导入小滴课堂前端项目
vcscode 初次打开vue项目,推荐安装
- vetur 插件: vue文件基本语法的高亮插件
- setting.json添加配置
- eslint插件:智能错误检测插件,在具体开发中作用很大,能够及时的帮我们发现错误
- setting.json添加配置
最终配置
{
    "emmet.syntaxProfiles": {
           "vue-html": "html",
           "vue": "html"
    },
    "eslint.validate": [
        "javascript",
        "javascriptreact",
        "html",
        "vue"
    ],
    "eslint.options": {
        "plugins":["html"]
    }
}
- VsCode代码快捷键:Vue 2 Snippets 、 Vue Peek
- 导入小滴课堂前端项目
- 启动后端项目,一直运行后台,你们学习的时候记得检查(端口是8089)
- 为啥要先讲这个呢? 可以快速知道大致开发的内容,带着疑惑学习,更容易掌握
![]() 愿景:"让编程不再难学,让技术与生活更加有趣"
愿景:"让编程不再难学,让技术与生活更加有趣"
全栈工程师必备之新版Vue2.6 急速掌握核心内容
第1集 新版VueCli 4.3创建vue项目
简介:使用vue cli 4.3创建vue项目
Vue模板语法开发起步
- 基于 HTML 的模版语法,允许声明式地将 DOM 绑定至底层 Vue 实例的数据。
- 用简洁的模板语法来声明式的将数据渲染进 DOM 的系统。
- 结合响应系统,在应用状态改变时, Vue 能够智能地计算出重新渲染组件并应用到 DOM 操作上
创建测试vue项目
vue create my-project
vue-cli创建项目,目录介绍
vscode打开项目
- 需要打开文件夹,文件夹里面创建Html
原生Vue测试基础语法
使用cdn引入vue
<!DOCTYPE html>
<html>
<head>
<meta charset="utf-8">
<title>小滴课堂vue快速入门</title>
<script src="https://cdn.jsdelivr.net/npm/vue/dist/vue.js"></script>
</head>
<body>
</body>
</html>
{{}}
文本插值
里面JavaScript 表达式支持
{{5+5}}
{{ message.split('').reverse().join('') }}
Vscode里面快速打开html
- 安装 Live Server 插件
第2集 新版Vue快速入门之Vue指令和参数
简介:讲解什么是Vue指令
VUE的文档 https://cn.vuejs.org/
指令 :带有 v- 前缀的特殊属性。 指令用于在表达式的值改变时,将某些行为应用到 DOM
v-bind 指令
- HTML 属性中的值更新时使用
v-if v-else 指令
- 逻辑判断
v-model 指令
- 实现双向数据绑定,
- 一般在 input、select、textarea、checkbox、radio等表单上使用
v-on指令
- 监听事件,并对用户的输入进行响应
参数: 在指令后以冒号指明,例如 v-bind 指令被用来响应地更新 HTML 属性
<p> <a v-bind:href = "url" > 小滴课堂 </a> </p>
- 附加: 指令表达式取值是不用加 双花括号
第3集 新版Vue快速入门之v-if 和v-else条件指令
简介:讲解新版Vue条件指令
- v-if v-else逻辑判断
<div id="app">

        <div v-if="Math.random() > 0.5 "> 大于0.5  </div>

        <div v-else>小于0.5  </div>

</div>


<script>
        new Vue({
            //绑定到哪个元素
            el:'#app',

            //数据源
            data:{

            },

            //自定义方法
            methods: {

            }
        })
</script>
第4集 新版Vue快速入门之v-for 循环指令
简介:讲解新版Vue的v-for 循环指令
- v-for 循环指令
<div id="app">

        <ol>
            <li v-for=" user in users ">
                {{user.name}}
            </li>
        </ol>
</div>
<script>
        new Vue({
            //绑定到哪个元素
            el:'#app',
            //数据源
            data:{
                users:[
                    {name: "Anna小姐姐"},
                    {name: "老王"},
                    {name: "二当家小D"},
                ]
            },
            //自定义方法
            methods: {

            }
        })
</script>
第5集 新版Vue快速入门之v-model
简介:讲解新版Vue的v-model
- v-model 实现双向数据绑定
    <div id="app">

       <p> {{phone}} </p>
       手机号 <input v-model="phone"  />

    </div>

    <script>
        new Vue({
            //绑定到哪个元素
            el:'#app',

            //数据源
            data:{
                phone : "000"
            },

            //自定义方法
            methods: {

            }
        })
    </script>
第6集 新版Vue快速入门之v-on监听事件
简介:讲解新版Vue的v-on指令 监听事件
- v-on 监听事件
<div id="app">


        <p> {{title}} </p>

        <button v-on:click="changeTitle"> 完善标题 </button>

    </div>


    <script>
        new Vue({
            //绑定到哪个元素
            el:'#app',

            //数据源
            data:{

              title: "面试专题课程"

            },

            //自定义方法
            methods: {
                changeTitle:function(){
                    this.title = "||小滴课堂 2020年 " + this.title;
                }

            }
        })
    </script>
第7集 Vue常见缩写 v-bind和v-on讲解
简介:vue常见缩写v-bind和v-on讲解
v-bind缩写
<!-- 完整语法 -->
<a v-bind:href="url">...</a>

<!-- 缩写 -->
<a :href="url">...</a>
v-on缩写
<!-- 完整语法 -->
<a v-on:click="changeTitle">...</a>

<!-- 缩写 -->
<a @click="changeTitle">...</a>
课程代码
  <div id="app">


        <p> {{title}} </p>

        <button @click="changeTitle"> 完善标题 </button>
        <p/>
        <a :href="url" > 点击跳转 </a>

    </div>


    <script>
        new Vue({
            //绑定到哪个元素
            el:'#app',

            //数据源
            data:{

              title: "面试专题课程",
              url : "https://xdclass.net"

            },

            //自定义方法
            methods: {
                changeTitle:function(){
                    this.title = "||小滴课堂 2020年 " + this.title;
                }

            }
        })
    </script>
第8集 新版Vue快速入门之component组件
简介:讲解vue里面的组件
vue的组件
- 扩展 HTML 元素,封装可重用的代码(就是通用的模块)
注册组件
- Vue.component(组件名, 选项)
组件可以拷贝多次,复用多次
每个组件都会各自独立维护它的数据
data 必须是一个函数,而不是前面讲的json对象
- 每个实例可以维护一份被返回对象的独立的拷贝, 否则数据就会共享出现问题
 <div id="app">

        <xd_component></xd_component>
        <xd_component></xd_component>
        <xd_component></xd_component>
        <xd_component></xd_component>

    </div>
    <script>
    Vue.component('xd_component',{
        data:function(){
            return {
                count: 0
            }
        },
        template:' <button v-on:click="count++">  点击 {{count}}次  </button> '
    })
        new Vue({
            //绑定到哪个元素
            el:'#app',

            //数据源
            data:{
            },

            //自定义方法
            methods: {

            }
        })
    </script>
第9集 新版Vue快速入门之prop向子组件传值
简介:讲解vue里面通过prop向子组件传值
 <div id="app">

        <xd_component message="小滴课堂 https://xdclass.net"></xd_component>

        <xd_component message="面试专题"></xd_component>

</div>


<script>

    Vue.component('xd_component',{

       props:{
           message:{
               type:String
           }
       },
       data:function(){
        return {
            count : 0
        }
       },
       //组件里面的template只能包含一个根节点
        template:'<div> <button v-on:click="count++"> {{message}}  点击 {{count}}次  </button> </p> </div> '

    })


   new Vue({
            //绑定到哪个元素
            el:'#app',

            //数据源
            data:{

            },

            //自定义方法
            methods: {

            }
        })
</script>
- 向子组件传外部data的里值,需要加 v-bind
<xd_component message="小滴课堂 https://xdclass.net" v-bind:XXXX></xd_component>
或缩写
<xd_component message="小滴课堂 https://xdclass.net" :XXXX></xd_component>
![]() 愿景:"让编程不再难学,让技术与生活更加有趣"
愿景:"让编程不再难学,让技术与生活更加有趣"
小滴课堂前端项目技术栈介绍和ES6知识点补充
第1集小滴课堂前端项目技术组件概述
简介:常见的技术组件的作用
学前必备基础: HTML、CSS 、JavaScript、Vue 基础知识
Vue: 用于构建用户界面的渐进式JavaScript框架
什么是Cube-UI
- 基于 Vue.js 实现的精致移动端组件库
- 地址:https://didi.github.io/cube-ui/#/zh-CN
Vuex: 在Vue项目开发时使用的状态管理工具
- state:存储数据
- mutations:同步修改存储数据
- actions: 异步修改存储数据
- getters:获取存储数据前进行修改
Axios: 是一个基于Promise 用于浏览器和 nodejs 的 HTTP 客户端
- 从浏览器中创建 XMLHttpRequest,也可以 node.js 发出 http 请求,
- 支持 Promise API
- 支持拦截请求和响应,并转换数据
- Vue-router:Vue官方的路由管理器,实现页面前端路由 Hash模式(默认): History模式:
第2集 ECMAScript 6常见语法快速入门《上》
简介:讲解ES6里面常见的语法上集
- 什么是ES6 ECMAScript 6(简称ES6)是于2015年6月正式发布的JavaScript语言的标准,正式名为ECMAScript 2015(ES2015)。它的目标是使得JavaScript语言可以用来编写复杂的大型应用程序,成为企业级开发语言
- let、const 语法 let : 定义变量,推荐在函数中使用 let 定义变量,而非 var const: 它可以声明一个常量(如果是普通的变量一般大写)
箭头函数: ES6 中,箭头函数就是函数的一种简写形式,使用括号包裹参数,跟一个 =>,紧接着是函数体
//以前js定义函数
var sum = function(num1,num2) {
   return num1 + num2;
};

// 使用箭头函数
let sum = (num1,num2) => num1 + num2;
对象词法扩展: 在对象字面量时使用简写语法,来初始化属性变量和函数的定义方法
function getVideo(make, model, value) {
  return {
    // 简写变量
    make,  // 等同于 make: make
    model, // 等同于 model: model
    value, // 等同于 value: value
  };
}

let video = getVideo('java', 'java', 99);

 output: {
   make: 'java',
   model:'java',
   value: 99,
}
第3集 ECMAScript 6常见语法快速入门《下》
简介:讲解ES6里面常见的语法下集
解构赋值 一种针对数组或者对象进行模式匹配,然后对其中的变量进行赋值
let [a, b, c] = [1, 2, 3];
// a = 1
// b = 2
// c = 3
let { foo, bar } = { foo: 'aaa', bar: 'bbb' };
// foo = 'aaa'
// bar = 'bbb'
在ES6中如何导入模块 import 模块名称 from '模块标识符'
import axios from 'axios'

import { loginApi } from '@/api/getData.js'
在ES6中如何导出模块
方式一: export default 向外暴露的成员可以使用任意的变量来接收 注意:在一个模块中只能使用export default向外暴露一次
//user.js
export default {
    name: 'xdclass.net',
    age: 10
}

//main.js
import xd from './user'
//xd 为一个包含 name 和 age 属性的对象
方式二: export 向外暴露的成员只能使用 {} 接收,这叫做 按需导出 注意:一个模块中可以同时使用 export default 和 export 暴露成员
// user.js
export default {
    name: 'xdclass.net',
    age: 10
}

export var teacher = "小滴课堂-二当家小D"
export var content = '全栈工程,和隔壁老王比较熟悉'
//main.js import xd, { teacher,content } from './user'
![]() 愿景:"让编程不再难学,让技术与生活更加有趣"
愿景:"让编程不再难学,让技术与生活更加有趣"
全栈工程师之小滴课堂前端项目架构搭建
第1集 VueCli 4.3搭建小滴课堂前端项目架构
简介:使用 VueCli 4.3搭建小滴课堂前端项目架构
创建小滴课堂vue项目
vue create xdclass_front

 ◉ Babel
 ◯ TypeScript
 ◯ Progressive Web App (PWA) Support
 ◉ Router
❯◉ Vuex
 ◉ CSS Pre-processors
 ◯ Linter / Formatter
 ◯ Unit Testing
 ◯ E2E Testing
选择feature模式,安装vuex/vue-router,用vscode打开
安装axios
- cnpm install axios --save
cnpm install <package_name> --save
- 表示将这个包名及对应的版本添加到 package.json的 dependencies
cnpm install <package_name> --save-dev
- 表示将这个包名及对应的版本添加到 package.json的 devDependencies
添加 cube-ui依赖 ( 输入 y 进行安装)
vue add cube-ui
第2集 小滴课堂前端项目目录结构创建和讲解
简介:小滴课堂前端项目目录结构创建和讲解
导入课程项目
- 安装包 cnpm install node-sass --save-dev (可以不安装)
- 启动项目 cnpm run serve
介绍目录结构(可以按需开发,也可以先划分好组件再开发)
创建新目录:api/router/views
views里面建组件的文件名
- Home
- CourseDetail
- Register
- Login
- Order
- Pay
- Personal
- 备注(删除几个组件文件后运行项目会报错,先不用运行项目哈,按照课程往下走就行)
第3集 基于浏览器和node.js的http客户端Axios讲解
简介:基于浏览器和node.js的http客户端Axios讲解
什么是Axios
基于promise用于浏览器和node.js的http客户端
安装 npm install axios (原先安装好了)
GET请求例子
// 为给定 ID 的 user 创建请求
axios.get('/user?ID=12345')
  .then(function (response) {
    console.log(response);
  })
  .catch(function (error) {
    console.log(error);
  });

// 上面的请求也可以这样做
axios.get('/user', {
    params: {
      ID: 12345
    }
  })
  .then(function (response) {
    console.log(response);
  })
  .catch(function (error) {
    console.log(error);
  });
POST请求例子
axios.post('/user', {
    firstName: 'Fred',
    lastName: 'Flintstone'
  })
  .then(function (response) {
    console.log(response);
  })
  .catch(function (error) {
    console.log(error);
  });
第4集 Axios封装通用后端请求API模块
简介:使用axios封装请求后端api接口
import axios from '../request'

//注册接口
export const registerApi = (phone, pwd , name)=> axios.post("/api/v1/pri/user/register",{
    "phone":phone,
    "pwd":pwd,
    "name":name
})

//登录接口
export const loginApi = (phone, pwd) => axios.post("/api/v1/pri/user/login",{
    phone,
    pwd
})


//轮播图接口
export const getBanner = () => axios.get("/api/v1/pub/video/list_banner")

//视频列表接口
export const getVideoList = ()=> axios.get("/api/v1/pub/video/list")


//视频详情
export const getVideoDetail = (vid)=> axios.get("/api/v1/pub/video/find_detail_by_id?",{
    params: {
        video_id:vid
    }
})

//下单接口
export const saveOrder = (token, vid)=>axios.post("/api/v1/pri/order/save",{
    "video_id":vid
},{
    headers:{
        "token":token
    }
})

//订单列表
export const getOrderList = (token)=>axios.get("/api/v1/pri/order/list",{
    params:{
        "token":token
    }
})

//用户信息接口
export const getUserInfo = (token)=>axios.get("/api/v1/pri/user/find_by_token",{
    params:{
        "token":token
    }
})
第5集 Vue-Router开发小滴课堂前端项目路由
简介:Vue-Router开发小滴课堂前端项目路由
vue-router
- 是 Vue.js 官方的路由管理器。它和 Vue.js 的核心深度集成,让构建单页面应用变得易如反掌
- 官方文档:https://router.vuejs.org/zh/
import Vue from 'vue'
import VueRouter from 'vue-router'
import Home from '../views/Home/Home.vue'
import CourseDetail from '../views/CourseDetail/CourseDetail.vue'
import Login from '../views/Login/Login.vue'
import Order from '../views/Order/Order.vue'
import Pay from '../views/Pay/Pay.vue'
import Personal from '../views/Personal/Personal.vue'
import Register from '../views/Register/Register.vue'


Vue.use(VueRouter)

  const routes = [
    {
      path:"/",
      name:"Home",
      component:Home
    },
    {
      path:"/coursedetail",
      name:"CourseDetail",
      //按需加载
      component : ()=>import("../views/CourseDetail/CourseDetail.vue")
      //component:CourseDetail
    },
    {
      path:"/login",
      name:"Login",
      component:Login
    },
    {
      path:"/order",
      name:"Order",
      component:Order
    },{
      path:"/pay",
      name:"Pay",
      component:Pay
    },{
      path:"/personal",
      name:"Personal",
      component:Personal
    },{
      path:"/register",
      name:"Register",
      component:Register
    },
  ]

const router = new VueRouter({
  routes
})

export default router
![]() 愿景:"让编程不再难学,让技术与生活更加有趣"
愿景:"让编程不再难学,让技术与生活更加有趣"
小滴课堂前端项目实战之通用底部选项卡CommonsFooter开发
第1集 怎样通过看Cube-UI官方文档和底部选项卡组件讲解
简介:学会看cube-ui文档,并掌握cube-tab-bar开发
分析前端需求
- 底部导航(开发)
- 首页Banner
- 首页视频列表
- 视频详情模块
- 注册模块
- 登录模块
- 个人信息模块
- 下单模块
- 订单列表模块
查看cube-ui文档
- 文档(如果失效百度搜索知识点) https://didi.github.io/cube-ui/#/zh-CN/docs/quick-start
cube-tab-bar组件
- 底部选项卡组件
- (如果失效百度搜索知识点)https://didi.github.io/cube-ui/#/zh-CN/docs/tab-bar
第2集 小滴课堂移动端cube-tab-bar选项卡开发《上》
简介:开发小滴课堂底部选项卡cube-tab-bar
template开发
- mac格式化代码:shift + option + F
- windows格式化代码: shift + alt + F
<template>
  <div class="tab">
    <cube-tab-bar v-model="selectedLabelSlots" @click="changHandler">
      <cube-tab
        v-for="(item) in tabs"
        :icon="item.icon"
        :label="item.label"
        :key="item.path"
        :value="item.path"
      ></cube-tab>
    </cube-tab-bar>
  </div>
</template>
<script>
export default {
  data() {
    return {
      selectedLabelSlots: "/",
      tabs: [
        {
          label: "首页",
          icon: "cubeic-home",
          path: "/"
        },
        {
          label: "我的订单",
          icon: "cubeic-like",
          path: "/order"
        },
        {
          label: "个人中心",
          icon: "cubeic-person",
          path: "/personal"
        }
      ]
    };
  }
};
</script>
第3集 小滴课堂移动端cube-tab-bar选项卡开发《下》
简介:开发小滴课堂底部选项卡cube-tab-bar 下
vue-router常见API介绍
文档(如果失效百度搜索知识点)
- https://router.vuejs.org/zh/api/#%E8%B7%AF%E7%94%B1%E5%AF%B9%E8%B1%A1
- router.path 获取当前的路由
- router.go(n) 这个方法的参数是一个整数,表示在 history 记录中向前或者后退多少步,类似 window.history.go(n)方法
- router.push(path) 导航到不同的path路径,这个方法会向 history栈添加一个新的记录,所以当用户点击浏览器后退按钮时,则回到之前的 URL。
- 开发方法
  methods: {
      changHandler(path){
          //this.$route.path是当前路径
          if(path !== this.$route.path){
              this.$router.push(path)
          }
      }
  },
//vue实例生命周期 created:在模板渲染成html前调用,即通常初始化某些属性值,然后再渲染成视图
//vue实例生命周期 mounted:在模板渲染成html后调用,通常是初始化页面完成后,再对html的dom节点进行额外的操作    //https://cn.vuejs.org/v2/guide/instance.html#%E5%AE%9E%E4%BE%8B%E7%94%9F%E5%91%BD%E5%91%A8%E6%9C%9F%E9%92%A9%E5%AD%90
  created(){
      //默认路由选择器,比如刷新页面,需要重新进到当前路由
      this.selectedLabelSlots = this.$route.path
  }
- 配置样式( 课程样式直接用,不调样式比较费时,也并非重点,样式是最基础的前端课程)
<!--SCSS是一种CSS预处理语言, scoped 是指这个scss样式 只作用于当前组件-->
<style lang="scss" scoped>
.tab {
  position: fixed;
  bottom: 0;
  z-index: 999;
  background-color:#fff;
  width: 100%;
  border-top: 1px solid rgba($color: #000000, $alpha: 0.1);
}
.cube-tab_active {
  color: #3bb149;
}
</style>
![]() 愿景:"让编程不再难学,让技术与生活更加有趣"
愿景:"让编程不再难学,让技术与生活更加有趣"
小滴课堂前端项目实战之首页轮播图和视频列表开发
第1集 小滴课堂首页Home模块开发
简介:小滴课堂首页Home模块开发
- 拆分子组件 Home banner videoList
- 指令属性里面取data里面的数据是不用加{{}}; html标签内容体中间则需要加双花括号
- template开发
<template>
  <div>
    <!-- 轮播图组件 -->
    <!-- <home-banner :banners="banners"> </home-banner> -->
    <!-- 视频列表组件 -->
    <!-- <video-list :courselist="courselist"></video-list> -->
    <!-- 底部导航栏组件 -->
    <common-footer></common-footer>
  </div>
</template>
await async 知识点
- async 用于声明一个 function 是异步的
- await 用于等待一个异步方法执行完成(发起请求,如果查询数据库、发起http等)
- 参考文章: https://www.cnblogs.com/jsgoshu/p/11444404.html https://segmentfault.com/a/1190000007535316
- script开发
<template>
  <!--首页轮播图-->
  <!-- <home-banner></home-banner>

  <video-list> </video-list>-->

  <common-footer></common-footer>
</template>


<script>
import HomeBanner from "./Component/Banner";
import VideoList from "./Component/VideoList";
import CommonFooter from "@/components/CommonFooter";
import { getBanner, getVideoList } from "@/api/getData.js";

export default {
  //注册组件
  components: {
    HomeBanner,
    VideoList,
    CommonFooter
  },
  //声明数据源
  data() {
    return {
      banners: [],
      videoList: []
    };
  },
  //定义方法
  methods: {

     // 获取轮播图数据
    async getBannerData() {
      try {
        const result = await getBanner();
        console.log(result);
        if (result.data.code == 0) {
          this.banners = result.data.data;
        }
      }catch(error){
          console.lo(error)
      }
    },

    //获取视频列表
    async getVList(){
        try{
            const result = await getVideoList();
            if (result.data.code == 0) {
                this.videoList = result.data.data;
            }
        }catch(error){
            console.lo(error)
        }
    }
  },
  mounted(){
      //页面渲染完成调用方法获取数据
      this.getBannerData();
      this.getVList()
  }
};
</script>


<style lang="scss" scope>
</style>
第2集 小滴课堂首页轮播图banner模块开发
简介:首页轮播图Banner模块开发
轮播图组件 cube-slide讲解
代码编写
<template>
  <div>
    <cube-slide  :data="banners">
      <cube-slide-item
        v-for="(item, index) in banners"
        :key="index">

        <a :href="item.url">
          <img :src="item.img"  style="width:100%"/>
        </a>

      </cube-slide-item>
    </cube-slide>
  </div>
</template>

<script>
export default {
    //获取父组件传递过来的值
    props:{
        banners:{
            type:Array,
            required:true
        }
    }
};
</script>

<style lang="scss" scoped>
</style>
- 和Home首页配合展示 查看首页效果
第3集 小滴课堂首页视频列表模块开发
简介:首页视频列表模块开发 和 router-link 参数讲解
router-link讲解
- template
<template>
  <div class="list-content">
    <div class="list">
      <!-- 遍历视频 -->
      <router-link
        :key="item.id"
        :to="{ path: '/coursedetail', query: { video_id: item.id } }"
        class="course"
        v-for="item in videoList"
      >
        <div class="item_img">
          <img :src="item.cover_img" />
        </div>
        <div class="video_info">
          <div class="c_title">{{ item.title }}</div>
          <div class="price">¥ {{ item.price / 100 }}</div>
        </div>
      </router-link>
    </div>
  </div>
</template>
- script
<script>
export default {
  props: {
    videoList: {
      type: Array,
      required: true,
    },
  },
}
</script>
- style
<style lang="scss" scoped>
//列表包裹层边距
.list-content {
  margin-top: 20px;
  padding: 0 13px;
}
//视频包括层
.list {
  display: flex; //设置flex布局
  flex-wrap: wrap; //换行排列
  justify-content: space-between; //两端对齐
  padding-bottom: 55px;
}
//视频个体层
.course {
  width: 48%;
  margin-bottom: 17px;
}
//视频图片
.item_img {
  font-size: 0; //消除图片元素产生的间隙
  box-shadow: 0 4px 11px 0 rgba(43, 51, 59, 0.6); //设置图片阴影,rgba前三个参数是颜色编码,最后一个是透明度
  border-radius: 8px; //设置图片圆角
  img {
    width: 100%;
    border-radius: 8px;
  }
}
.c_title {
  //设置超过两行隐藏 start
  display: -webkit-box;
  -webkit-box-orient: vertical;
  -webkit-line-clamp: 2;
  overflow: hidden;
  word-break: break-all;
  //设置超过两行隐藏 end
  font-size: 11px;
  height: 26px;
  line-height: 13px;
  margin-top: 10px;
  color: #2b333b;
}
//价格
.price {
  margin-top: 8px;
  font-size: 12px;
  color: #d93f30;
}
</style>
- 和Home首页配合展示 查看首页效果
![]() 愿景:"让编程不再难学,让技术与生活更加有趣"
愿景:"让编程不再难学,让技术与生活更加有趣"
小滴课堂前端项目实战之视频详情页模块开发
第1集 小滴课堂视频详情页基础模块开发
简介:小滴课堂CourseDetail基础模块开发
- 注意:如果有bug或者其他小问题如样式等,先忽略等到最后再看(只要不影响主流程就行)
CourseDetail模块开发,拆分组件
CourseDetail.vue
Header.vue
Course.vue
Tab.vue
- Summary.vue
- Calalog
- 开发CourseDetail的script
<script>
//引入组件
import DetailHeader from './Components/Header'
import DetailCourse from './Components/Course'
import DetailTab from './Components/Tab'

import { getVideoDetail } from "@/api/getData.js";


export default {
    //注册组件
    components:{
        DetailHeader,
        DetailCourse,
        DetailTab
    },

    data(){
        return {
            //视频信息
            vdieoInfo:{},
            //章集
            chapterList:[]
        }
    },

    methods:{
        //获取视频详情
        async getDetail(vid){
            try{
               const result =  await getVideoDetail(vid)
               if(result.data.code == 0){
                   this.vdieoInfo = result.data.data;
                   this.chapterList = result.data.data.chapter_list;
               }

            }catch(error){
                console.log(error)
            }
        }
    },

    mounted(){
        //渲染完成后拿数据
        console.log(this.$route.query.video_id)
        this.getDetail(this.$route.query.video_id);

    }
}
</script>
- 开发CourseDetail的template
<template>
    <div>

        <!--顶部返回组件-->
        <detail-header ></detail-header>

        <!--视频介绍组件-->
        <!-- <detail-course></detail-course>

        <!--视频tab简介组件-->
        <detail-tab></detail-tab>

        <!--底部立刻购买-->
        <footer></footer> -->

    </div>
</template>
第2集 小滴课堂视频详情页Header子组件开发
简介:小滴课堂CourseDetail的Header子组件开发
- 开发script
<script>
export default {

    props:{
        vdieoInfo:{
            type:Object,
            required:true
        }
    }
}
</script>
- 开发template
<template>
    <div>
        <header>
            <div class="header">
                <span @click="$router.back(-1)"> <i class="cubeic-back"></i> </span>
                <div class="title">
                    {{vdieoInfo.title}}
                </div>
            </div>
        </header>

    </div>
</template>
- 开发style
<style lang="scss" scoped>
.header {
    display: flex;//flex左右布局
    background-color: #07111b;
    padding: 10px 20px;
    color: #fff;
}
// 返回箭头
.cubeic-back {
    color: #fff;
    margin-right:5px;
}
//视频标题
.title {
    font-size: 16px;
    width: 80%;
    //超出省略
    text-overflow: ellipsis;
    overflow: hidden;
    white-space: nowrap;
}
</style>
第3集 小滴课堂视频详情页Course子组件开发
简介:小滴课堂CourseDetail的Course子组件开发
- 开发script
<script>
export default {
  //从父组件传内容过来
  props: {
    videoInfo: {
      type: Object,
      required: true
    }
  }
};
</script>
- 开发template
<template>
  <div class="c_wapper">
    <div class="course">
      <div class="l_img">
        <img :src="videoInfo.cover_img" :title="videoInfo.title" />
      </div>

      <div class="r_txt">

        <div class="txt">
          <span>综合评分:</span>
          <p>{{videoInfo.point}}</p>
        </div>

        <div class="txt">
          <span>价格:</span>
          <p>¥{{videoInfo.price /100}}</p>
        </div>

      </div>
    </div>
  </div>
</template>
- 开发style
<style lang="scss" scoped>
//包裹层
.c_wrapper {
    padding: 0 14px;
}
//视频信息包裹层
.course {
  margin:14px 0;
  display:flex;//设置flex,左右布局
}
//视频左边图片层
.l_img {
  height:88px;
  margin-right:14px;
  & img {
    height:100%;
    border-radius:15px;
  }
}
// 视频右边文字包裹层
.r_txt {
    padding:6px 0;
    font-size:12px;
    flex:1;//设置1可自动伸缩占用剩余空间
}
//每行文字层(综合评分、价格)
.txt {
    // 设置flex让文字两端对齐
    display:flex;
    justify-content:space-between;
    line-height:16px;
    & p {
        text-align:center;
        width:40%;
        color:#3bb149;
    }
    & i {
        color:#666;
        font-weight:bolder;
        width:60%;
        & span {
            color:#2b333b;
            font-size:12px;
        }
    }
}

</style>
第4集 小滴课堂视频详情页tab子组件开发和vue动态组件讲解
简介:小滴课堂CourseDetail的tab子组件开发和vue的动态组件讲解
什么是vue的动态组件
组件的过渡
script开发
<script>
import Summary from './Summary'
import Catalog from './Catalog'

export default {

    components:{
        Summary,
        Catalog
    },

    props:{
        videoInfo:{
            type:Object,
            required:true
        },
        chapterList:{
            type:Array,
            required:true
        }

    },

    data(){
        return{
            selectedLabel:"简介",
            tabs:[
                {
                    label:"简介"
                },{
                    label:"目录"
                }
            ]
        }
    }
}
</script>
- template开发
<template>

    <div>
        <cube-tab-bar v-model="selectedLabel" show-slider>
            <cube-tab v-for="item in tabs" :label="item.label" :key="item.label">
            </cube-tab>
        </cube-tab-bar>

        <component :videoInfo="videoInfo" :chapterList="chapterList" :is='selectedLabel==="简介"?"Summary":"Catalog" '>
        </component>

    </div>

</template>
第5集 小滴课堂视频详情页summary子组件开发
简介:小滴课堂CourseDetail的summary子组件开发
- script开发
<script>
export default {
    props:{
        videoInfo:{
            type:Object,
            required:true
        }
    }
}
</script>
- template开发
<template>
    <div> <img class="summary" :src="videoInfo.summary"/> </div>
</template>
- style开发
<style lang="scss" scoped>
.summary {
width:100%;
padding-bottom:50px;
margin:15px 0;
}
</style>
第6集 小滴课堂视频详情页Catalog目录子组件开发
简介:小滴课堂CourseDetail的Catalog目录子组件开发
- script开发
<script>
export default {
//从父组获取章集信息
props:{
chapterList:{
type:Array,
required:true
}
}
}
</script>
- template开发
<template>
<div class="cate_box">
<div>
<ul class="content" v-for="(item, ind) in chapterList" :key="item.id">
<h1> 第{{ind +1}}章 {{item.title}} </h1>
<li class="sub_cate" v-for="(item,subind) in chapterList[ind].episode_list" :key="item.id">
<span class="sub_title">{{ind+1}}-{{subind+1}} {{item.title}} </span>
</li>
</ul>
</div>
</div>
</template>
- style开发
<style lang="scss" scoped>
// 目录包裹层设置边距
.cate_box {
padding: 0 15px 50px;
background-color: #fff;
margin: 15px 0;
}
//每一章包裹层
.content {
padding: 10px;
// 章标题
& h1 {
font-size: 16px;
width: 100%;
margin-bottom: 15px;
font-weight: bolder;
// 设置章标题过长,超过行宽度省略隐藏
text-overflow: ellipsis;
overflow: hidden;
white-space: nowrap;
}
}
//集包裹层
.sub_cate {
font-size: 12px;
padding: 10px 0;
//集标题
.sub_title {
// 设置集标题过长,超过行宽度省略隐藏
display: block;
text-overflow: ellipsis;
overflow: hidden;
white-space: nowrap;
}
}
</style>
- app.vue样式调整
<style lang="scss">
#app {
font-family: Avenir, Helvetica, Arial, sans-serif;
-webkit-font-smoothing: antialiased;
-moz-osx-font-smoothing: grayscale;
color: #2c3e50;
}
</style>
第7集 小滴课堂视频详情页footer立刻购买按钮开发
简介:开发小滴课堂CourseDetail的footer立刻购买按钮
- courseDetail增加
<!--底部立刻购买-->
<footer>
<router-link :to="{path:'/pay',query:{video_id:this.$route.query.video_id}}" class="user_buy">
<button>立刻购买</button>
</router-link>
</footer>
- style增加
<style lang="scss" scoped>
//底部
footer {
// fixed固定在底部
position: fixed;
bottom: 0;
width: 100%;
padding: 8px 0;
background-color: #fff;
z-index: 999;
box-shadow: 0 -2px 4px 0 rgba(0, 0, 0, 0.05);
}
//设置购买按钮样式
button {
display: block;
color: #fff;
margin: 0 auto;
background-color: #d93f30;
height: 34px;
line-height: 34px;
border-radius: 17px;
width: 80%;
border: none;
font-size: 15px;
text-align: center;
}
</style>
- 查看整体效果
![]() 愿景:"让编程不再难学,让技术与生活更加有趣"
愿景:"让编程不再难学,让技术与生活更加有趣"
小滴课堂前端项目实战之注册-登录-个人中心模块开发
第1集 小滴课堂前端用户模块之注册功能开发
简介:小滴课堂注册基础模块开发
Cube-UI的 form表单
开发script
<script>
//注册接口
import { registerApi } from "@/api/getData.js";
export default {
data() {
return {
model: {
phoneValue: "",
pwdValue: "",
nameValue: ""
},
fields: [ {
type: "input",
modelKey: "nameValue",
label: "名称",
props: {
placeholder: "请输入名称"
},
rules: {
required: true
},
messages: {
required: "名称不能为空"
}
},
{
type: "input",
modelKey: "phoneValue",
label: "手机号",
props: {
placeholder: "请输入手机"
},
rules: {
required: true
},
messages: {
required: "手机号不能为空"
}
},
{
type: "input",
modelKey: "pwdValue",
label: "密码",
props: {
placeholder: "请输入密码",
type: "password",
eye: {
open: false
}
},
rules: {
required: true
},
messages: {
required: "密码不能为空"
}
}
]
};
},
methods: {
submitHandler(e, model) {
e.preventDefault();
//调用注册接口
registerApi(model.phoneValue, model.pwdValue, model.nameValue).then(
res => {
if (res.data.code === 0) {
const toast = this.$createToast({
txt: "注册成功",
type: "correct",
time: 1500
});
toast.show();
}
}
);
}
}
};
</script>
- 开发template
<template>
<div class="main">
<cube-form :model="model" @submit="submitHandler">
<cube-form-group>
<!--名称-->
<cube-form-item :field="fields[0]"></cube-form-item>
<!--手机号-->
<cube-form-item :field="fields[1]"></cube-form-item>
<!--密码-->
<cube-form-item :field="fields[2]"></cube-form-item>
</cube-form-group>
<cube-form-group>
<cube-button type="submit">注册</cube-button>
</cube-form-group>
</cube-form>
<router-link to="/login" class="reg">登录</router-link>
</div>
</template>
- style
<style lang="scss" scoped>
.main {
padding: 50px 5% 0;
text-align: center;
}
//注册
.cube-btn {
margin-top: 20px;
}
// 登录
.reg {
display: inline-block;
margin-top: 30px;
font-size: 18px;
}
</style>
第2集 小滴课堂前端用户模块之登录功能开发
简介:小滴课堂用户登录模块开发
- 开发script
<script>
//登录接口
import { loginApi } from "@/api/getData.js";
export default {
data() {
return {
model: {
phoneValue: "",
pwdValue: ""
},
fields: [
{
type: "input",
modelKey: "phoneValue",
label: "手机号",
props: {
placeholder: "请输入手机"
},
rules: {
required: true
},
messages: {
required: "手机号不能为空"
}
},
{
type: "input",
modelKey: "pwdValue",
label: "密码",
props: {
placeholder: "请输入密码",
type: "password",
eye: {
open: false
}
},
rules: {
required: true
},
messages: {
required: "密码不能为空"
}
}
]
};
},
methods: {
submitHandler(e, model) {
e.preventDefault();
//调用注册接口
loginApi(model.phoneValue, model.pwdValue).then(
res => {
if (res.data.code === 0) {
//登录成功,跳转到个人中心
localStorage.setItem('token',res.data.data)
//跳转页面, 根据业务需要
this.$router.push({path:'/'})
}else{
const toast = this.$createToast({
txt: "登录失败",
type: "error",
time: 1500
});
toast.show();
}
}
);
}
}
};
</script>
- 开发template
<template>
<div class="main">
<cube-form :model="model" @submit="submitHandler">
<cube-form-group>
<!--手机号-->
<cube-form-item :field="fields[0]"></cube-form-item>
<!--密码-->
<cube-form-item :field="fields[1]"></cube-form-item>
</cube-form-group>
<cube-form-group>
<cube-button type="submit">登录</cube-button>
</cube-form-group>
</cube-form>
<router-link to="/register" class="reg">注册</router-link>
</div>
</template>
- 开发style
<style lang="scss" scoped>
.main {
padding: 50px 5% 0;
text-align: center;
}
// 登录
.cube-btn {
margin-top: 20px;
}
//注册
.reg {
display: inline-block;
margin-top: 30px;
font-size: 18px;
}
</style>
第3集 你知道vue里面的状态管理vuex吗?
简介:讲解vue里面的状态管理vuex模块
vuex是什么?
- VueX是适用于在Vue项目开发时使用的状态管理工具
- 官方文档:https://vuex.vuejs.org/zh/
- 开发store/index.js
import Vue from 'vue'
import Vuex from 'vuex'
Vue.use(Vuex)
export default new Vuex.Store({
state: {
token: localStorage.getItem("token")
},
//同步修改state里面的值
mutations: {
SET_TOKEN:(state, token)=>{
state.token = token
}
},
//异步调用mutations里面的方法
//contxt.commit 利用上下文触发mutations某个方法
// vue代码里面 this.$store.dispatch触发action里面的定义的方法
actions: {
setToken(context,token){
context.commit('SET_TOKEN',token)
},
clearToken(context){
context.commit('SET_TOKEN','')
}
},
modules: {
}
})
- 整合Login登录存储token
第4集 小滴课堂前端用户模块之个人中心开发
简介:用户模块个人中心开发
- 开发script
<script>
import CommonFooter from "@/components/CommonFooter";
import { getUserInfo } from "@/api/getData.js";
import defaultHeadImg from "@/assets/logo.png";
export default {
components: {
CommonFooter
},
data() {
return {
info: {},
defaultHeadImg: defaultHeadImg
};
},
computed: {
getToken() {
return this.$store.state.token;
}
},
methods: {
//获取用户信息
async getInfo() {
try {
const result = await getUserInfo(this.getToken);
if (result.data.code === 0) {
this.info = result.data.data;
}
} catch (error) {
console.log(error);
}
},
//退出登录
async signOut() {
//清除token
await this.$store.dispatch('clearToken');
localStorage.removeItem("token");
//刷新页面
location.reload();
}
},
mounted() {
if (this.getToken) {
this.getInfo();
}
}
};
</script>
- 开发template
<template>
<div>
<div class="container">
<div class="p_top">
<div>
<img :src='info.head_img || defaultHeadImg' alt="头像"/>
<router-link to="/login" v-if = "getToken === ''">
<p>立刻登录</p>
</router-link>
<p v-else>{{info.name}} </p>
</div>
</div>
<button v-if="getToken !== ''" class="green" @click="signOut">
退出登录
</button>
</div>
<common-footer></common-footer>
</div>
</template>
- 开发style
<style lang="scss" scoped>
.container {
// 顶部头像区域
.p_top {
width: 100%;
display: flex;
flex-direction: column;
align-items: center;
padding: 20px 0;
background-color: #2c3f54;
div {
text-align: center;
img {
width: 60px;
height: 60px;
border-radius: 50px;
}
p {
font-size: 16px;
color: #fff;
margin-top: 10px;
}
}
}
}
// 退出登录
.green {
display: block;
background-color: #3bb149;
border: none;
outline: none;
width: 80%;
height: 40px;
margin: 20px auto 0;
color: #fff;
border-radius: 20px;
}
</style>
![]() 愿景:"让编程不再难学,让技术与生活更加有趣"
愿景:"让编程不再难学,让技术与生活更加有趣"
小滴课堂前端项目实战之路由拦截和订单模块开发
第1集 小滴课堂前端项目实战之路由拦截功能开发
简介:前置守卫 路由拦截功能开发
- router里面配置需要登录的路由 meta : {requiresAuth: true}
- main.js里面配置路由拦截
//路由拦截,拦截全部路由,每次操作路由都是被拦截进行判断
router.beforeEach((to,from,next)=>{
const token = localStorage.getItem("token");
//筛选需要传token的路由,匹配route里面需要登录的路径,如果匹配到就是true
if( to.matched.some(record => record.meta.requiresAuth) ){
//根据token是否有,判断是否需要调到登录页面
if(token){
next()
}else{
next({path:'/login'})
}
}else{
next();
}
})
第2集 小滴课堂前端下单页面组件开发
简介:小滴课堂下单页面组件模块开发
- 开发script
<script>
import { getVideoDetail, saveOrder } from "@/api/getData.js";
export default {
data() {
return {
videoinfo: {}
};
},
methods: {
//获取视频详情
async getDetail(vid) {
try {
const result = await getVideoDetail(vid);
if (result.data.code == 0) {
this.videoinfo = result.data.data;
}
} catch (error) {
console.log(error);
}
},
//下单
async pay() {
try {
const result = await saveOrder(
this.$store.state.token,
this.$route.query.video_id
);
if (result.data.code == 0) {
const toast = this.$createToast({
txt: "购买成功",
type: "correct",
time: 2000,
onTimeout: () => {
this.$router.push({ path: "order" });
}
});
toast.show();
}
} catch (error) {
console.log(error);
}
}
},
mounted() {
this.getDetail(this.$route.query.video_id);
}
};
</script>
- 开发template
<template>
<div>
<!--视频信息-->
<div class="info">
<p class="info_title">商品信息</p>
<div class="box">
<div class="imgdiv">
<img alt="课程照片" :src="videoinfo.cover_img" />
</div>
<div class="textdiv">
<p class="c_title">{{videoinfo.title}}</p>
<p class="price">¥: {{(videoinfo.price / 100).toFixed(2)}}</p>
</div>
</div>
</div>
<!--顶部支付-->
<div class="footer">
<p class="money">实付: {{(videoinfo.price / 100).toFixed(2)}}</p>
<p class="submit" @click="pay">立刻支付</p>
</div>
</div>
</template>
- 开发style
<style lang="scss" scoped>
// 视频标题
.info_title {
padding: 10px 20px;
background-color: #fff;
border-bottom: 1px solid #d9dde1;
}
.box {
background-color: #fff;
box-sizing: border-box;
padding: 20px;
display: flex;
margin-bottom: 15px;
.imgdiv {
width: 105px;
height: 59px;
flex-shrink: 0;
img {
width: 100%;
height: 100%;
}
}
.textdiv {
margin-left: 20px;
height: 59px;
flex-grow: 1;
display: flex;
flex-direction: column;
justify-content: space-between;
.price {
flex-shrink: 0;
}
}
}
//底部
.footer {
position: fixed;
bottom: 0;
width: 100%;
height: 50px;
background-color: #fff;
display: flex;
justify-content: space-between;
box-shadow: 0 -2px 4px 0 rgba(0, 0, 0, 0.1);
font-size: 16px;
.money {
height: 50px;
line-height: 50px;
flex: 2;
text-align: center;
background-color: #fff;
}
.submit {
height: 50px;
line-height: 50px;
flex: 1;
text-align: center;
background-color: #ff2d50;
color: #fff;
}
}
</style>
第3集 小滴课堂前端订单列表模块开发
简介:小滴课堂前端订单列表组件模块开发
- 开发script
<script>
import CommonFooter from '@/components/CommonFooter'
import { getOrderList } from "@/api/getData.js";
export default {
components:{
CommonFooter
},
data(){
return{
orders:[]
}
},
methods:{
//获取订单列表
async getOrderList(){
try{
const result = await getOrderList(this.$store.state.token)
if(result.data.code == 0){
this.orders = result.data.data || []
}
}catch(error){
console.log(error)
}
}
},
mounted(){
this.getOrderList();
}
}
</script>
- 开发template
<template>
<div class="main">
<!--订单列表-->
<div class="list" v-if="orders.length > 0">
<div class="box" v-for="(item, index) of orders" :key="index">
<router-link :to="{path:'/coursedetail', query:{ video_id : item.video_id }}">
<div class="smallbox">
<div class="imgdiv">
<img :src="item.video_img" alt="小滴课堂课程图片"/>
</div>
<div class="textdiv">
<p class="title"> {{item.video_title}} </p>
<p class="price"> {{(item.total_fee / 100).toFixed(2)}}</p>
</div>
</div>
</router-link>
</div>
</div>
<div class="no_order" v-else>
<p>暂未购买课程 </p>
</div>
<!--底部导航-->
<common-footer></common-footer>
</div>
</template>
- 开发style
<style lang="scss" scoped>
.list {
padding: 0 20px;
}
// 视频个体
.box {
padding: 20px 0;
background-color: #fff;
border-bottom: 1px solid #ddd;
// 标题
.title {
font-size: 14px;
margin-bottom: 15px;
}
// 订单详情
.smallbox {
//flex左右排列,两端对齐
display: flex;
justify-content: space-between;
.imgdiv {
width: 90px;
height: 60px;
flex-shrink: 0;
img {
width: 100%;
height: 100%;
border-radius: 10px;
}
}
.textdiv p {
margin-top: 10px;
padding-left: 10px;
}
}
}
.no_order {
margin-top: 50px;
text-align: center;
}
</style>
第4集 小滴课堂前端项目开发总结回顾
简介:小滴课堂前端项目开发总结回顾
整体功能演示
前端代码整理
后端代码整理
sql整理
- 数据缺少,可以自己录入数据进去
![]() 愿景:"让编程不再难学,让技术与生活更加有趣"
愿景:"让编程不再难学,让技术与生活更加有趣"
互联网公司 前端-后端项目云服务器生产环境部署核心知识
第1集 小滴课堂互联网架构之应用部署上线核心知识
简介:讲解应用部署到可以公网访问需要的知识
一个http请求基本流程
- 客户端通过发起域名资源请求 -> DNS解析获得IP -> 寻找服务器获得资源
域名和ip的关系,DNS作用
- DNS:Domain Name Server 域名服务器 域名虽然便于人们记忆,但网络中的计算机之间只能互相认识IP地址,它们之间的转换工作称为域名解析,域名解析需要由专门的域名解析服务器来完成,DNS 就是进行域名解析的服务器
什么是cname和a记录
a记录
- 用户可以在此设置域名并指向到自己的目标主机地址上,从而实现通过域名找到服务器(也叫ip指向域名配置)
cname
- 别名指向,可以为一个主机设置别名。比如设置open1024.com,用来指向一个主机 xdclass.net 那么以后就可以用open1024.com来代替访问 xdclass.net 了
- http://www.xdclass.net --> xdclass.net
购买服务器,阿里云,腾讯云,亚马逊云aws
购买域名,备案
- 阿里云 备案地址:https://beian.aliyun.com/
安装项目依赖的基本环境,比如java、nginx等软件(看项目)
配置域名解析到服务器
备注:后端项目一般部署Linux服务器,前端静态资源可以部署Linux也可以部署在CDN上
第2集 云服务器介绍和阿里云服务器ECS服务器选购
简介:什么是云服务器及目前主要的几个厂商介绍
- 演示本地例子,部署阿里云
- 阿里云、腾讯云、亚马逊云 阿里云:https://www.aliyun.com/ 腾讯云:https://cloud.tencent.com/ 亚马逊云:https://aws.amazon.com/
- 阿里云新用户地址(如果地址失效,联系我或者客服即可) https://www.aliyun.com/minisite/goods?userCode=r5saexap&share_source=copy_link
第3集 阿里云服务器远程登录和常用工具
简介:讲解阿里云服务器登录使用和常见终端工具
备注:(服务器、域名等使用你们自己购买的哈,上面有提供低价购买链接,失效找我)
控制台修改阿里云远程连接密码
windows工具 putty,xshell, security 参考资料: https://jingyan.baidu.com/article/e75057f210c6dcebc91a89dd.html https://www.jb51.net/softjc/88235.html
苹果系统MAC : 通过终端登录
- ssh root@ip 回车后输入密码
- ssh root@112.74.55.160
linux图形操作工具(用于远程连接上传文件)
mac: filezilla
- sftp://112.74.55.160
windows: winscp
资料:https://jingyan.baidu.com/article/ed2a5d1f346fd409f6be179a.html
- 可以尝试自己通过百度进行找文档, 安装mysql jdk nginx maven git redis等,也可以看我们的课程
![]() 愿景:"让编程不再难学,让技术与生活更加有趣"
愿景:"让编程不再难学,让技术与生活更加有趣"
生产环境Linux CentOS云服务器常见相关软件安装
第1集 阿里云Linux服务器Centos7 安装JDK8环境
简介:Linux云服务器安装JDK1.8
官方地址:http://www.oracle.com/technetwork/java/javase/downloads/jdk8-downloads-2133151.html
本地上传JDK1.8到服务器(课程提供安装包,对应章集的资料里面)
配置全局环境变量
解压:tar -zxvf jdk-8u171-linux-x64.tar.gz
重命名
vim /etc/profile
配置
JAVA_HOME=/usr/local/software/jdk1.8 CLASSPATH=$JAVA_HOME/lib/ PATH=$PATH:$JAVA_HOME/bin export PATH JAVA_HOME CLASSPATH
环境变量立刻生效
- source /etc/profile
查看安装情况 java -version
第2集 生产环境Linux服务器上Nginx介绍和安装
简介:介绍什么是nginx服务器和快速安装
什么是Nginx服务器
- 一个高性能的HTTP和反向代理web服务器
安装依赖
- yum -y install gcc zlib zlib-devel pcre-devel openssl openssl-devel
创建一个文件夹,上传本地提供的nginx包
tar -zxvf nginx-1.13.7.tar.gz
//执行命令 ./configure make make install
默认安装路径
- /usr/local/nginx
访问配置
cd /usr/local/nginx/sbin ./nginx
防火墙开放端口,阿里云网络安全组配置80端口
第3集 生产环境Linux服务器上Mysql安装和导入数据
简介:阿里云 Linux CentOS7 快速安装 Mysql
- 安装Mysql 5.7 (注意,Mysql和系统务必保持一致,不然存在不一致)
- 开启mysql远程连接(如果是准线上,建议不要开启远程连接)
- 开放阿里云网络安全组配置 3306 端口
- 导入测试数据到Mysql
#下载mysql的Yum仓库 wget -i -c http://dev.mysql.com/get/mysql57-community-release-el7-10.noarch.rpm yum -y install mysql57-community-release-el7-10.noarch.rpm #安装 mysql服务 yum -y install mysql-community-server #启动数据库服务, systemctl 该命令可用于查看系统状态和管理系统及服务,centos7上开始使用 systemctl start mysqld.service #查看状态 systemctl status mysqld.service #在日志文件中查看初始密码 grep "password" /var/log/mysqld.log #进入修改Mysql密码 mysql -uroot -p #新密码设置必须由大小写字母、数字和特殊符号组成 ALTER USER 'root'@'localhost' IDENTIFIED BY 'Xdclass.net168'; #开启mysql的远程访问, %是指全部 grant all privileges on *.* to 'root'@'%' identified by 'Xdclass.net168' with grant option; #刷新权限 flush privileges;
小滴课堂综合项目实战-前端-后端集群部署线上Linux云服务器
第1集 前后端项目总体部署架构和阿里云域名解析A记录配置
简介:前端、后端项目总体部署架构和A记录配置
后端接口地址 api.16web.net
- 阿里云机器:112.74.55.160
前端接口地址 web.16web.net
- 阿里云机器:112.74.55.160
前端部署nginx上
- 后端部署多个节点,同过nginx反向代理做集群
第2集 后端Java API项目阿里云服务器部署安装
简介:SpringBoot项目部署阿里云服务器
打包上传
打包命令,各个系统通用,只要按照maven
mvn install -Dmaven.test.skip=true
- 修改配置文件:数据库连接,账户密码
启动应用指定外部文件
nohup java -jar -Dspring.config.location=./application.properties online_xdclass-0.0.1-SNAPSHOT.jar &
测试访问接口是否畅通
curl 127.0.0.1:8089/api/v1/pub/video/list_banner 112.74.55.160:8089/api/v1/pub/video/list_banner 112.74.55.160:8088/api/v1/pub/video/list_banner
第3集 前后端分离-前端项目打包上传阿里云服务器
简介:前端项目打包上传阿里云服务器
本地vue项目进行打包
- cnpm run build
- 上传dist目录到Centos系统某个目录
第4集 线上部署之前端项目接入Nginx代理服务器
简介:讲解前后端应用部署和配置nginx访问
后端接口地址 api.16web.net
- 阿里云机器:112.74.55.160
前端接口地址 web.16web.net
- 阿里云机器:112.74.55.160
- 注意:配置A记录后不会立刻生效,且如果二次修改存在本地dns缓存,应该清除本地dns缓存,才可以访问
前端配置Nginx
location / { root /usr/local/software/front_end/dist; index index.html index.htm; }重启nginx
- ./nginx -s reload
第5集 高可用处理之后端API多节点集群部署
简介:讲解springboot应用多节点部署和配置nginx访问
- 多节点启动 节点1:112.74.55.160:8088 节点2:112.74.55.160:8089
- 配置nginx集群访问
upstream lbs {
server 112.74.55.160:8089;
server 112.74.55.160:8088;
}
location /api/ {
proxy_pass http://lbs;
proxy_redirect default;
}
重启nginx命令
./nginx -s reload
http { include mime.types; default_type application/octet-stream;
log_format main 'remote_addr - remote_user [time_local] "request" '
'status body_bytes_sent "$http_referer" '
'"http_user_agent" "http_x_forwarded_for"';
access_log logs/access.log main;
sendfile on;
tcp_nopush on;
keepalive_timeout 0;
keepalive_timeout 65;
upstream lbs { server 112.74.55.160:8089; server 112.74.55.160:8088; }
gzip on;
server { listen 80; server_name localhost;
#charset koi8-r; #access_log logs/host.access.log main; location /api/ { proxy_pass http://lbs; proxy_redirect default; } location / { root /usr/local/software/vue/dist; index index.html index.htm; }
#error_page 404 /404.html;
# redirect server error pages to the static page /50x.html
#
error_page 500 502 503 504 /50x.html;
location = /50x.html {
root html;
}
# proxy the PHP scripts to Apache listening on 127.0.0.1:80
#
#location ~ \.php$ {
# proxy_pass http://127.0.0.1;
#}
# pass the PHP scripts to FastCGI server listening on 127.0.0.1:9000
#
#location ~ \.php$ {
# root html;
# fastcgi_pass 127.0.0.1:9000;
# fastcgi_index index.php;
# fastcgi_param SCRIPT_FILENAME /scripts$fastcgi_script_name;
# include fastcgi_params;
#}
# deny access to .htaccess files, if Apache's document root
# concurs with nginx's one
#
#location ~ /\.ht {
# deny all;
#}
}
第6集 小滴课堂前端-后端项目阿里云服务器部署总结
简介:小滴课堂前端后端项目部署总结
项目总体体验
遇到问题怎么解决?
- 分析日志和链路,结合搜索引擎
前端、后端项目会一直存在github,地址: https://github.com/jackxy/new-ssm
不做“有人生,没人养”的教程和项目,如果是我这边的课程的项目,有问题直接问我就可以,也会一直维护下去
![]() 愿景:"让编程不再难学,让技术与生活更加有趣"
愿景:"让编程不再难学,让技术与生活更加有趣"
新版SSM课程零基础到项目实战总结和学习路线规划
第1集 新版SSM零基础到项目实战课程总结和学习路线推荐
简介:课程总结和学习路线建议
课程总结
- SpringBoot2.X零基础到高手系列
- Mybatis3.x零基础到高手系列
- Spring5.X零基础到高手系列
- 新版Vue2.X急速入门+ES6语法
- 小滴课堂在线教育系统后端开发
- 小滴课堂在线教育系统前端开发
- 前后端项目部署上线阿里云服务器
后端开发人在公司核心工作:
- 是否需要掌握前端,从开发人员职责来看,前后端分离是趋势。
- 专业的人做专业的东西,前端工程师负责页面,后端工程师负责接口,效率更高,你是老板怎么考虑?
- 新的一个方向:全栈工程师,必须把前端和后端方向一起掌握,才能全栈
高级全栈/java工程师成长路径
初级: javaese -> javaweb -> Mysql -> html/css/js->Maven+nexus私有仓库 -> idea -> Linux基础 -> 新版SSM+前后端综合实战 -> 微信支付项目实战 -> git代码管理+Jenkins持续集成
中级:springcloud微服务 -> 分布式缓存Redis一期二期-> 分布式框架Dubbo+Zookeeper -> 分布式消息队列RocketMQ -> Jmeter压力测试 ->优惠券系统综合实战->Shiro权限框架->
高级:ElasticSearch搜索引擎->Shell脚本 ->Docker容器->JDk8~13新特性->JVM虚拟机->Netty百万连接实战->面试专题第一季->秒杀系统综合实战->Nginx高性能服务-> 服务性能调优实战->拼团项目实战->服务监控和自动化扩容
技术总监:网络安全和攻击->分布式事务实战->k8s+devops实战->Serverless无服务->服务网格和云原生->面试专题第二季 -> 软件架构教程 -> 团队合作和OKR考核-> 产品思维+商业化能力探索
- 学习靠自律,一定要多做笔记

小滴课堂,愿景:让编程不在难学,让技术与生活更加有趣
相信我们,这个是可以让你学习更加轻松的平台,里面的课程绝对会让你技术不断提升
欢迎加小D讲师的微信: xdclass-lw
我们官方网站:https://xdclass.net
千人IT技术交流QQ群: 718617859
重点来啦:加讲师微信 免费赠送你干货文档大集合,包含前端,后端,测试,大数据,运维主流技术文档(持续更新)
https://mp.weixin.qq.com/s/qYnjcDYGFDQorWmSfE7lpQ